< Previous | Contents | Next >
View, create, stop and remove reports on the Reports page.
Filter your search of the Reports page by selecting one or more filter values from the Search list. From the Search list, select a filter value from one or more of the following keys: IS ACTIVE, CREATED, LAST REPORT, and NEXT REPORT. To add FILTER, press SAVE CURRENT SEARCH button in search field. For more information, see Using the search filter.
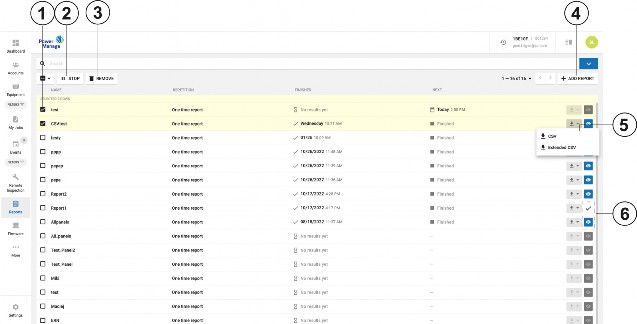
Figure 39. Navigating the Reports page
Callout | Name | Description |
1 | Check box | Select the check box of one or more reports to enable use of STOP and REMOVE. |
2 | STOP | Click to stop a report that is currently running. If you stop a report, it does not run on scheduled dates in the future. STOP appears when you select a check box. |
3 | REMOVE | Click to remove a report from the list of reports and cancel any recurrences that are scheduled in the future. REMOVE appears when you select a check box. |
4 | ADD REPORT | Click to create a new report for all panels that you enroll on the server. For more information, see Creating a new report for all panels on the server. Note: To create a new report for one or more panels, see Creating a new report on the Panels page. |
5 | Download | Click to download the report locally as a CSV or PDF file. |
6 | Viewed and unviewed icon | The Eye icon indicates unviewed reports. If you click the icon, a check mark replaces it to identify the report as viewed. Only mark an event as viewed if you conclude the event investigation. |
Related topics
Creating a new report for all panels on the server Creating new reports