Configuration
Overview
Use the Configuration screen to manage panel settings, system information, maintenance tools, and installation options for the IQ Panel.
Use this page to:
- Configure panel behavior and system settings.
- Manage users and installer options.
- Review hardware, software, and communication information.
- Configure date, time, sound, and network settings.
- Perform maintenance actions such as rebooting the panel or updating software.
- Access installation and diagnostic tools.
Before you begin
Preconditions
- Confirm that the IQ Panel is powered on and operational.
Important limitations
- Rebooting or powering down the panel temporarily interrupts panel access.
- Available options may differ depending on panel model, firmware version, and installed hardware modules.
Page layout
Configuration dashboard
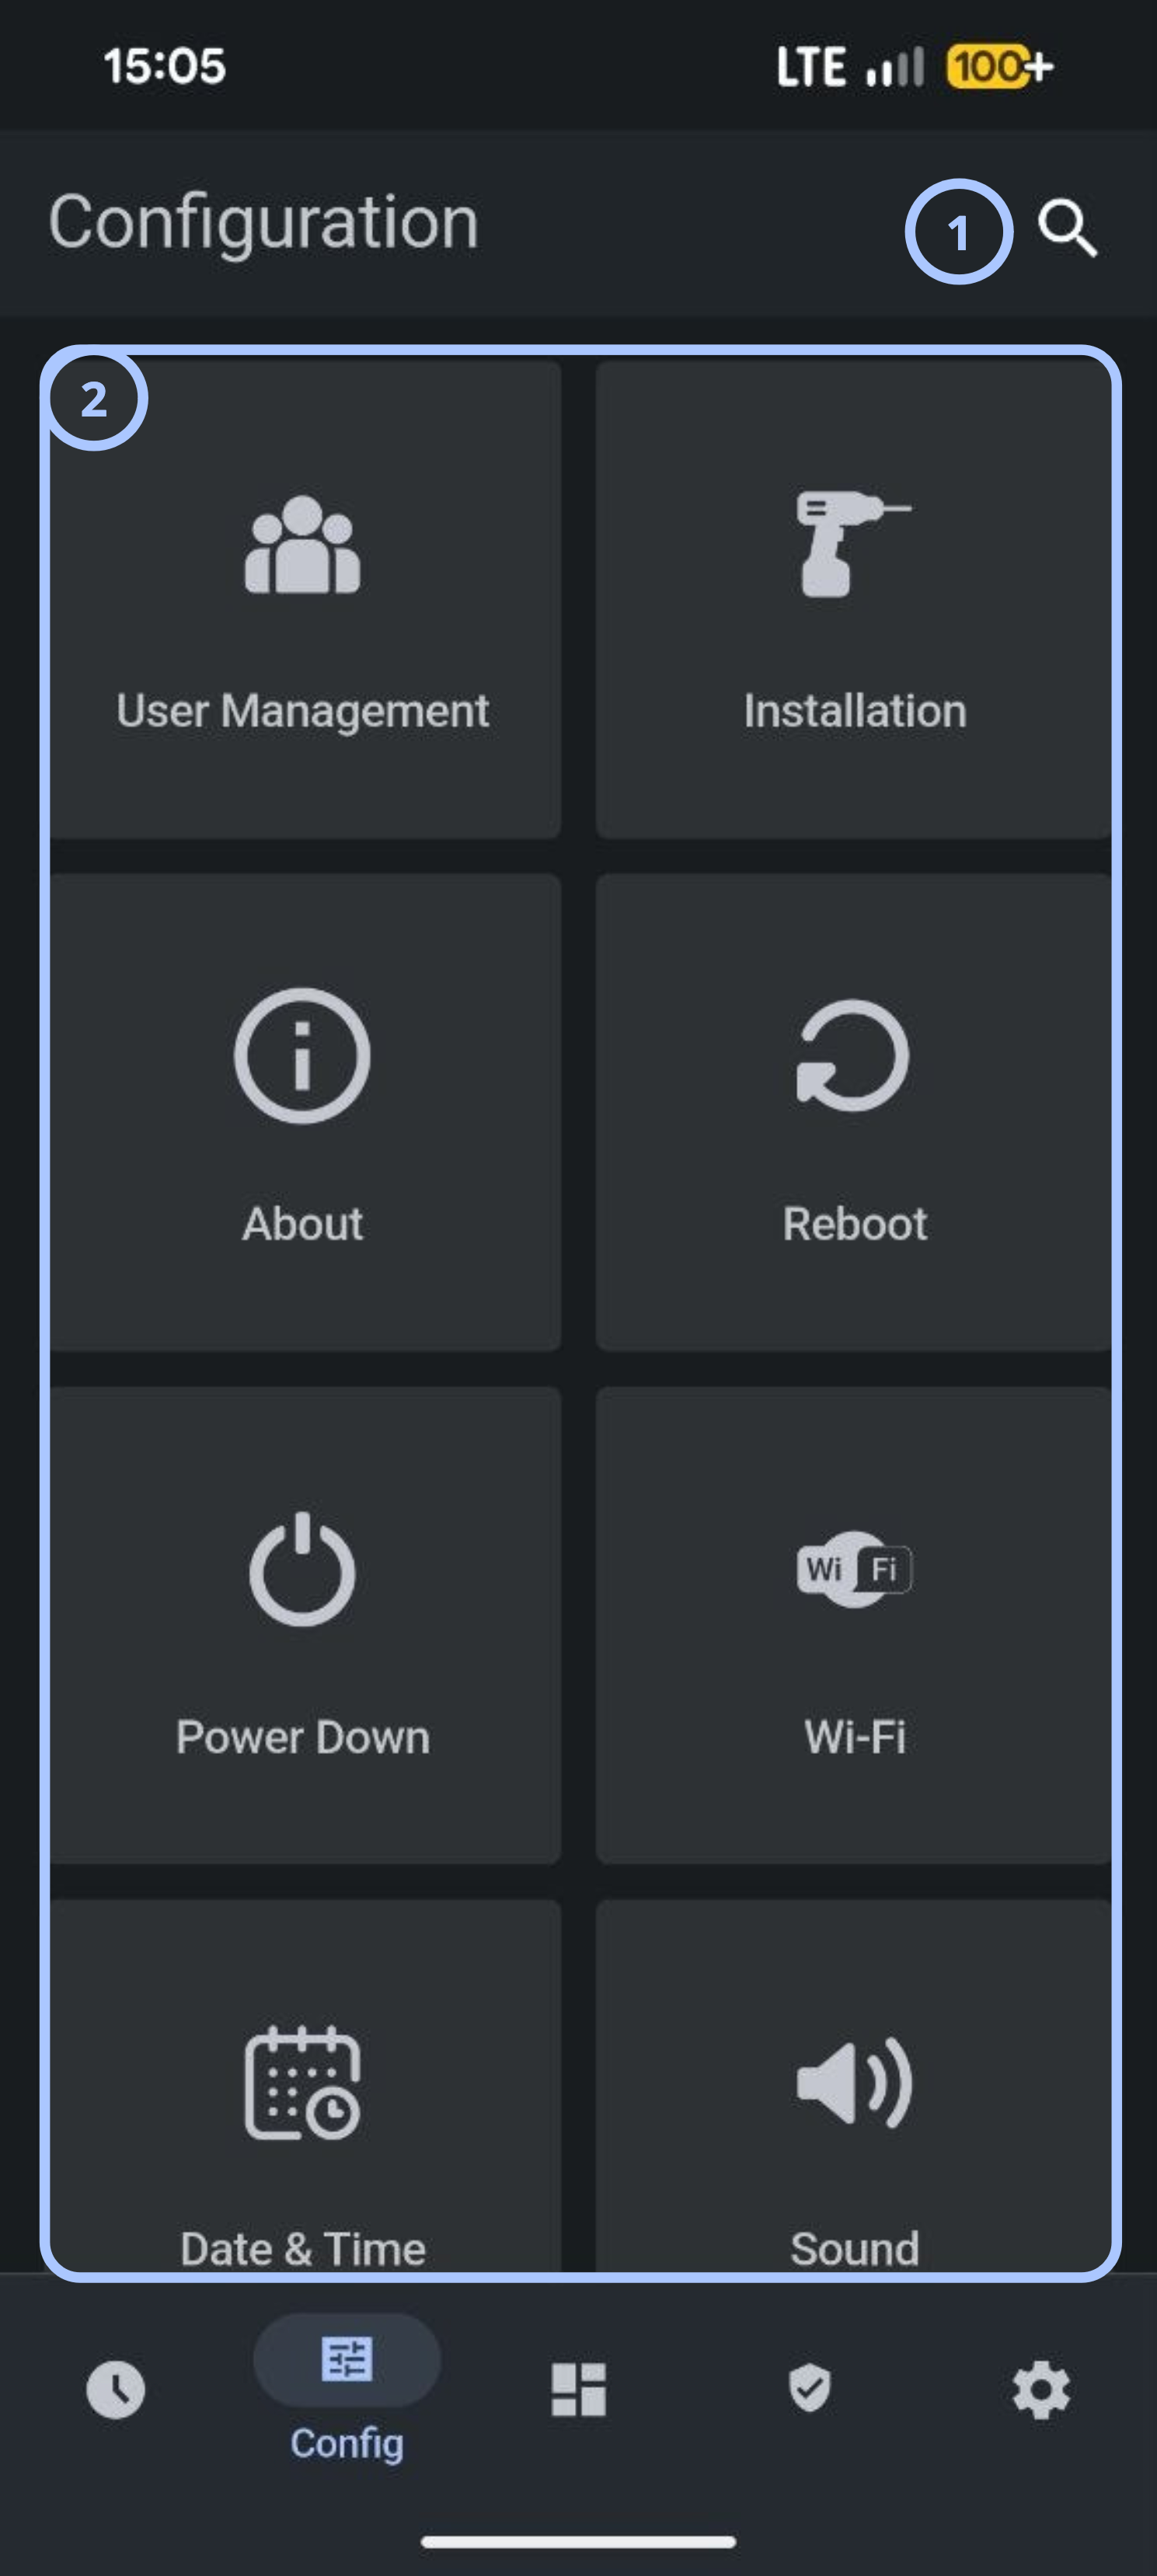
| Callout | UI element | Description | When to use |
|---|---|---|---|
| 1 | Search | Searches available configuration pages and settings. | Use to locate a specific configuration option. |
| 2 | Configuration tiles | Provides access to configuration categories and maintenance functions. | Use to navigate to a specific configuration area. |
Configuration tiles
The Configuration page contains the following primary tiles.
| Tile | Description | When to use |
|---|---|---|
| User Management | Manages panel users and access settings. | Use when adding, updating, or removing users. |
| Installation | Opens installer and advanced system settings. | Use during panel setup and maintenance. |
| About | Displays panel information and component details. | Use when reviewing firmware, hardware, or communication information. |
| Reboot | Restarts the panel. | Use after maintenance or troubleshooting activities. |
| Power Down | Safely shuts down the panel. | Use before servicing hardware or disconnecting power. |
| Wi-Fi | Configures wireless network connectivity. | Use when connecting or troubleshooting wireless communication. |
| Date & Time | Configures date, time, and time format. | Use to ensure accurate event timestamps. |
| Sound | Configures panel audio settings. | Use to adjust announcements, beeps, chimes, and volume. |
| Upgrade Software | Starts software update procedures. | Use when updating panel firmware. |
| Partitions | Configures partition settings. | Use when managing multiple security partitions. |
Installation page
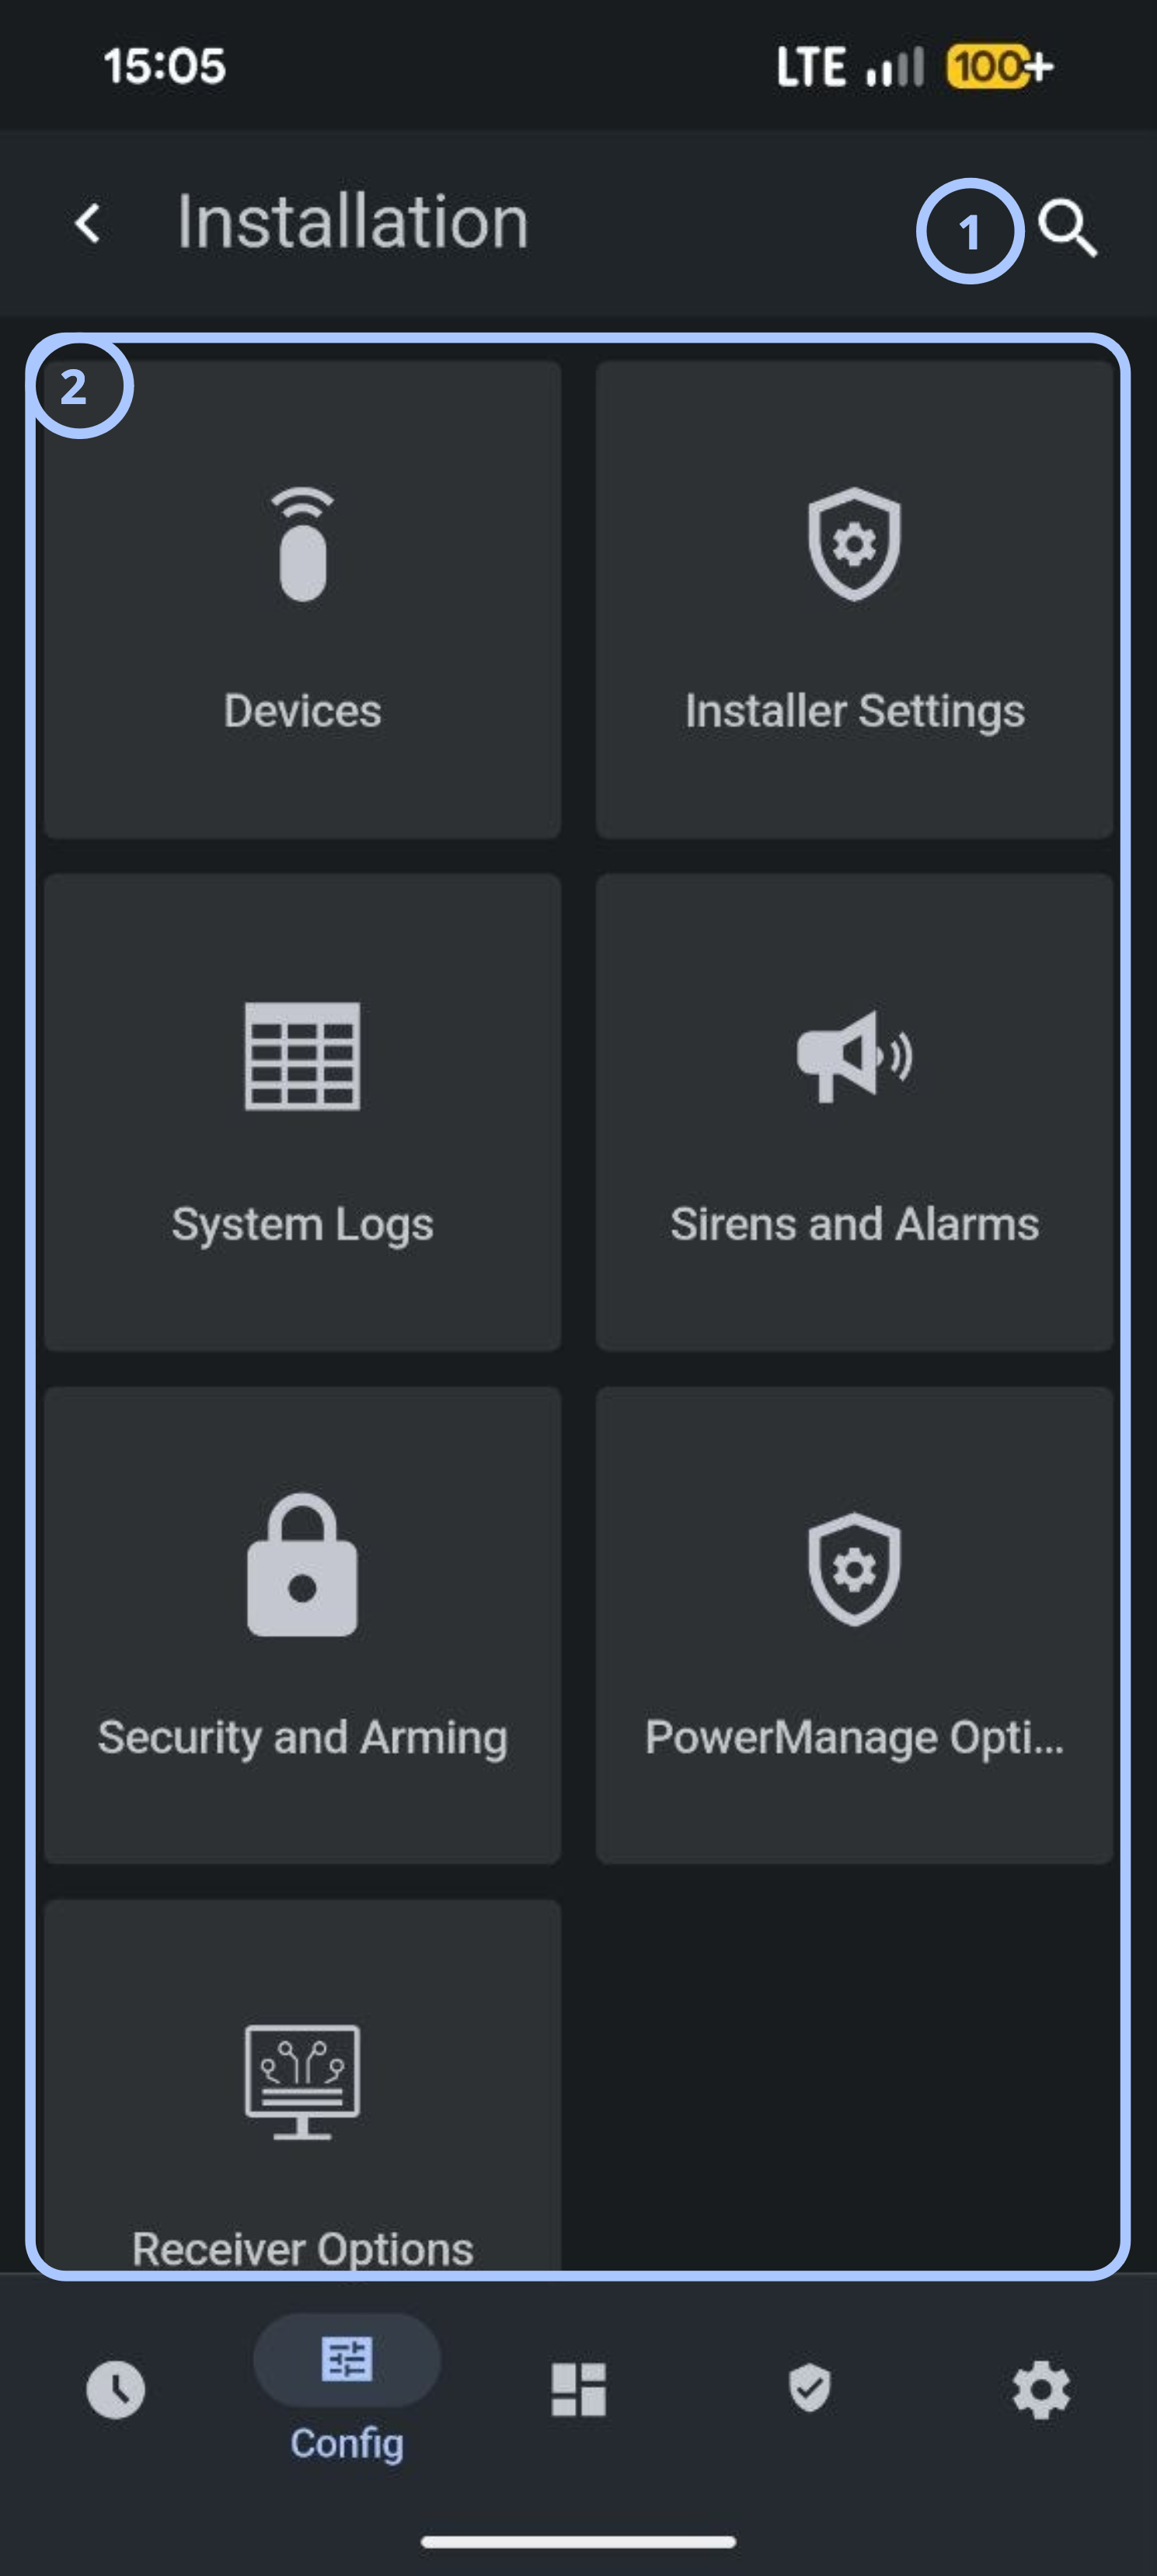
| Callout | UI element | Description | When to use |
|---|---|---|---|
| 1 | Search | Searches available configuration pages and settings. | Use to locate a specific configuration option. |
| 2 | Installation options | Provides access to installer-level configuration and diagnostics. | Use during setup, maintenance, and troubleshooting. |
Installation tiles
The Installation page contains the following primary tiles.
| Tile | Description | When to use |
|---|---|---|
| Devices | Manages paired devices, such as sensors, keypads, and other peripherals. | Use when adding, removing, or reviewing connected devices. |
| Installer Settings | Opens advanced installer-level configuration options. | Use to configure system behavior during installation and setup. |
| System Logs | Displays a log of system events and panel activity. | Use to review panel history and troubleshoot issues. |
| Sirens and Alarms | Configures siren and alarm output settings. | Use to adjust alarm behavior and siren activation. |
| Security and Arming | Configures arming and security-related settings. | Use to define arming behavior and security options. |
| PowerManage Options | Configures the connection between the panel and the PowerManage server. | Use to set up or update remote management connectivity. |
| Receiver Options | Configures receiver settings used for alarm reporting. | Use to set up communication with the central monitoring receiver. |
About page
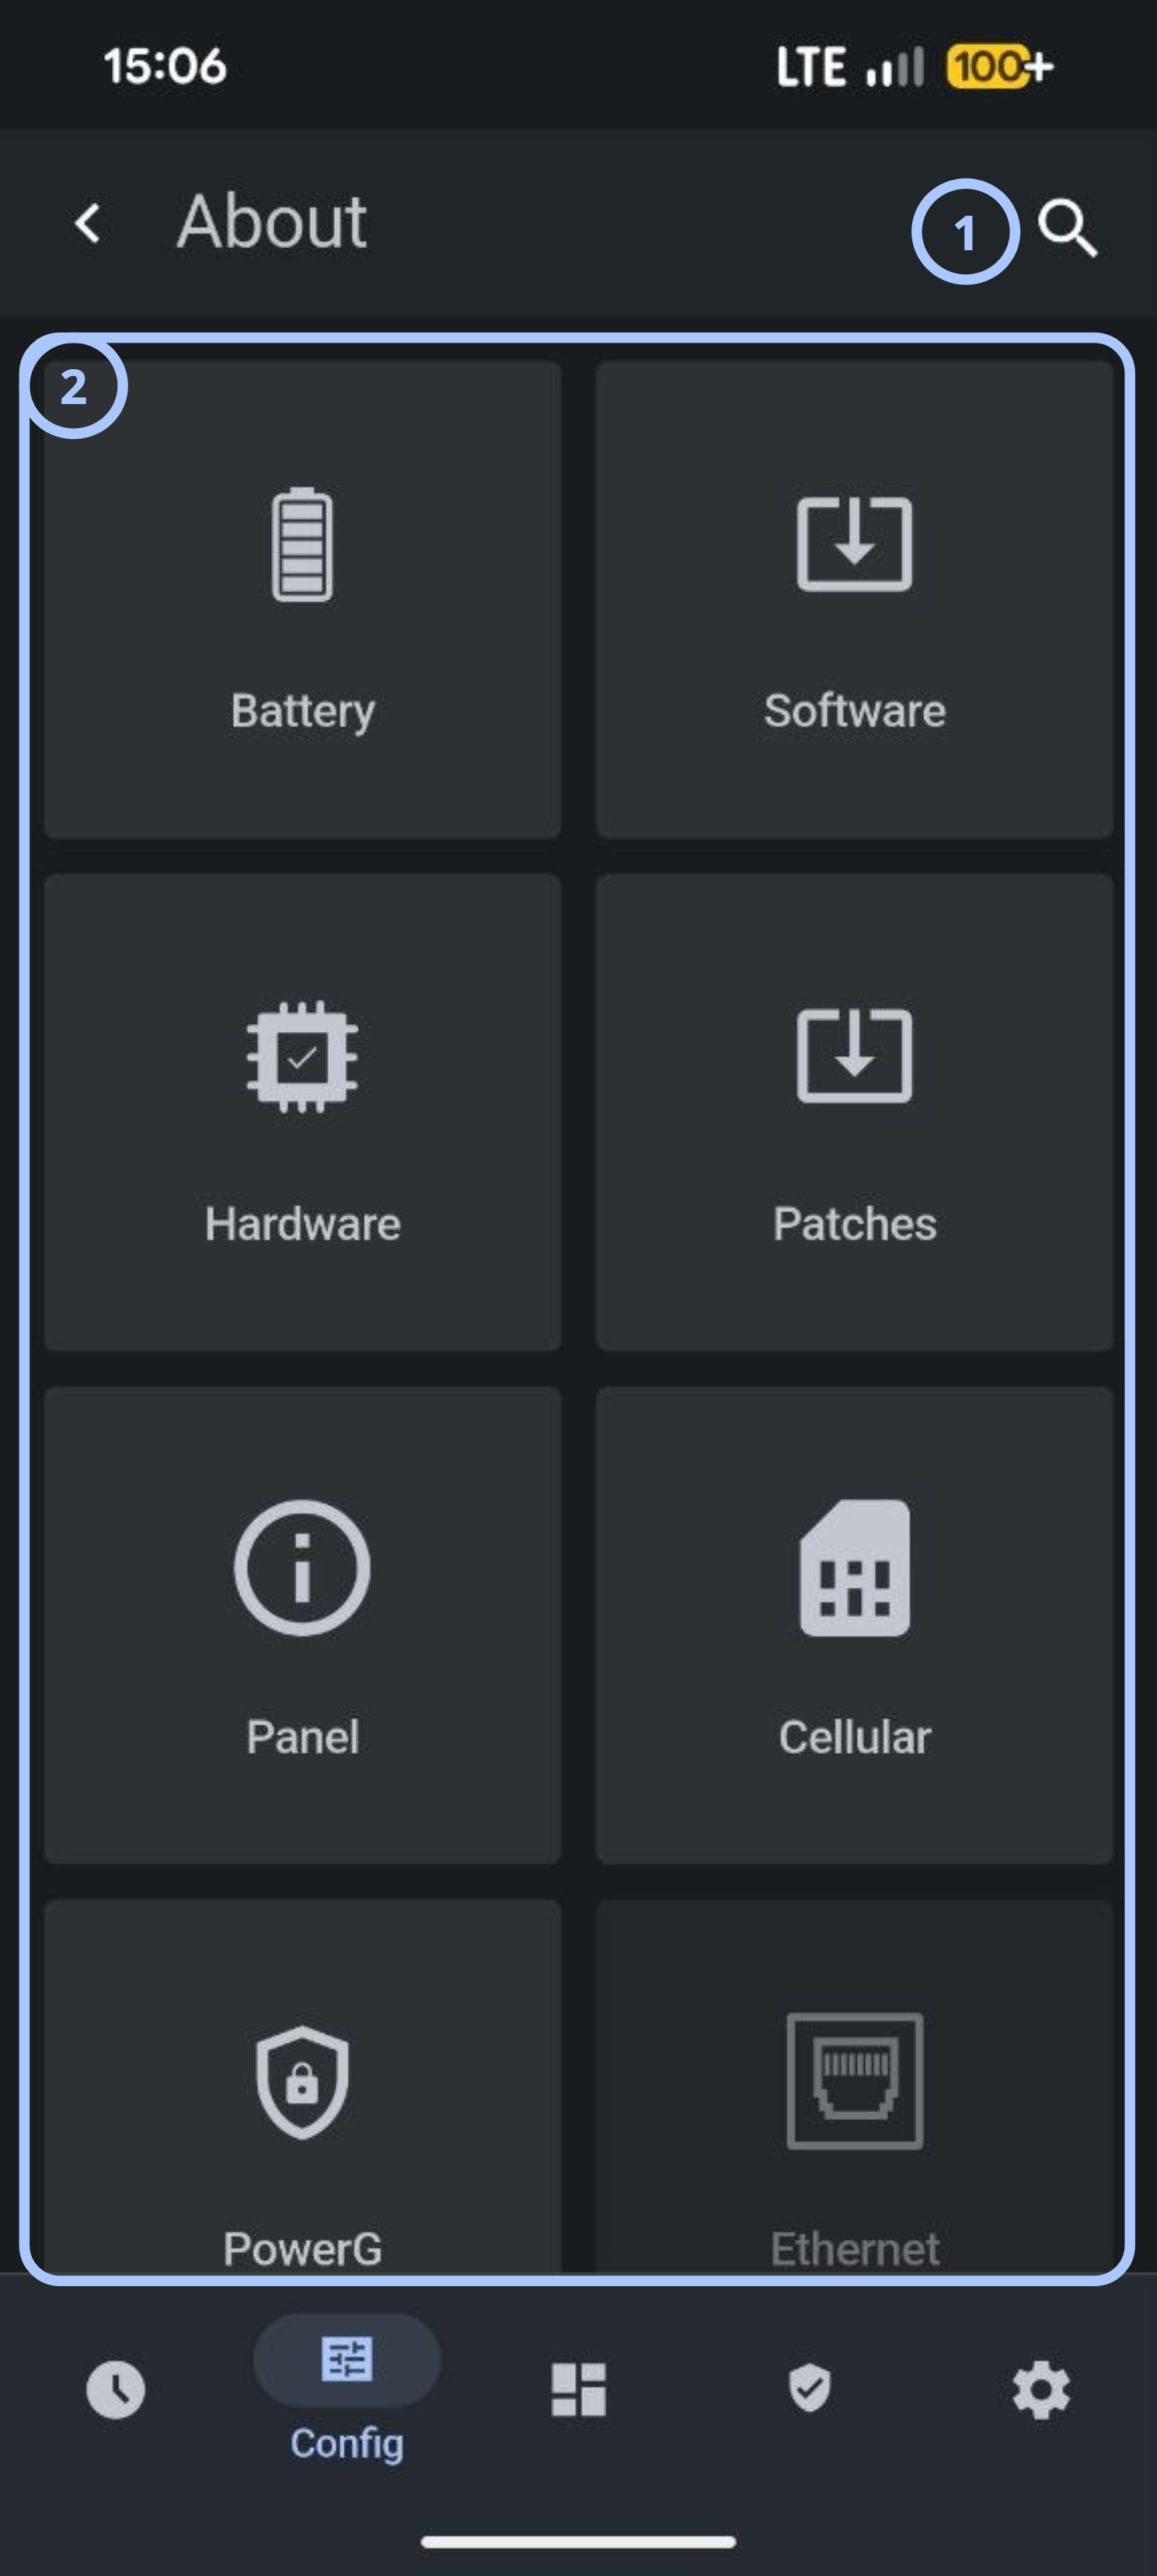
| Callout | UI element | Description | When to use |
|---|---|---|---|
| 1 | Search | Searches available configuration pages and settings. | Use to locate a specific configuration option. |
| 2 | About options | Provides access to panel information categories, such as battery, hardware, software, and connectivity details. | Use to review panel information and diagnostics. |
About tiles
The About page contains the following primary tiles.
| Tile | Description | When to use |
|---|---|---|
| Battery | Displays battery status and details. | Use to verify battery information. |
| Software | Displays panel software information. | Use for reviewing software information. |
| Hardware | Displays panel hardware information. | Use for reviewing hardware information. |
| Reboot | Restarts the panel. | Use after maintenance or troubleshooting activities. |
| Patches | Displays available panel patches. | Use before starting a patch update. |
| Panel | Displays panel identification and general details. | Use to confirm panel information. |
| Cellular | Displays cellular communication details. | Use to verify cellular status during troubleshooting. |
| PowerG | Displays PowerG communication details. | Use to verify PowerG status and diagnostics. |
| Ethernet | Displays Ethernet connectivity details. | Use to verify wired network status. |
Date & Time
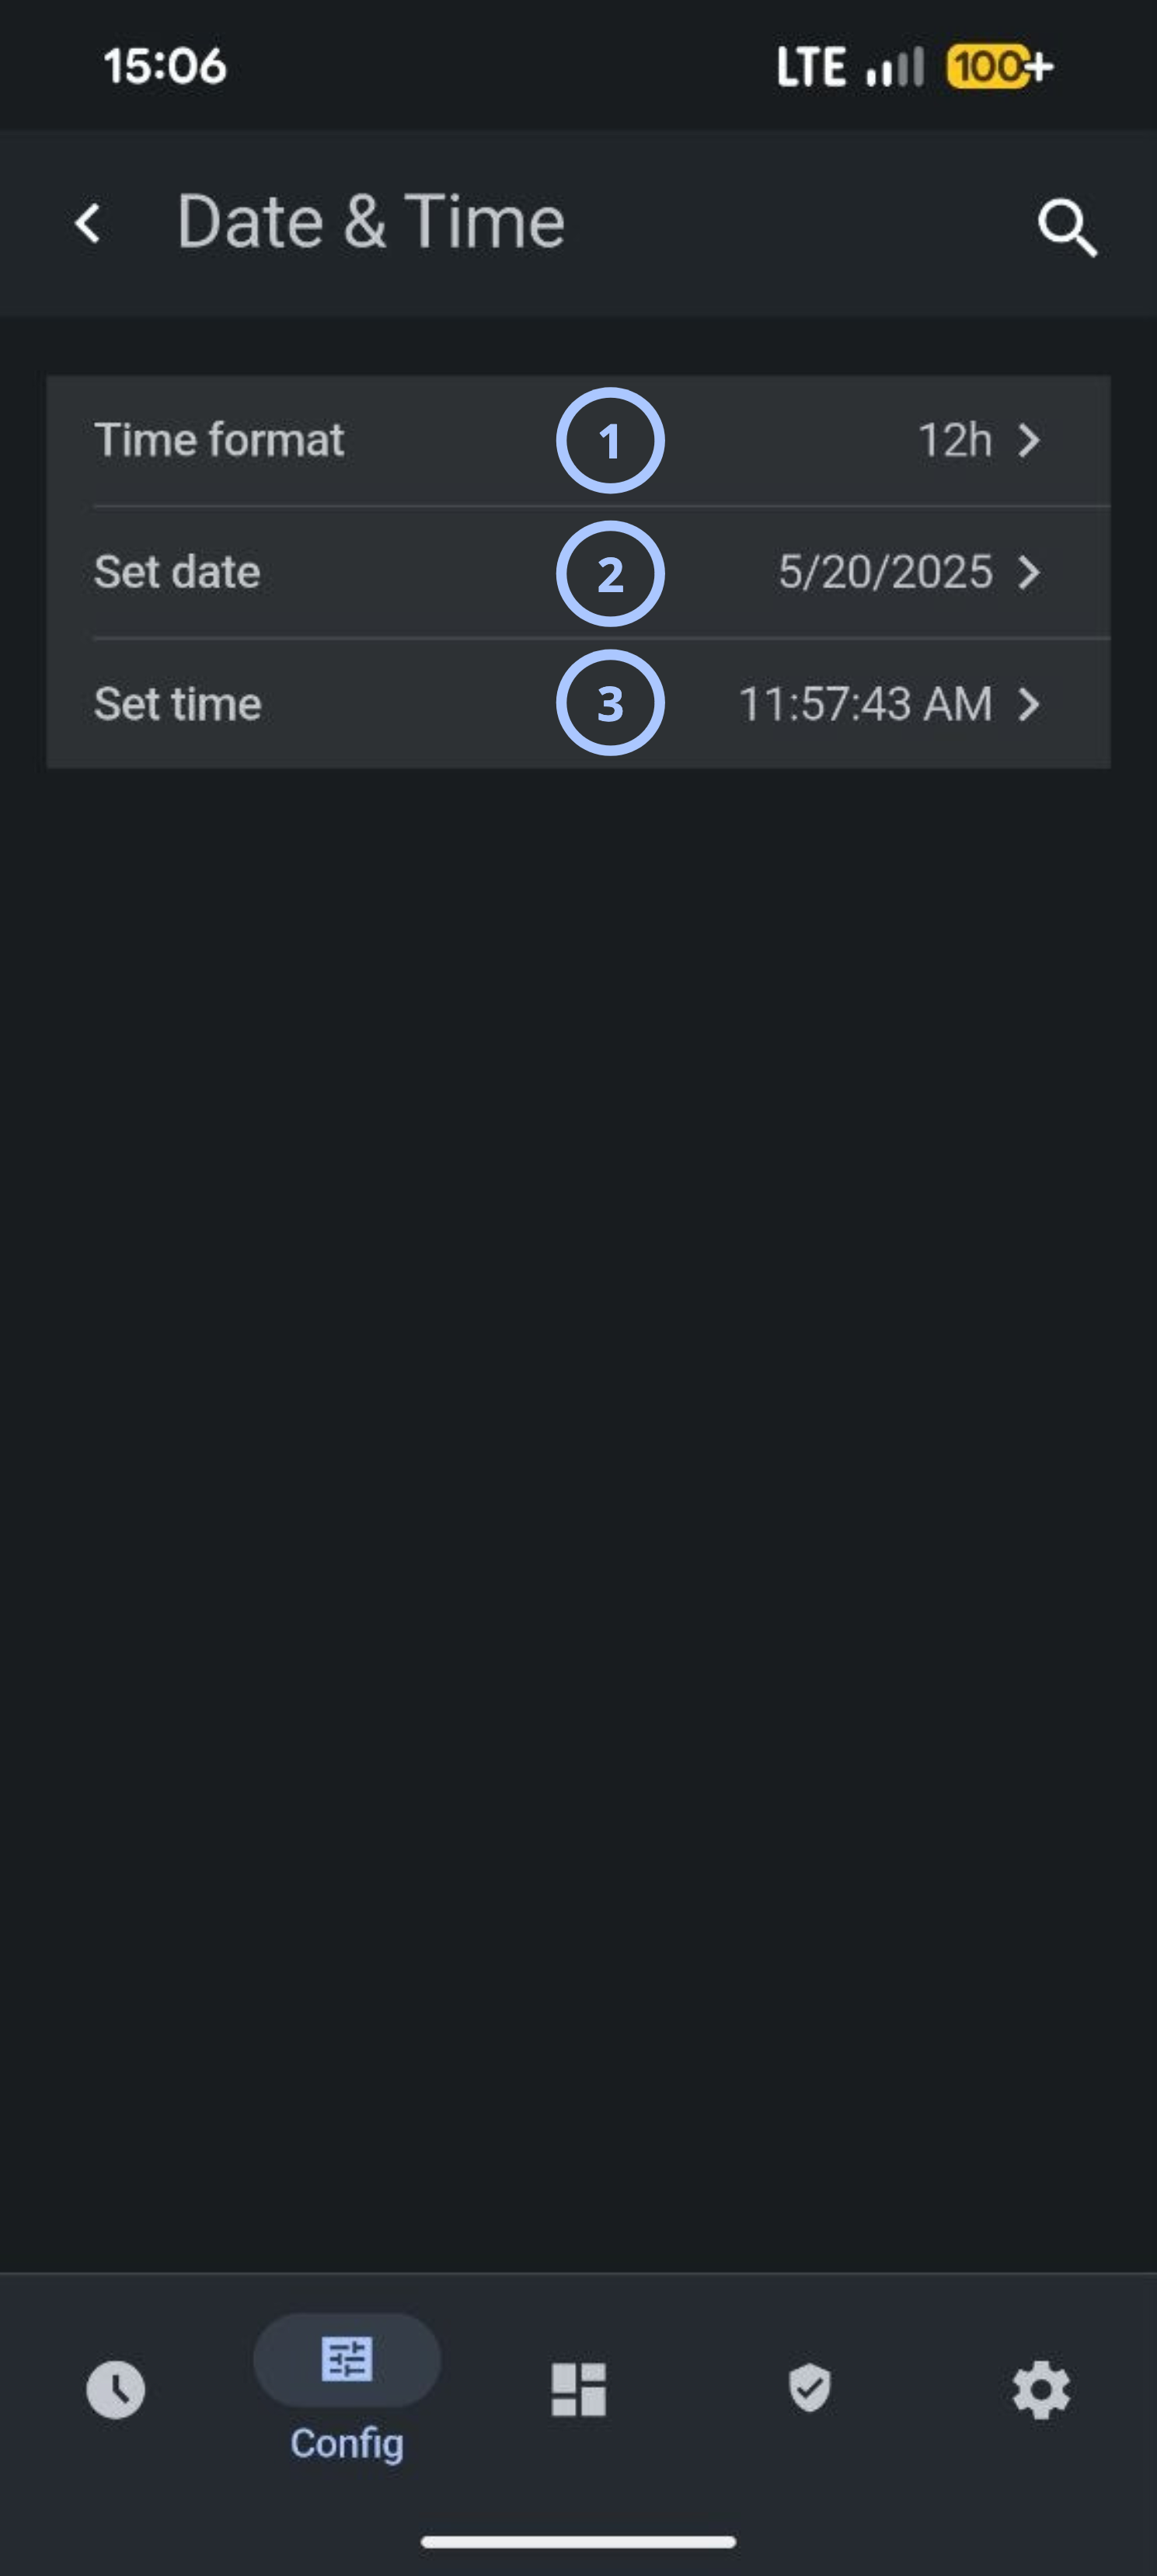
| Callout | UI element | Description | When to use |
|---|---|---|---|
| 1 | Time format | Displays and sets the clock format used across the panel. | Use to switch between a 12-hour and 24-hour clock display. |
| 2 | Set date | Displays and sets the current panel date. | Use to correct or update the panel date. |
| 3 | Set time | Displays and sets the current panel time. | Use to correct or update the panel time. |
Sound
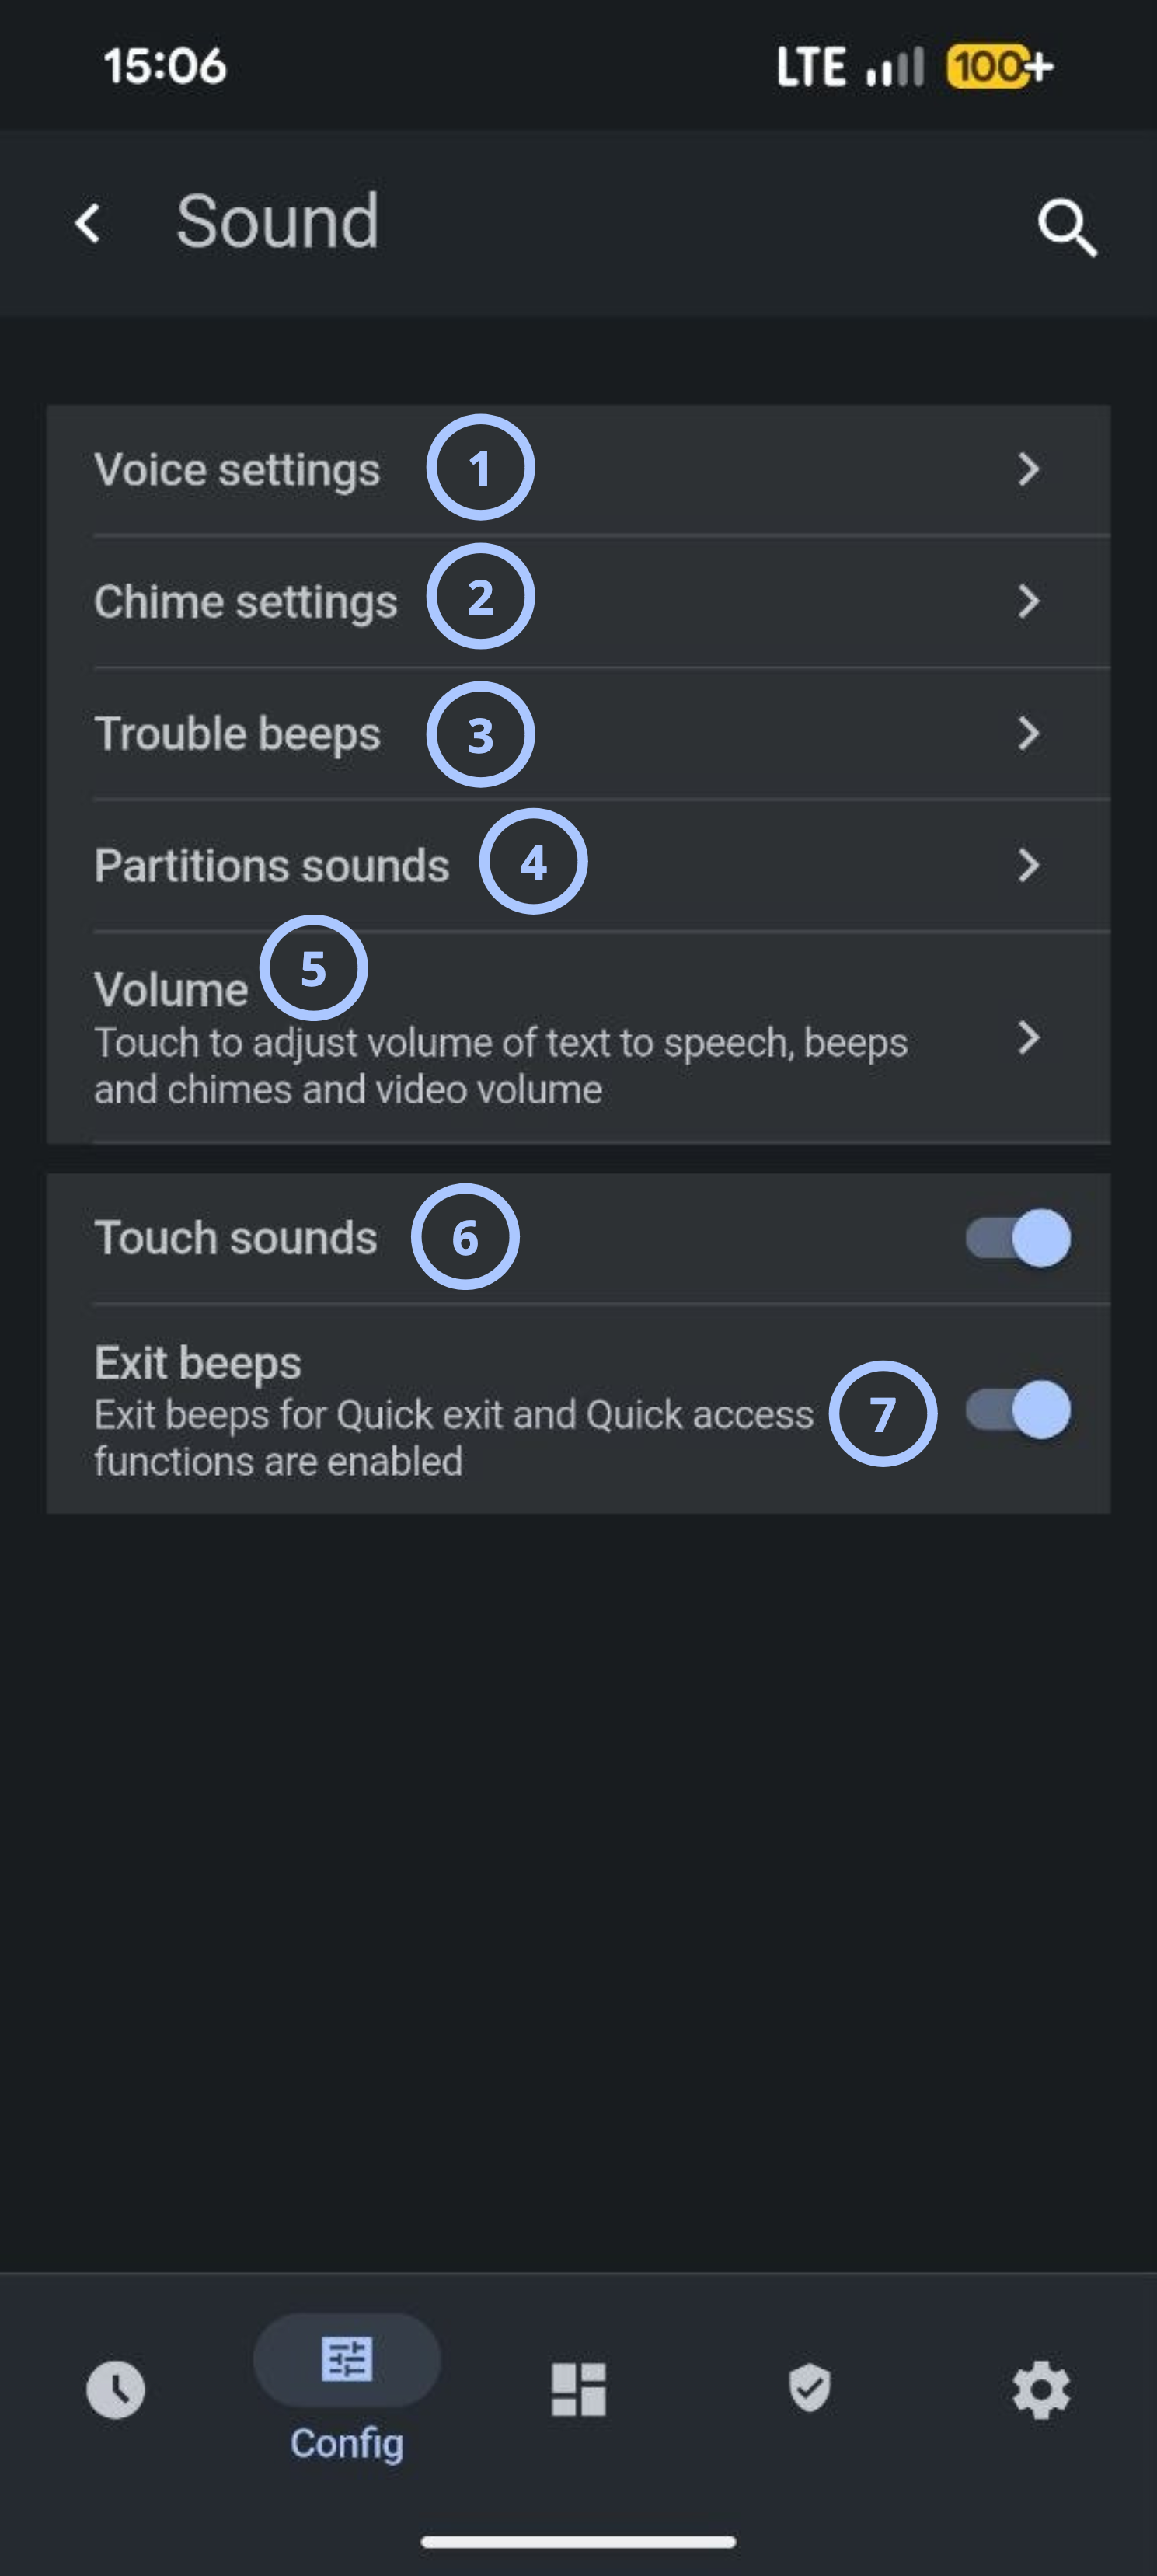
| Callout | UI element | Description | When to use |
|---|---|---|---|
| 1 | Voice settings | Opens options for panel voice announcements. | Use to configure spoken alerts and announcements. |
| 2 | Chime settings | Opens options for door and zone chime tones. | Use to configure chime behavior for entry and exit sensors. |
| 3 | Trouble beeps | Opens options for trouble condition audio alerts. | Use to configure audible alerts for system trouble conditions. |
| 4 | Partitions sounds | Opens sound configuration specific to individual partitions. | Use in multi-partition systems to configure sounds per partition. |
| 5 | Volume | Adjusts the volume of text-to-speech, beeps, chimes, and video. | Use to raise or lower the overall panel audio level. |
| 6 | Touch sounds toggle | Turns audible feedback for screen touches on or off. | Use to enable or disable touch feedback sounds. |
| 7 | Exit beeps toggle | Turns exit beeps for Quick exit and Quick access functions on or off. | Use to enable or disable audible feedback during exit sequences. |
How to use this page
Review panel information
Goal:
- View hardware, software, and communication details.
Steps:
- Open Configuration.
- Select About.
- Select the information category to review.
- Review the displayed details.
The selected system, firmware, hardware, or communication information appears.
Configure date and time
Goal:
- Update the panel date and time settings.
Steps:
- Open Configuration.
- Select Date & Time.
- Select Time format and choose the required format.
- Select Set date and enter the correct date.
- Select Set time and enter the correct time.
- If prompted, save the changes.
The panel displays the updated date and time. Future events use the updated timestamp.
Incorrect date and time settings can affect event logs and troubleshooting activities.
Configure sound settings
Goal:
- Modify panel audio behavior.
Steps:
- Open Configuration.
- Select Sound.
- Select the setting that you want to modify.
- Adjust the required option.
- If prompted, save the changes.
The panel applies the updated sound settings.
Reboot the panel
Goal:
- Restart the panel safely.
Steps:
- Open Configuration.
- Select Reboot.
- Confirm the action if prompted.
- Wait for the panel to restart.
The panel restarts, and configuration changes that require a restart become active.
Panel services may be temporarily unavailable during the restart process.
Power down the panel
Goal:
- Shut down the panel safely.
Steps:
- Open Configuration.
- Select Power Down.
- Confirm the shutdown request.
- Wait until the panel fully powers down.
The panel shuts down and is ready for approved hardware maintenance.
Configure PowerManage connection (LwM2M only)
Goal:
- Configure PowerManage connection.
Steps:
- Log in to Direct mode.
- Select Config.
- Select Installation.
- Select PowerManage Options.
- Set Host Name to
powermanage.com. - Set Port Number to
5685. - If prompted, save the changes.
The panel stores the PowerManage server settings and can use the configured endpoint for remote connectivity.
Tips
- Verify the date and time after firmware upgrades or prolonged power interruptions.
- Use system logs during troubleshooting to identify recent panel events.
- Confirm network configuration after changing Wi-Fi settings.
Troubleshooting
Date or time is incorrect
Possible causes:
- The date or time was entered incorrectly.
- The selected time format is incorrect.
- The system clock was not updated.
What to try:
- Open Date & Time settings.
- Confirm the selected time format.
- Enter the correct date and time.
- If prompted, save the changes.
Software update cannot start
Possible cause:
- Network connectivity is unavailable.
What to try:
- Check network connectivity.
- Start the software update again.
- If the update still cannot start, contact your administrator or service provider.