Reports
Overview
Use the Reports screen to view, manage, and generate reports for the selected panel. You can:
- Review completed reports.
- Monitor scheduled reports.
- Generate reports on demand.
- Export report results as PDF files.
- Configure report content and delivery settings.
Before you begin
- Confirm that the panel exists in the system.
- Confirm that your mobile device has a network connection.
Report availability and email delivery depend on system settings
- Report history retention may be limited by system settings.
- Email delivery requires a valid email address and configured SMTP server settings.
Page layout
Reports list view
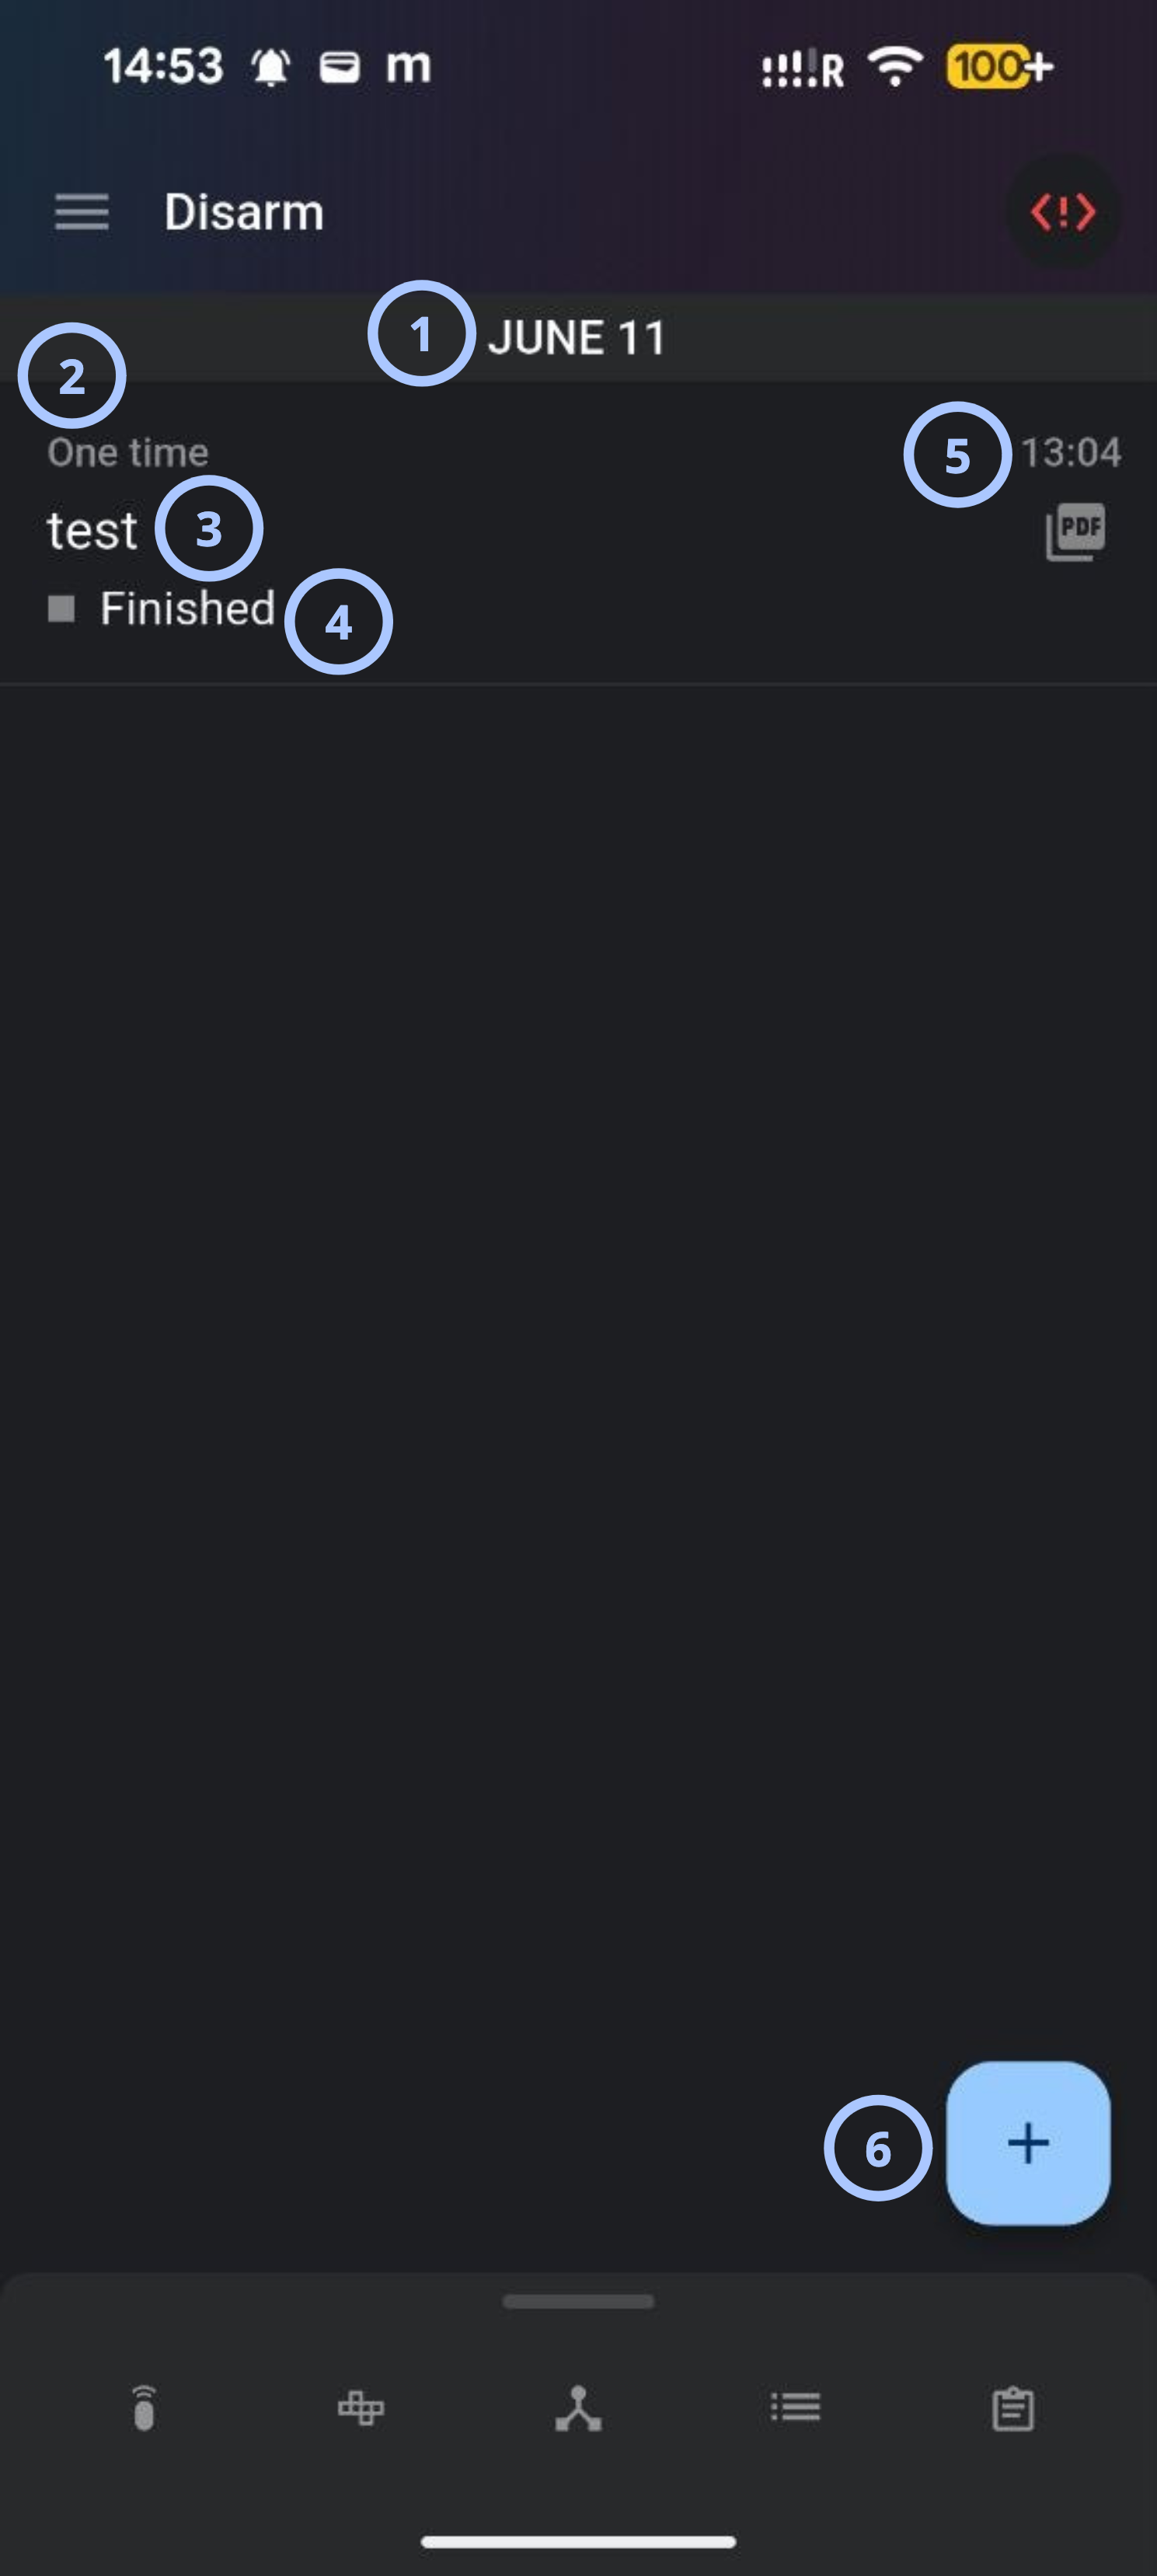
| Callout | UI element | Description | When to use |
|---|---|---|---|
| 1 | Date header | Groups reports by scheduled or completed date. | Use to locate reports created on a specific date. |
| 2 | Report type | Indicates whether the report runs once, daily, or weekly. | Use to identify recurring or manually created reports. |
| 3 | Report name | Displays the report name. | Use to review report details or monitor execution status. |
| 4 | Report status | Indicates whether the report completed or scheduled. | Use to check report status. |
| 5 | Execution time | Shows the scheduled or completed execution time. | Use to verify when the report ran or is scheduled to run. |
| 6 | + (Add report) button | Opens the Add report dialog. | Use to create a new report. |
Add report view
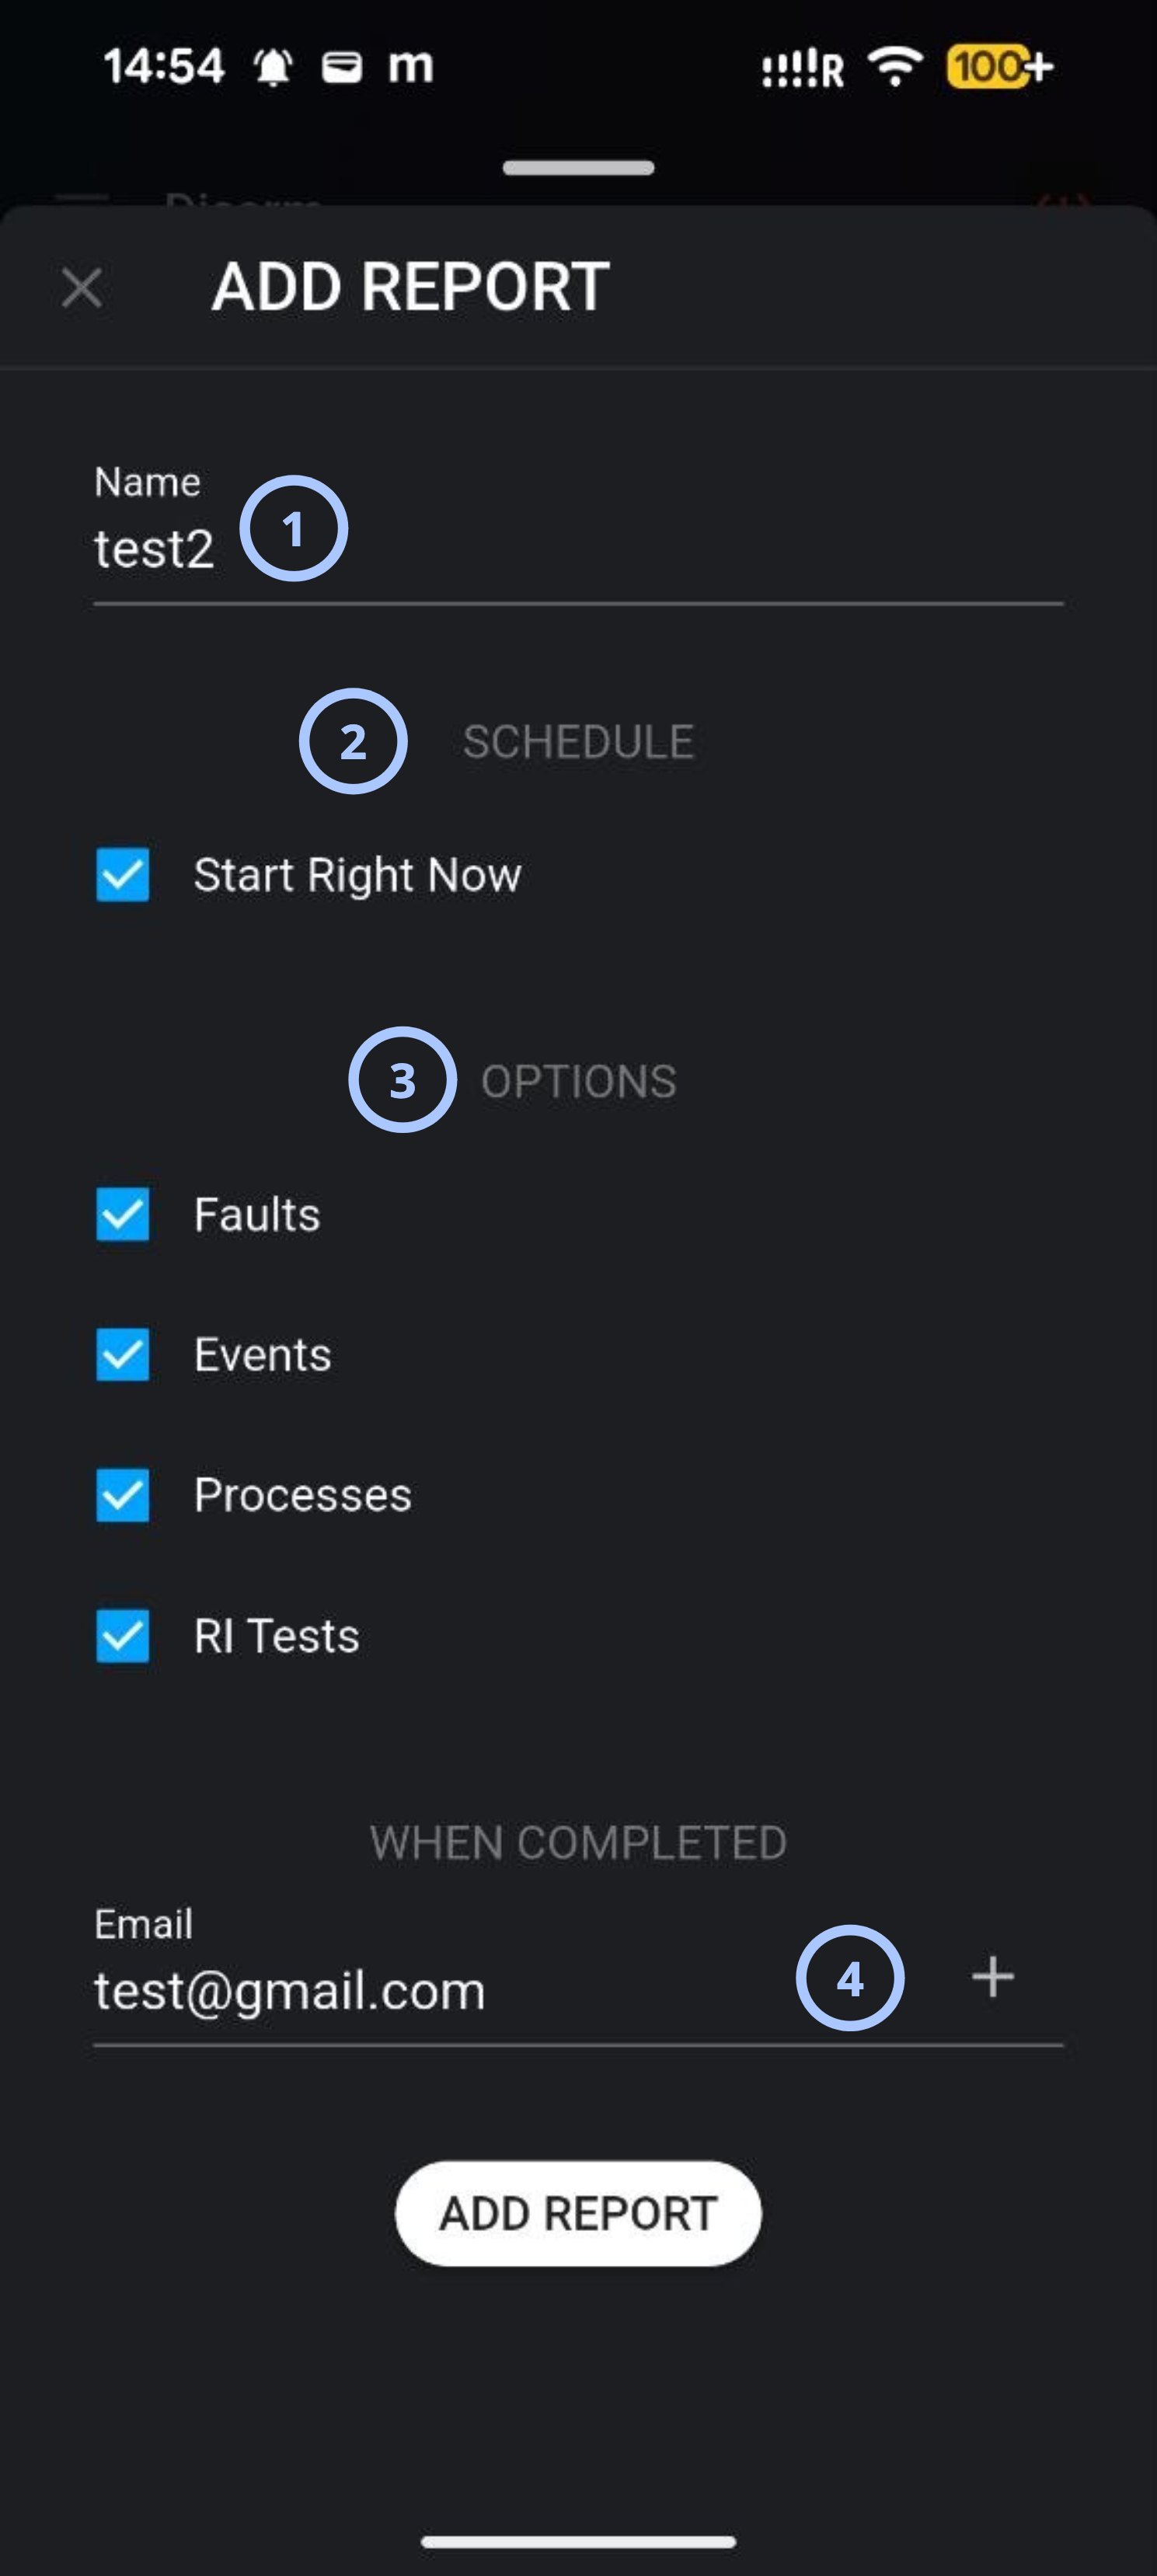
| Callout | UI element | Description | When to use |
|---|---|---|---|
| 1 | Name field | Defines the report name displayed in the reports list. | Use to assign a recognizable identifier to the report. |
| 2 | SCHEDULE section | Contains scheduling options for the report. | Use to control when report generation starts. |
| 3 | OPTIONS section | Contains report-content checkboxes. | Use to include Faults, Events, Processes, or RRI Tests in the report. |
| 4 | Email field | Specifies a recipient email address for completed reports. | Use to send reports automatically after generation. |
How to use this page
Create a new report
Goal:
- Create and run a report for a selected panel.
Steps:
- Open the REPORTS tab for the selected panel.
- Select the Add report (+) button.
- Enter a report name in the Name field.
- Select one or more content options under OPTIONS:
- Faults includes fault data.
- Events includes event history.
- Processes includes process activity.
- RRI Tests includes RRI test results.
- Select Start Right Now under SCHEDULE if the report should run immediately.
- Enter an email address under WHEN COMPLETED if automatic delivery is required.
- Select ADD REPORT.
The report appears in the reports list. The system schedules or starts report generation. A PDF becomes available after the report finishes.
View a completed report
Goal:
- Open a generated report in PDF format.
Steps:
- Open the Reports screen.
- Locate the completed report in the list.
- Confirm that the Finished status is shown for the report.
- Select the report.
You can download the report as a PDF and review its content.
Review scheduled reports
Goal:
- Verify upcoming or pending reports.
Steps:
- Open the Reports screen.
- Review report entries grouped by date.
- Check the execution time and status for each entry.
You can identify pending, in-progress, and completed reports.
Send reports by email
Goal:
- Deliver generated reports to one or more recipients automatically.
Steps:
- Create a new report.
- Enter an email address in the Email field under WHEN COMPLETED.
- To add another recipient, select the Add (+) icon and enter the email address.
- Select ADD REPORT.
The system sends the completed report to all specified recipients after generation finishes.
Invalid addresses can prevent delivery
Invalid email addresses may prevent report delivery. Verify all addresses before creating the report.
Tips
tip
- Use descriptive report names to make reports easier to identify in the list.
- Select only the content categories required to keep report size manageable.
- Confirm the Finished status before attempting to open a PDF.
- Use email delivery for scheduled operational reviews or compliance audits.
- Add multiple email recipients when reports must be distributed to a team.
Troubleshooting
Report does not finish
Possible causes:
- The panel is offline or unreachable.
- System communication is unavailable or delayed.
- Report processing is delayed.
What to try:
- Confirm that the panel is online and connected.
- Wait for the system to refresh the report status.
- If the report still does not finish, create the report again.
Unable to create a report
Possible causes:
- A required field is incomplete.
- An email address has an invalid format.
What to try:
- Confirm that the Name field is completed.
- Check that all email addresses use a valid format.
- Create the report again.
Email delivery fails
Possible causes:
- A recipient email address is invalid or incorrectly formatted.
- The email server is not configured correctly.
- Network connectivity was unavailable during delivery.
What to try:
- Check all recipient email addresses for typing or formatting errors.
- Remove unsupported characters or extra spaces from the email field.
- Contact your server administrator to verify the email server configuration.
- Try again with a valid email address.
Related pages
See also
Was this page helpful?