Managing devices
Overview
Use the Devices page to review the devices connected to a panel, filter device lists, edit device names, add supported devices, and enroll new devices.
Use this page when you need to:
- Check panel information.
- View zones, detectors, PGMs, and other connected devices.
- Filter devices by status or device type.
- Change a device name.
- Add supported cameras.
- Enroll a keyfob and assign an owner.
Manage all connected security devices and identify those that need attention in one location.
Before you begin
Preconditions
- You are signed in to AlarmInstall in remote mode.
- The security panel is connected to PowerManage.
- Devices, zones, PGMs, cameras, or keyfobs are configured or available for enrollment.
Limitations
- Device categories may vary by panel configuration.
- Some devices may be visible but not editable.
- Available actions depend on the panel state, connection status, capabilities and active processes.
- Displayed information can be outdated until discovery, configuration download, or the relevant refresh process completes.
- Device RSSI, GSM RSSI, and Wi-Fi RSSI use separate refresh processes. Starting one process does not update the other signal-strength results.
- You cannot start another Refresh RSSI process while one is already running.
- RSSI refresh does not apply to wired zones or reed-switch sub-zones.
- Walktest cannot start when the panel is armed, in an alarm state, or disconnected from the server. Only supported security zones are included in the test.
Page layout
The Devices workflow includes two main screens:
- Devices list
- Add new device
Devices list
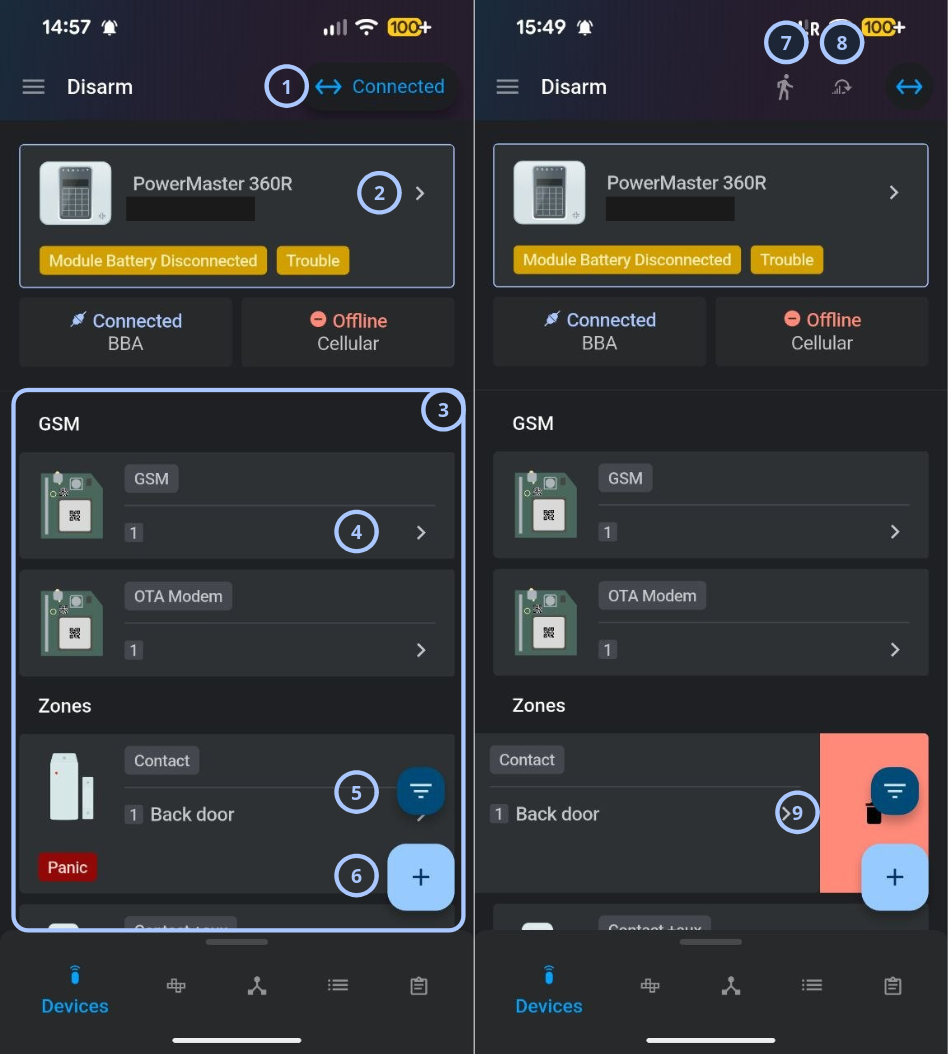
| Callout | UI element | Description | When to use |
|---|---|---|---|
| 1 | Panel connection status | Shows the current connection status of the panel. | Use to confirm whether the panel is online. |
| 2 | Panel details arrow | Opens the panel details screen. | Use to view panel information. |
| 3 | Device list | Lists communication modules, zones, and connected devices. | Use to review hardware and device settings. |
| 4 | Details arrow | Opens the selected device details screen. | Use to view or edit a device. |
| 5 | Filter | Filters the device list. | Use to show all devices, only trouble devices, or hide null devices. |
| 6 | Add | Starts a new device enrollment workflow. | Use to add a device or camera. |
| 7 | Walktest | Starts a Walktest workflow. | Use to run a quick test. |
| 8 | Refresh RSSI | Refreshes the received signal strength indicator. | Use to check wireless signal quality. |
| 9 | Swipe-to-delete area | Shows the delete action after you swipe a row to the left. | Use to remove a device. |
Device details screen
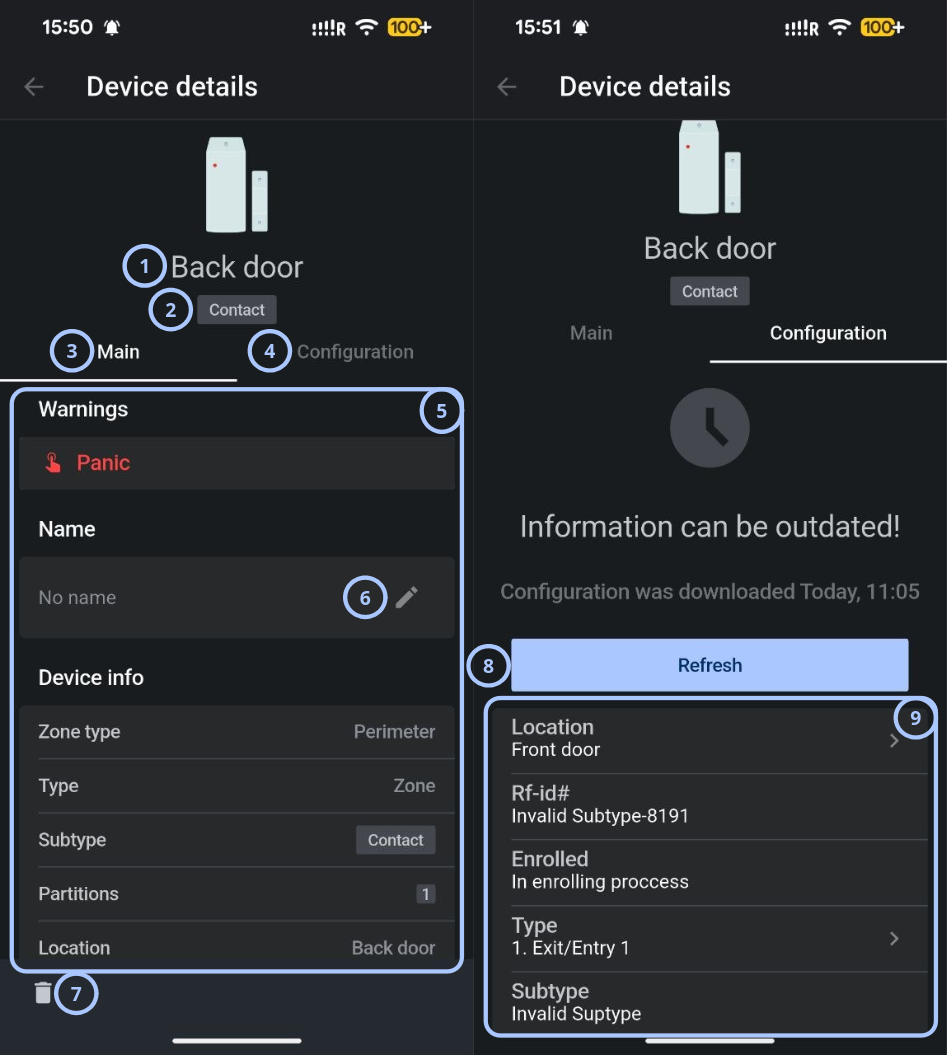
| Callout | UI element | Description | When to use |
|---|---|---|---|
| 1 | Device name | Shows the selected device name. | Use this to confirm the selected device. |
| 2 | Device type | Shows the selected device type. | Use this to identify the device type. |
| 3 | Main tab | Shows warnings and basic device details. | Use this for a quick overview. |
| 4 | Configuration tab | Shows configurable device settings. | Use this to review and adjust settings. |
| 5 | Device details section | Lists active warnings and main information for the selected device. | Use this to identify issues and device details. |
| 6 | Edit icon | Shows the current device name and edit icon. | Use this to rename a device. |
| 7 | Delete icon | Removes the selected device. | Use with caution when decommissioning devices. |
| 8 | Refresh button | Updates the device configuration from the panel. | Use this when the displayed data is outdated. |
| 9 | Configuration settings | Shows the device configuration options. | Use this to review or change device settings. |
Panel details screen
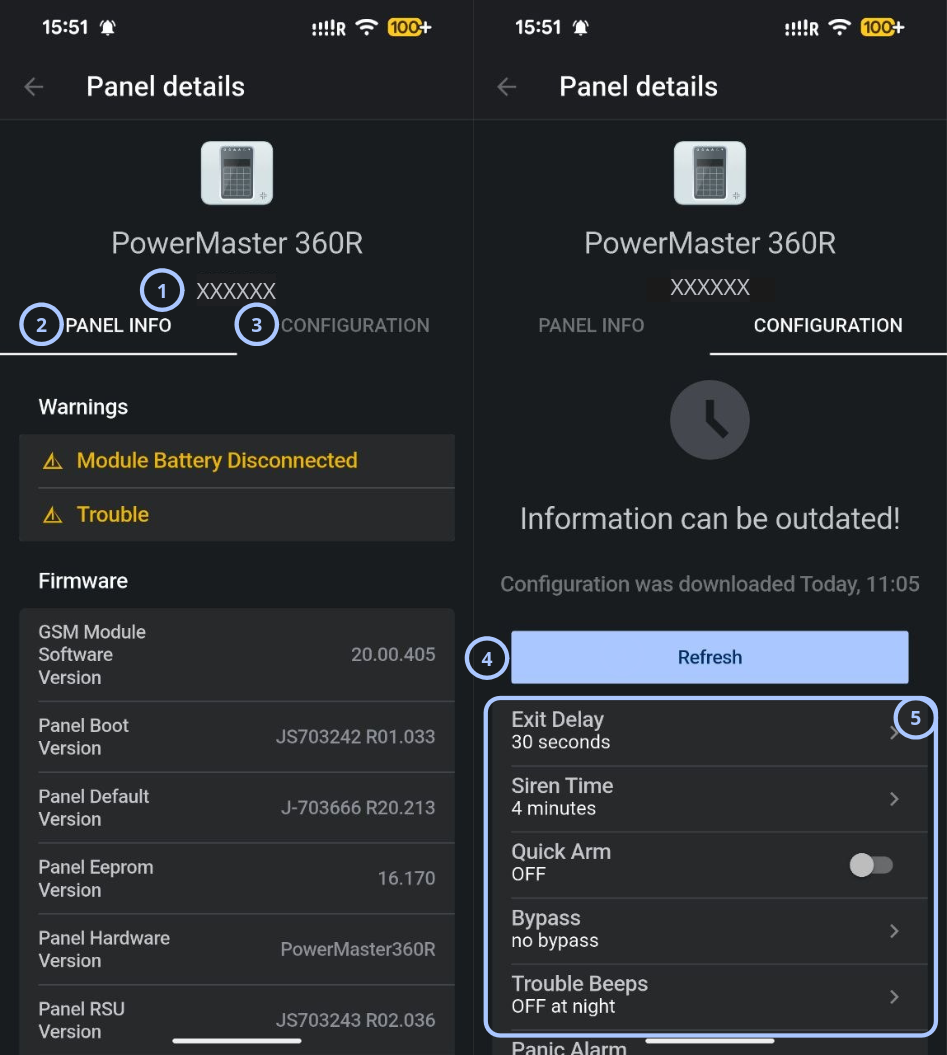
| Callout | UI element | Description | When to use |
|---|---|---|---|
| 1 | Panel ID | Shows the selected panel identifier. | Use this to confirm the selected panel. |
| 2 | Panel info tab | Selects the Panel info tab. | Use this to view firmware and system information. |
| 3 | Configuration tab | Selects the Configuration tab. | Use this to review or change panel settings. |
| 4 | Refresh button | Updates the panel configuration from the panel. | Use this when the displayed configuration is outdated. |
| 5 | Configuration parameters | Shows panel configuration parameters. | Use this to review or change system behavior. |
Add new device general screen
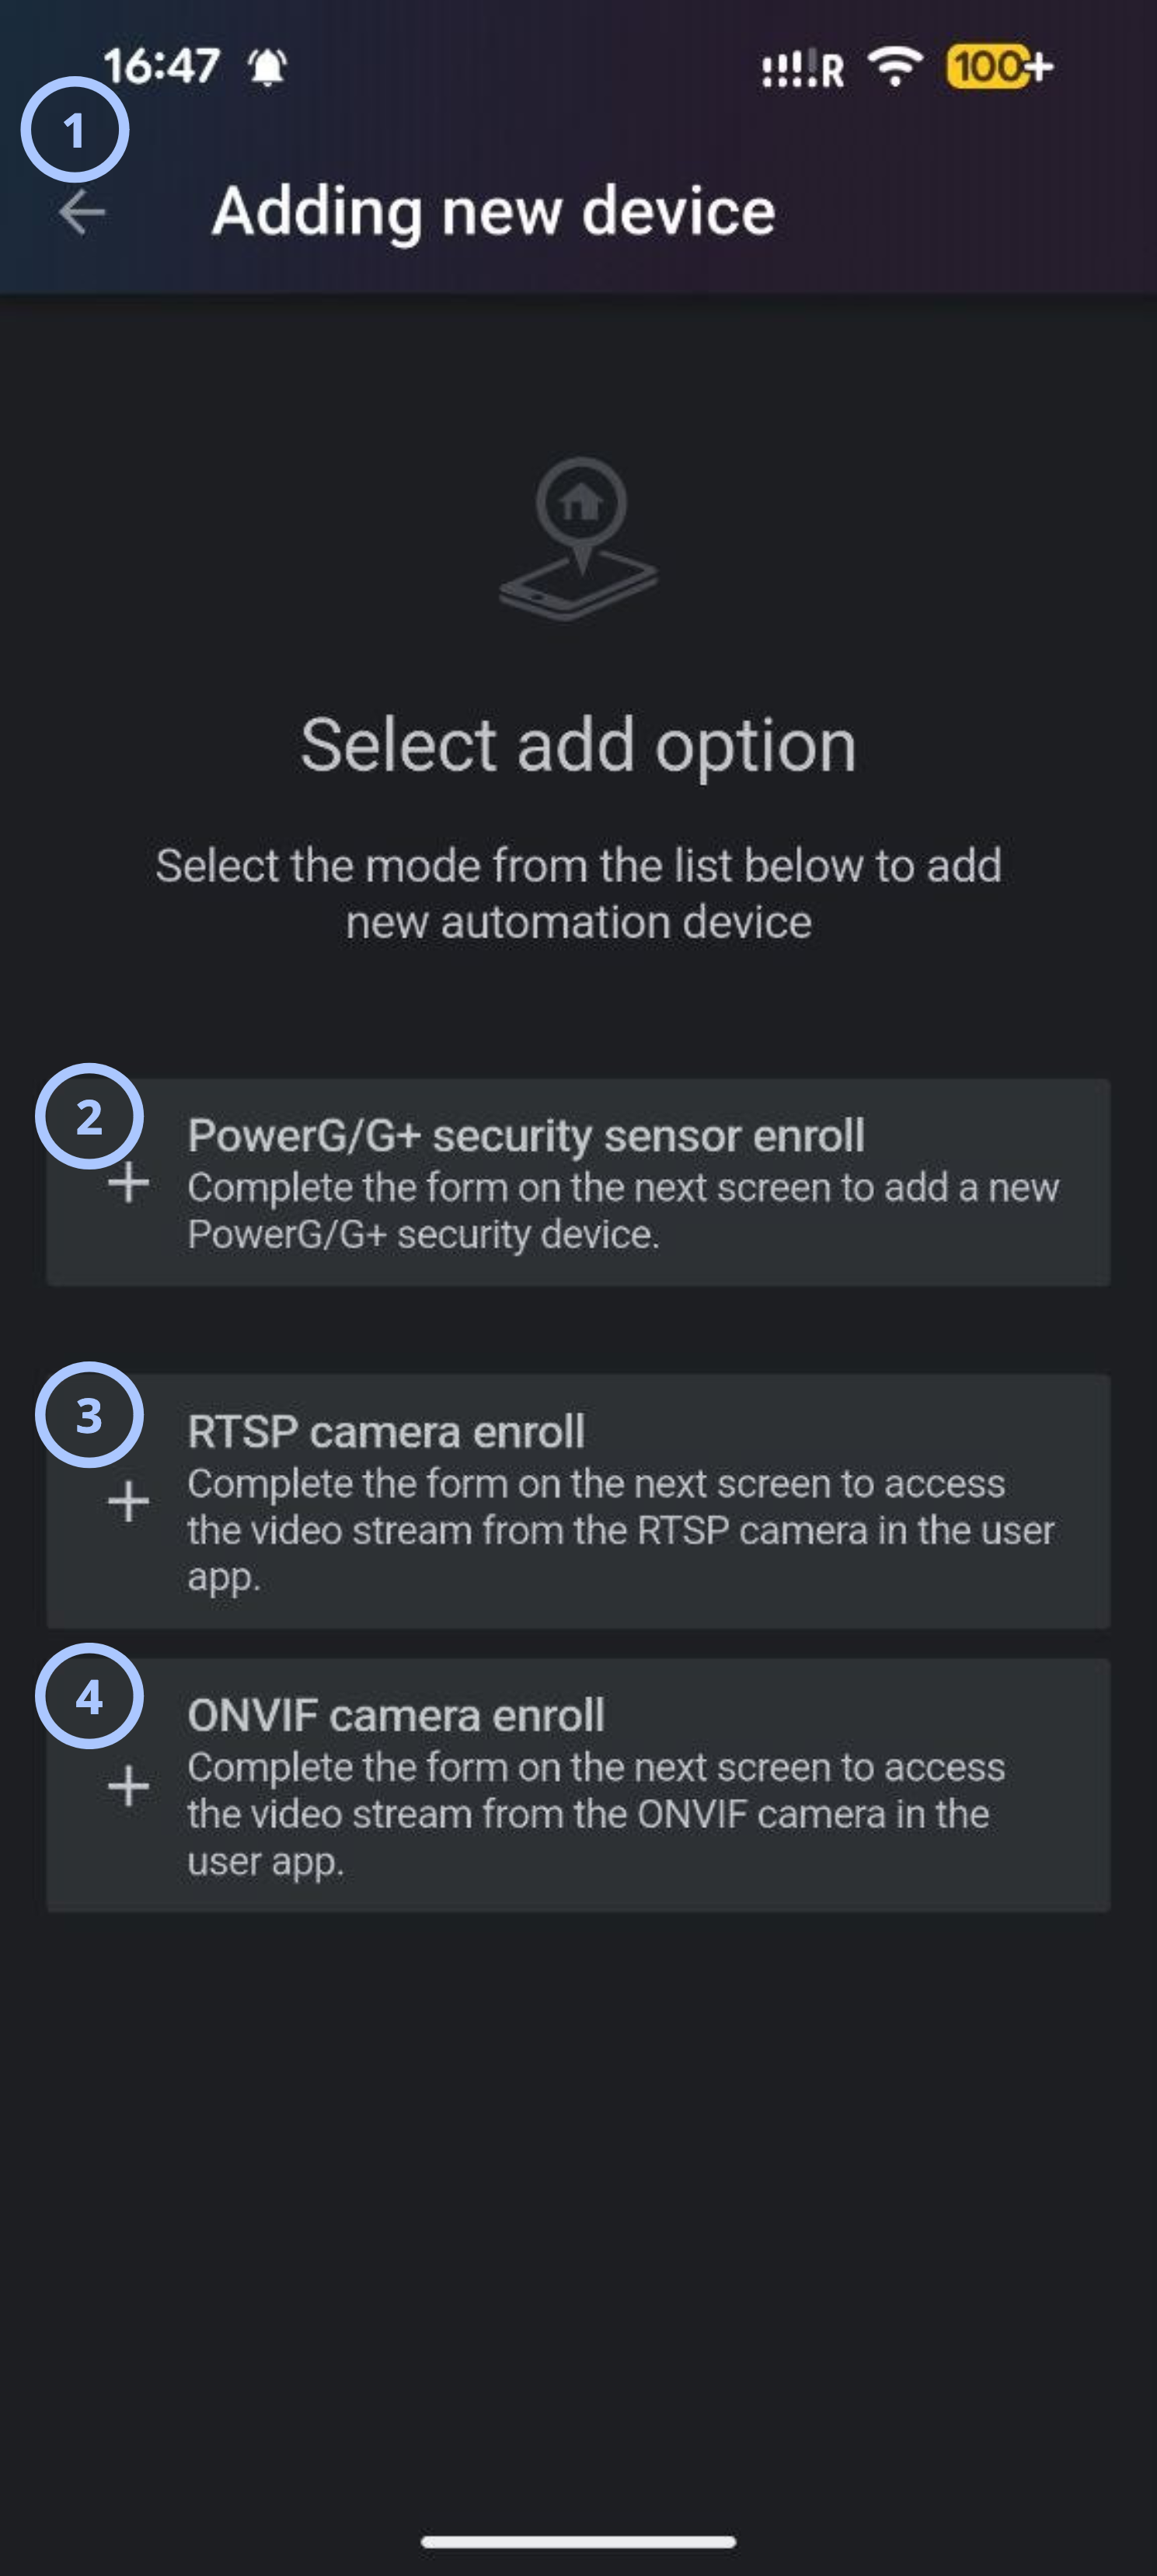
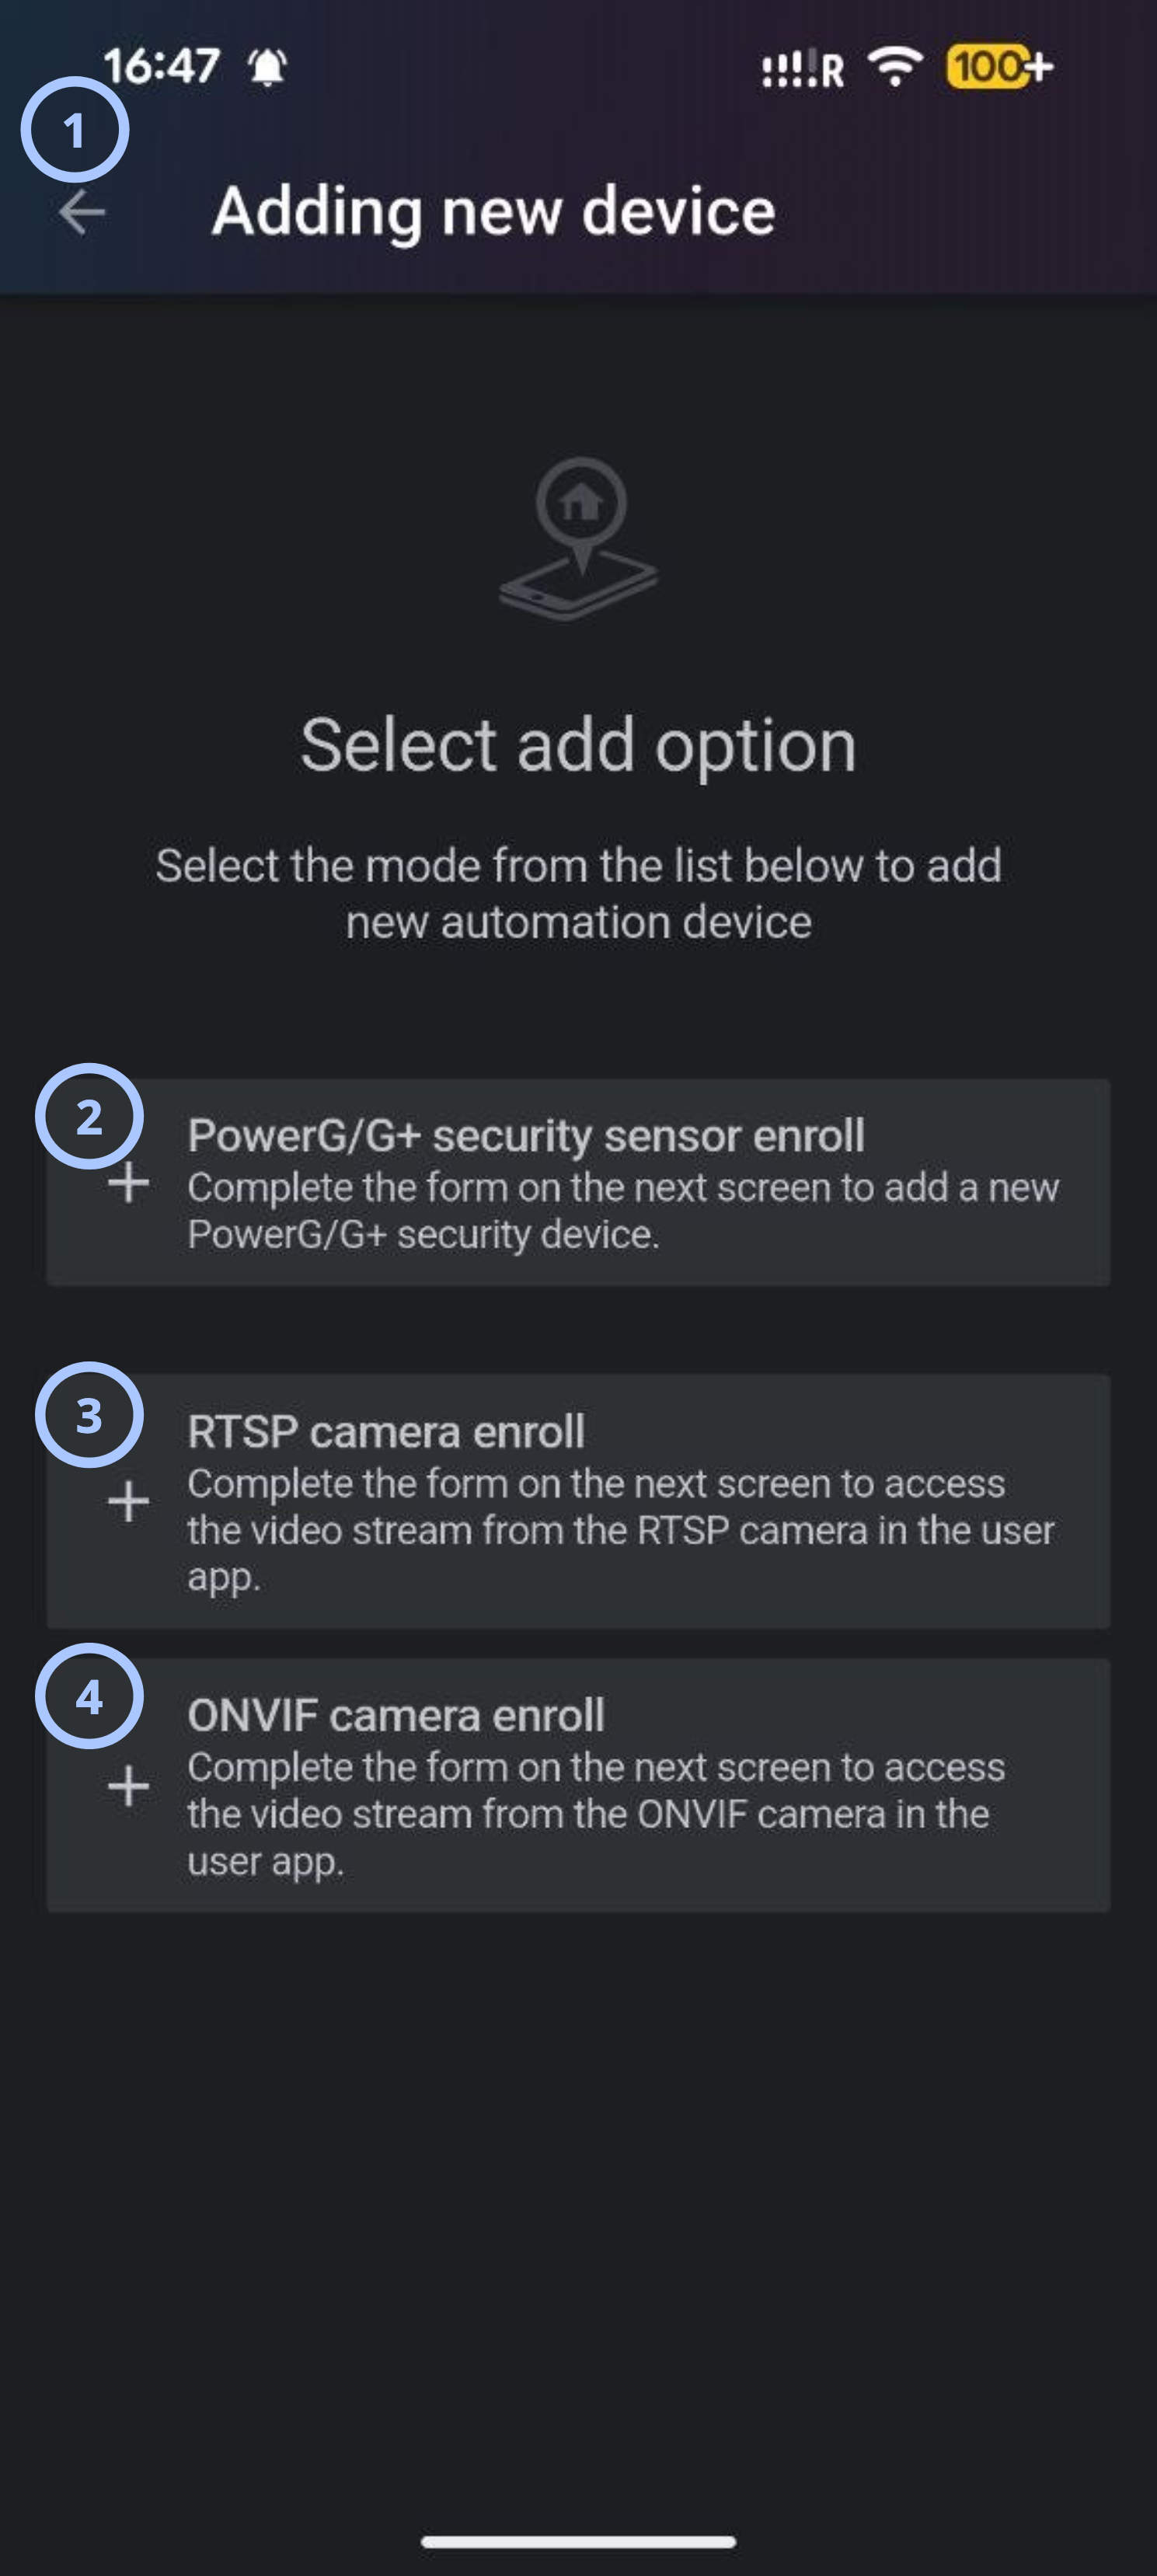
The Add new device general screen screen appears when you select the Add button from the Devices page.
Use this screen to choose the type of device you want to enroll.
| Callout | UI element | Description | When to use |
|---|---|---|---|
| 1 | Back button | Returns to the Devices page without starting an enrollment process. | Use when you do not want to add a device. |
| 2 | PowerG security sensor enroll | Starts the workflow for enrolling a new PowerG security device. | Use when adding supported wireless sensors such as contacts, motion detectors, or other compatible devices. |
| 3 | RTSP camera enroll | Starts the RTSP camera enrollment process. | Use when adding a camera that provides an RTSP video stream. |
| 4 | ONVIF camera enroll | Starts the ONVIF camera enrollment process. | Use when adding a camera that supports the ONVIF standard. |
Add device
| Callout | UI element | Description | When to use |
|---|---|---|---|
| 1 | Enrollment ID | Enters the device ID required for enrollment. | Use to manually add a device. |
| 2 | ID scanning | Scans the PowerG device ID for enrollment. | Use to add a device by scanning the ID. |
| 3 | QR-code scanning | Scans the device QR code for enrollment. | Use to add a device by scanning the QR code. |
Add RTSP camera
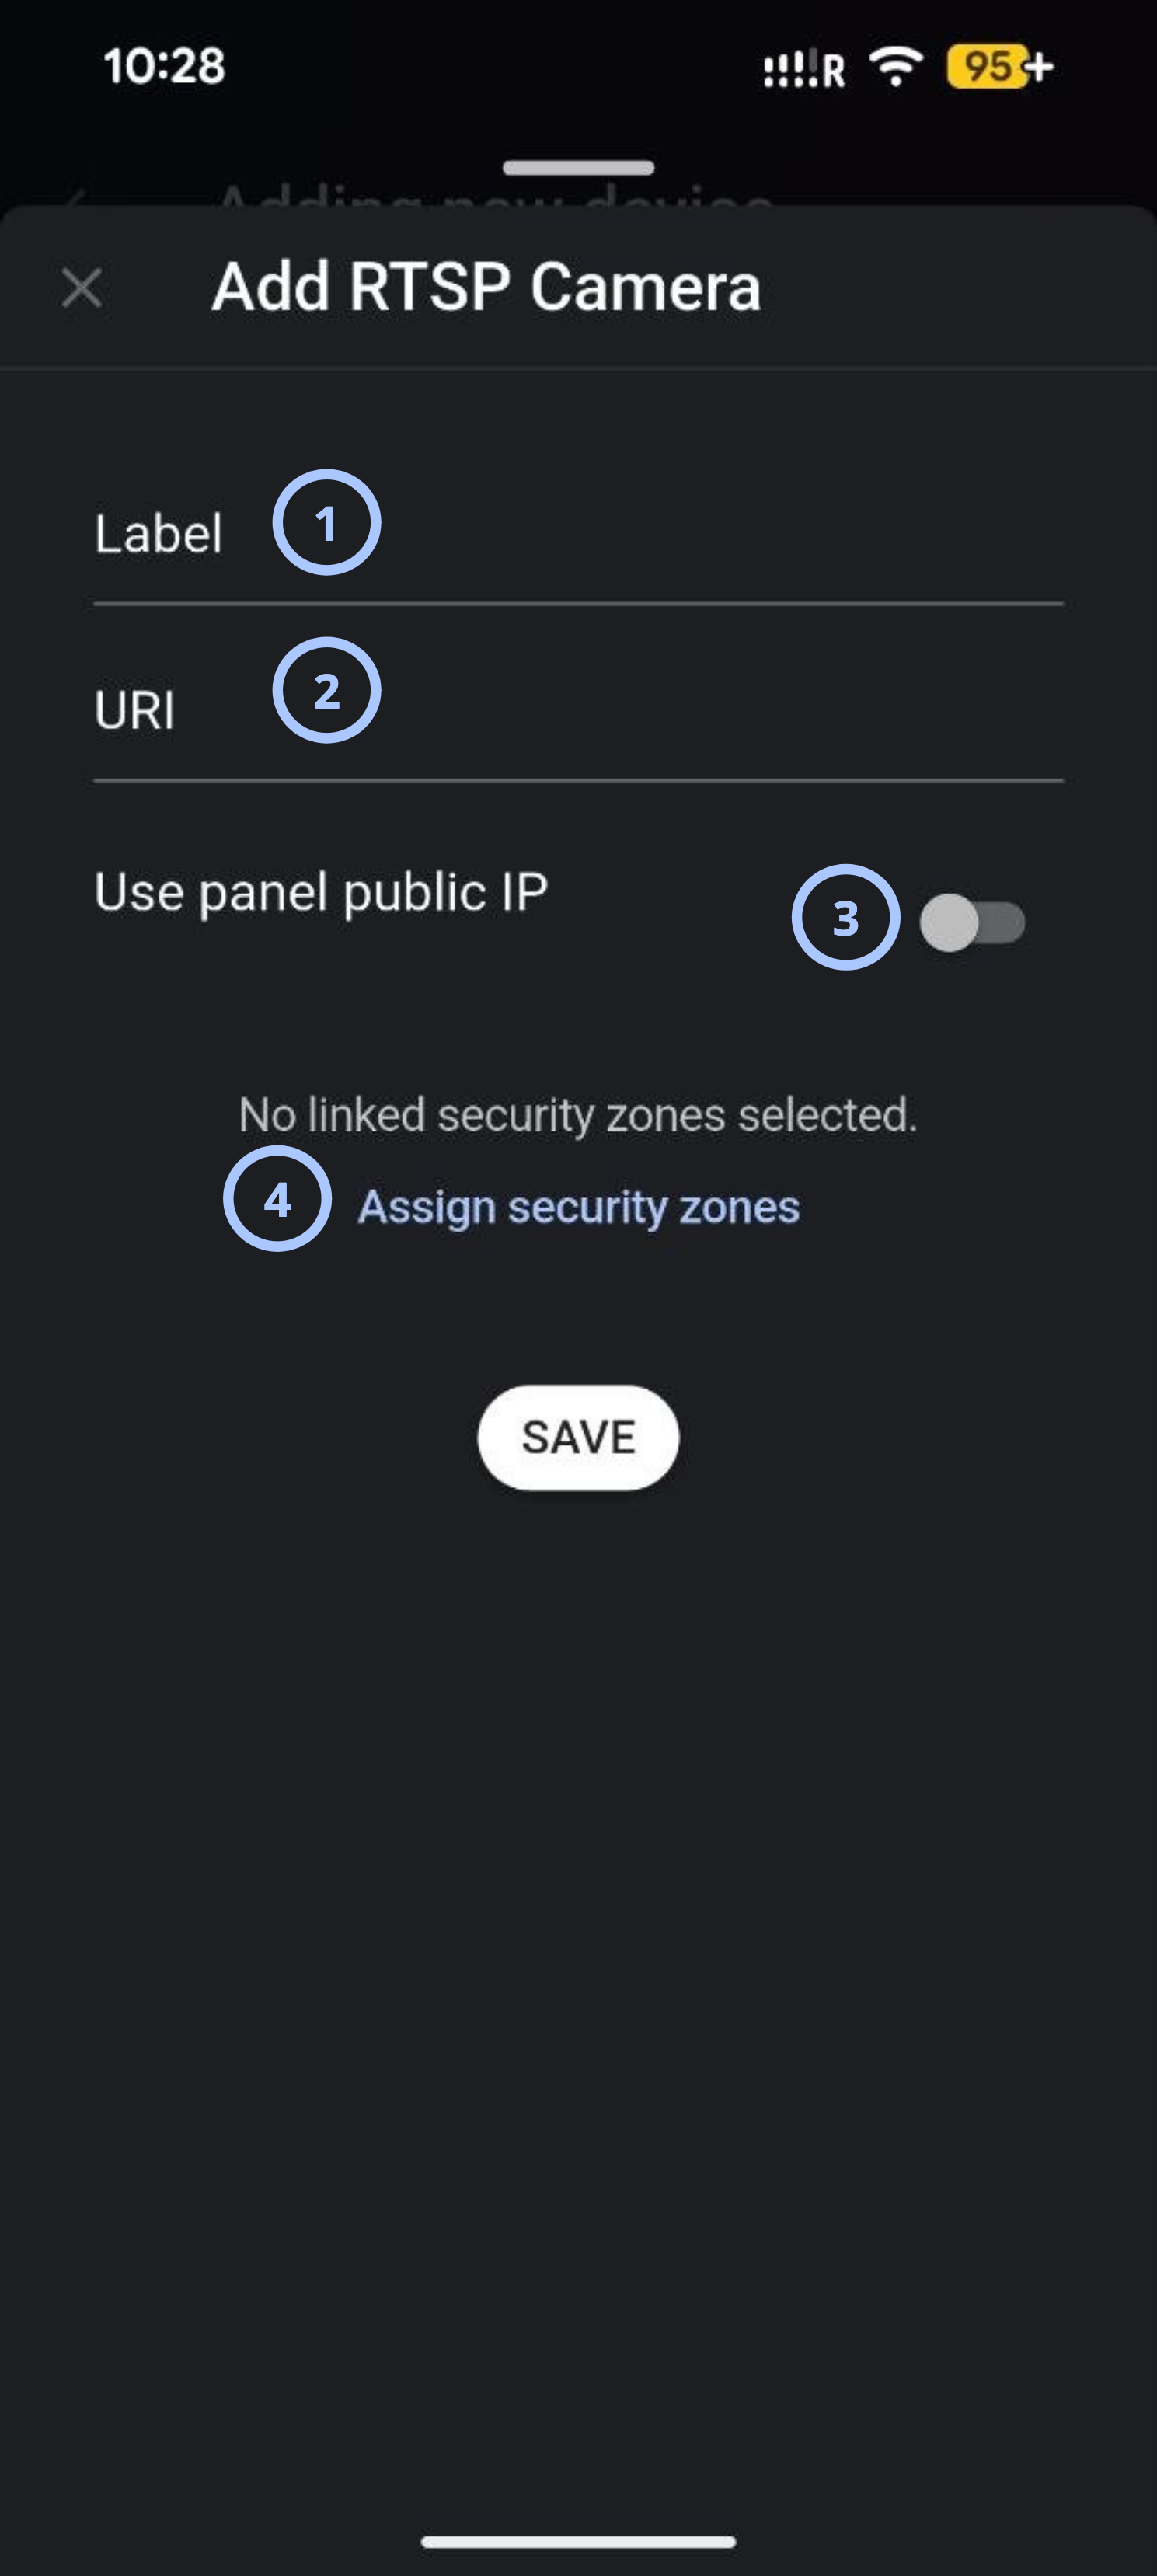
| Callout | UI element | Description | When to use |
|---|---|---|---|
| 1 | Label | Enters the camera label. | Use to name the camera. |
| 2 | URI | Enters the camera stream URI. | Use to connect the RTSP camera. |
| 3 | Use public IP | Routes the camera's RTSP stream through the site's public IP instead of its local IP , so the feed is reachable from outside the local network. | Use when the camera is accessed outside the local network. |
| 4 | Assign security zones | Selects the security zones to assign to the camera. | Use to assign the camera to one or more zones. |
Add ONVIF camera
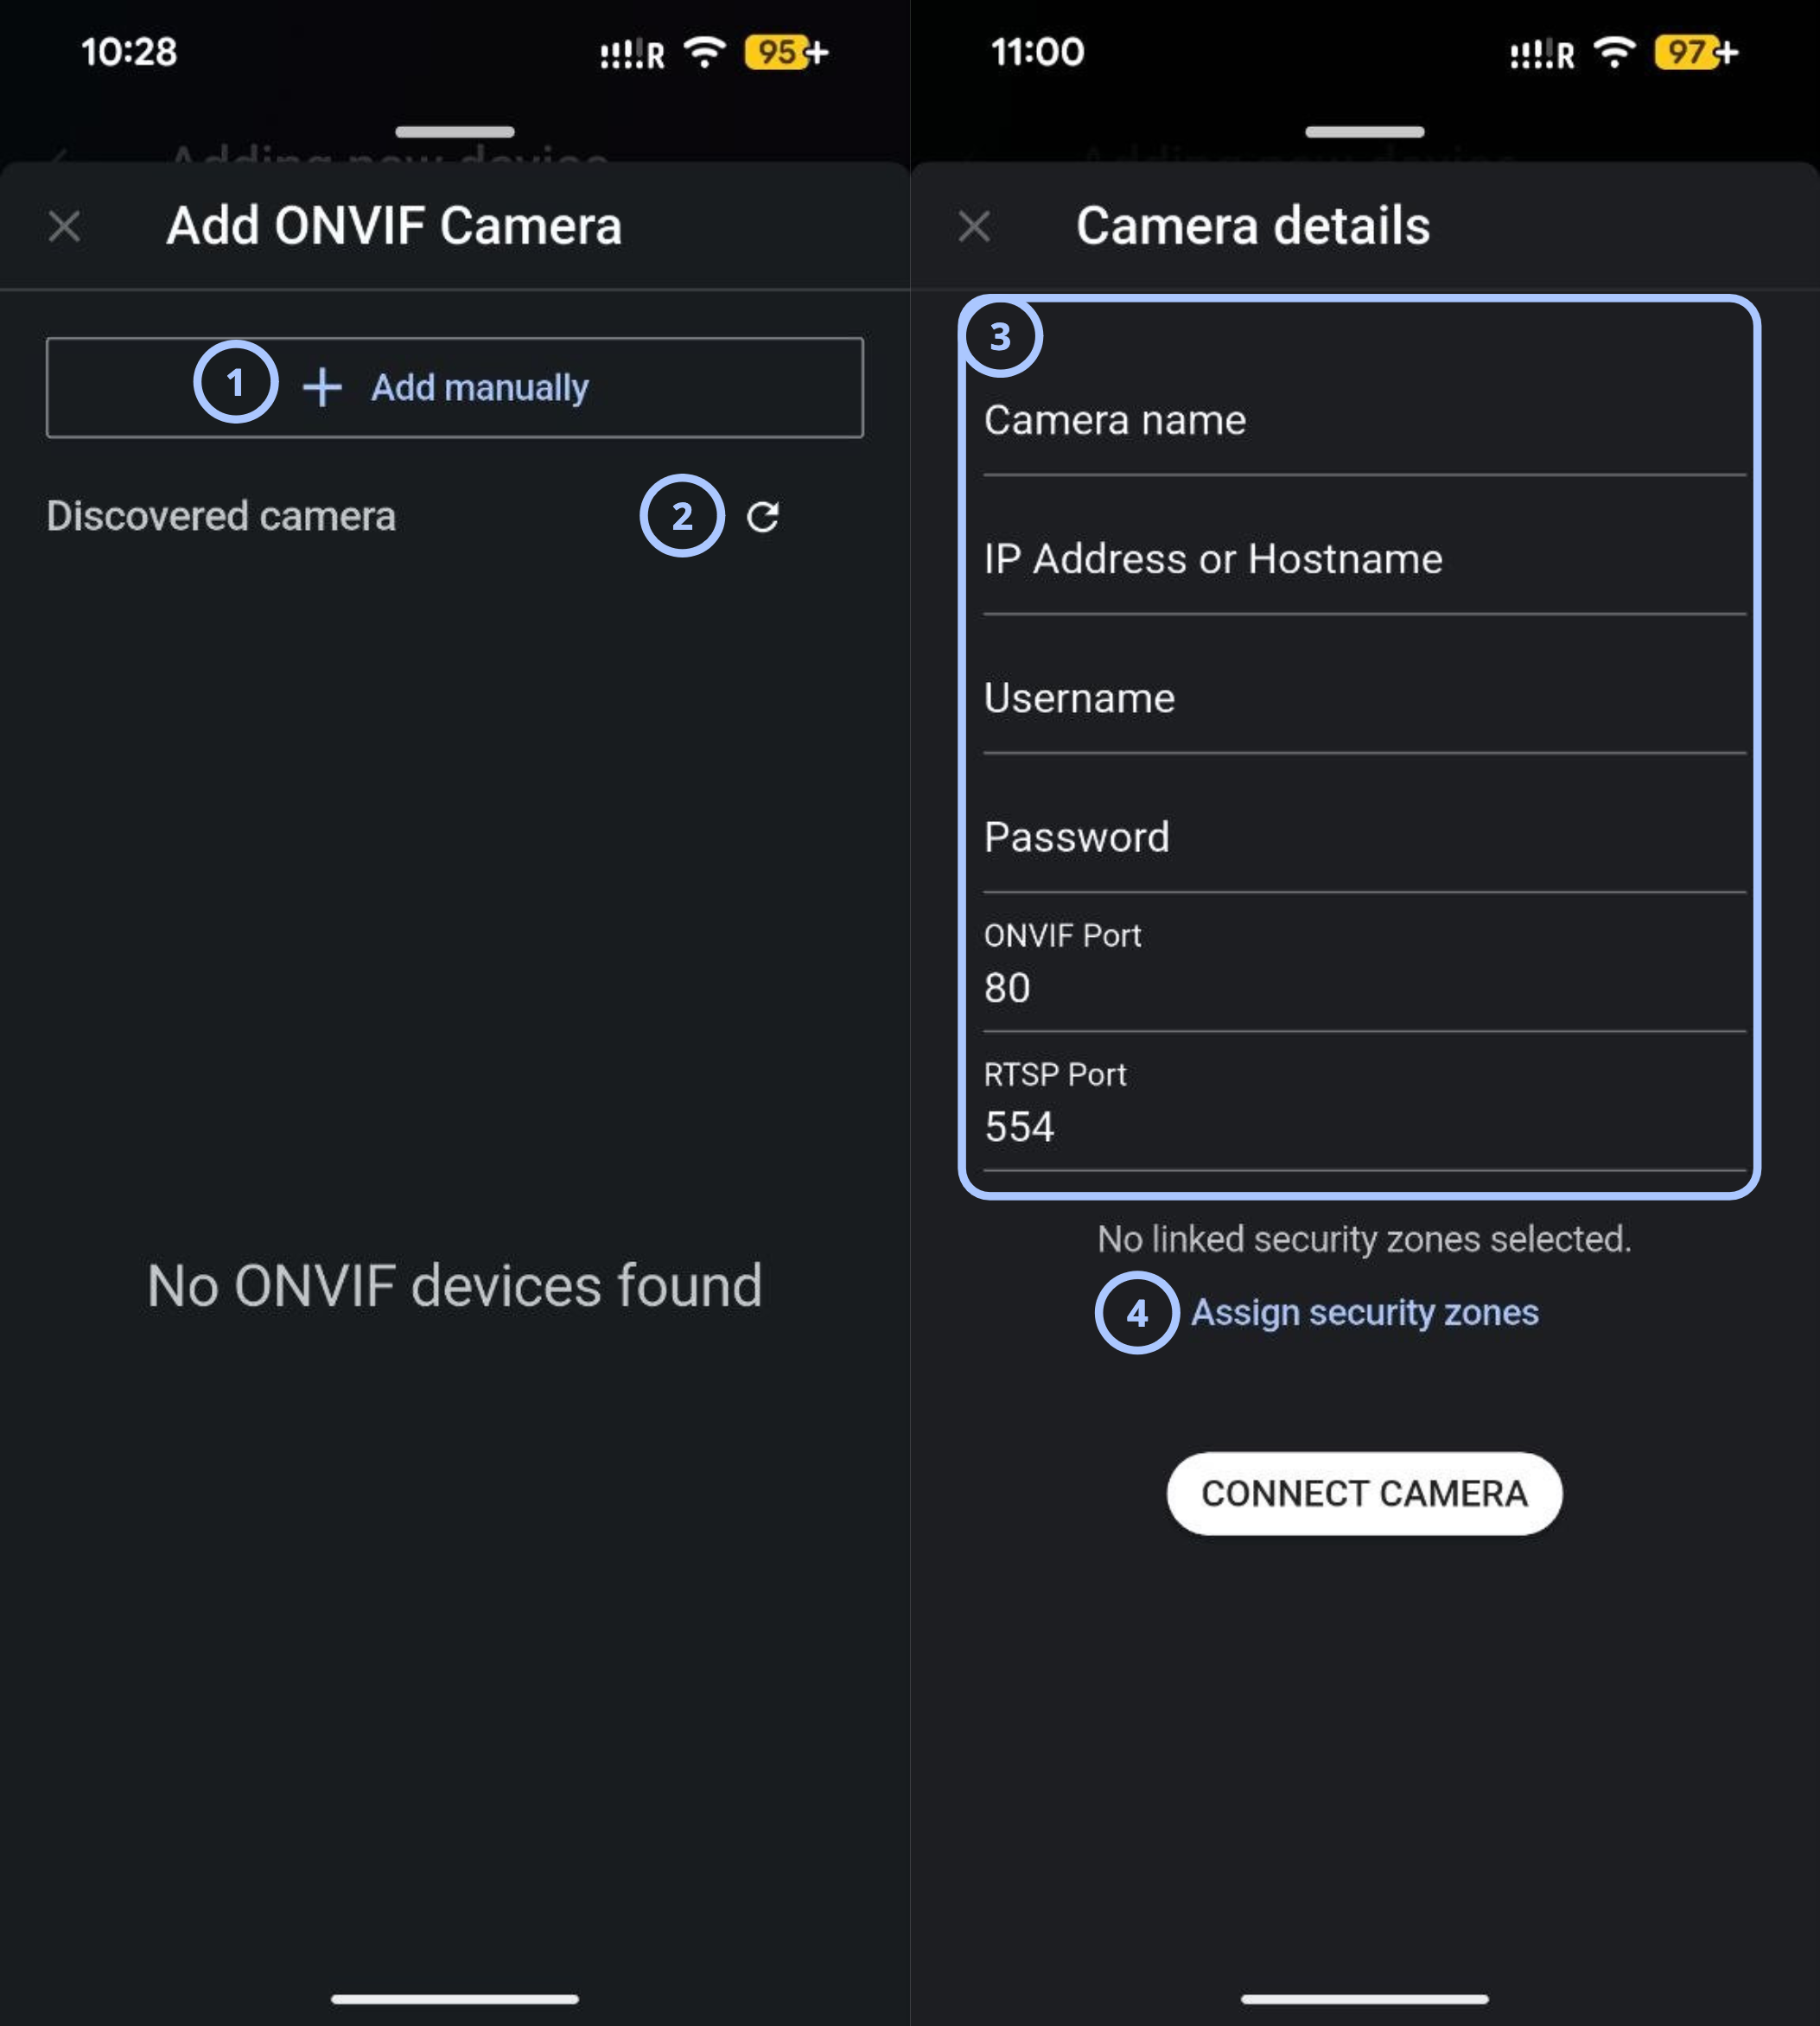
| Callout | UI element | Description | When to use |
|---|---|---|---|
| 1 | Add manually | Starts manual ONVIF camera entry. | Use when the camera is not discovered automatically. |
| 2 | Camera discover button | Use to search ONVIF cameras in network for enrollment. | Use to automatically find the ONVIF camera. |
| 3 | Camera details | Shows the information required for ONVIF enrollment, including the camera name, IP address or hostname, username, password, ONVIF port, and RTSP port. | Use to enter the required camera details. |
| 4 | Assign security zones | Selects the security zones to assign to the camera. | Use to assign the camera to one or more zones. |
Use public IP
Turning on Use public IP routes the camera's RTSP stream through the site's public (WAN) IP instead of its local IP, so the feed is reachable from outside the local network. This requires the site's router to forward the RTSP port (554 by default) to the camera's local IP — either manually or via UPnP; the public IP alone won't route traffic to a specific device behind the router. Because the stream becomes reachable from the internet once enabled, use a strong password on the camera.
Assign ONVIF/RTSP camera to security zones
Assigning a security zone links an ONVIF/RTSP camera to a specific zone (a motion, contact, or other sensor) in the alarm configuration. This tells the system which camera physically covers which sensor's area, so the two are treated as connected.
Use this when a camera's field of view covers one or more security zones — for example, a hallway motion sensor and a camera pointed at that hallway. It's especially useful on sites with multiple cameras and zones, where quickly identifying the right camera during an alarm would otherwise be difficult.
When an assigned zone triggers an alarm, the push notification sent to the client in ConnectAlarm includes a direct link to the corresponding camera's stream. Tapping the notification takes the user straight to the live video from the camera what was assigned to that zone.
How to use this page
View all devices
- Open the AlarmInstall app.
- Sign in to your account in remote mode.
- Select the Devices tab from the bottom navigation bar.
Add a PowerG security sensor
- Open the Devices tab.
- Select Add.
- Select PowerG security sensor enroll.
- On the Add device screen, enter the Enrollment ID.
- Select Zone field and choose zone of device.
- Select ENROLL.
Add an ONVIF camera
- From the same (internal) network
- From the outside (external) network
- Open the Devices tab.
- Select the Add button.
- Select ONVIF camera enroll.
- The app scans your local network.
- Select the camera you want to add.
- Complete the form by entering the camera name, username, and password.
- Open the Devices tab.
- Select the Add button.
- Select ONVIF camera enroll.
- Select Use panel public IP.
- Assign security zones if you want direct access from push notifications to cameras.
- Save changes.
You must configure your router, forward ports, and open the ONVIF port to the camera. ONVIF typically uses port 80, but this depends on your camera brand.
Check Conformant products - ONVIF for details about your camera or its manufacturer.
Add an RTSP camera
- From the same (internal) network
- From the outside (external) network
- Open the Devices tab.
- Select the Add button.
- Select RTSP camera enroll.
- Complete the form by entering the camera label and URI.
- Assign security zones if you want direct access from push notifications to cameras.
- Save changes.
- Open the Devices tab.
- Select the Add button.
- Select RTSP camera enroll.
- Complete the form by entering the camera label and URI.
- Turn on Use panel public IP.
- Assign security zones if you want direct access from push notifications to cameras.
- Save changes.
You must configure your router, forward ports, and open the RTSP port to the camera. RTSP typically uses port 554, but this depends on your camera brand.
Add a keyfob
- Open the Devices tab.
- Select the Add button.
- Select PowerG security sensor enroll.
- On the Add device screen, enter the Enrollment ID of keyfob.
- Choose the user who will own the keyfob.
- Select ENROLL.
Tips
- Use Only trouble devices before changing device settings. This focuses on devices that need attention.
- Check the connection status before adding or editing devices.
- Use the scan icon for device enrollment when available. Scanning reduces enrollment ID entry errors.
- Run discovery before reviewing devices if the panel hardware, modules, or enrolled devices have recently changed.
- Use Refresh RSSI to check the current and average signal strength of PowerG and PowerG+ devices.
- During Autolearn, verify the detected device model and enrollment ID before adding the device.
- Before adding an RTSP or ONVIF camera, verify the camera credentials, URLs, stream link, ports, network routing, and zone associations.
- Associate cameras with the relevant zones so users can identify video related to alarm activity.
- Review parent and child relationships before removing a module or device.
Troubleshooting
| Problem | Possible cause | What to try |
|---|---|---|
| The Devices tab does not show expected devices |
|
|
| The scan icon does not work |
|
|
| Enrollment does not finish when adding a device |
|
|
| ENROLL is disabled, or nothing happens after selecting it |
|
|
| The device is reported as already enrolled |
|
|
| No ONVIF cameras appear under Discovered camera |
|
|
| Adding an RTSP or ONVIF camera fails (SAVE or CONNECT CAMERA does not complete) |
|
|
| Configuration settings cannot be changed |
|
|
| Configuration changes do not save |
|
|