Home Automation
Overview
Use the Home Automation screen in ConnectAlarm to create and manage automation rules for a security panel. A rule can run one or more actions when its trigger occurs and its conditions are met.
You can:
- Review active and inactive automation rules.
- Create or edit an automation rule.
- Enable or disable a rule.
- Delete a rule.
- Configure rule triggers, conditions, and actions.
For example, a rule can run every day at a configured time, change the panel state, or control a connected automation device.
Before you begin
- Sign in to ConnectAlarm.
- Open the required security panel.
- Confirm that the panel and required devices are available.
- Confirm that a network connection is available before you save, update, disable, or delete a rule.
Available triggers, conditions, and actions depend on supported panel features, connected devices, system configuration, and permissions. Device actions require communication between the PowerManage server, panel, and target device.
- A rule does not run when it is disabled or when its required conditions are not met.
- An action can fail when the panel is disconnected or the target device is offline.
- Deleting a rule removes it from the list. An undo option is not available.
- A rule can include up to 20 actions.
Screen layout
The Home Automation workflow includes the Home Automation rule list, New automation screen, and Edit automation screen.
Home Automation rule list
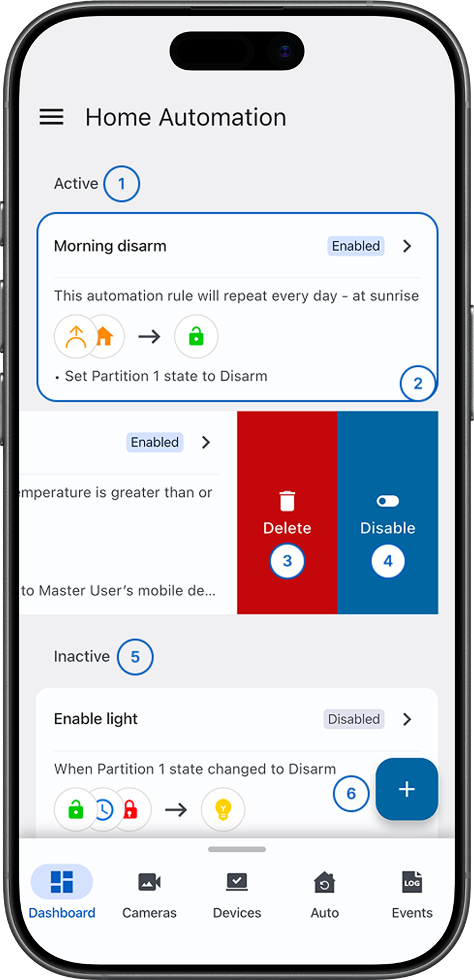
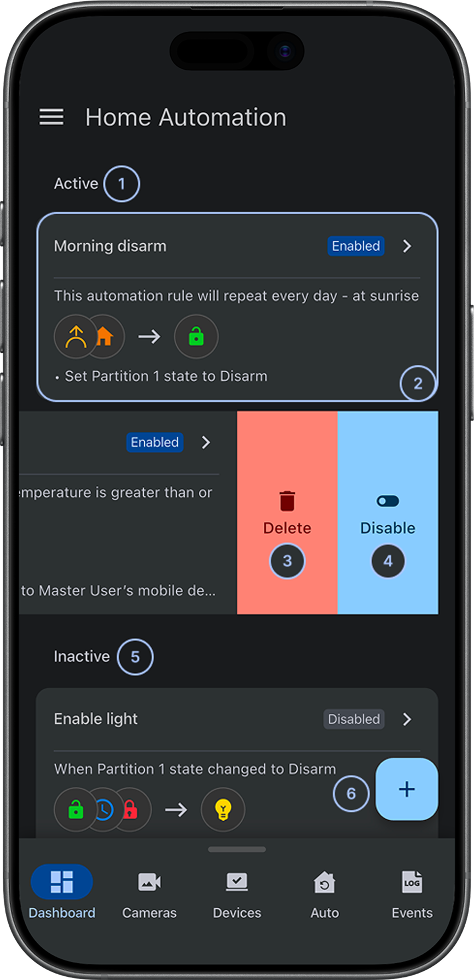
- Active sectionLists rules that are currently enabled. Rules in this section can run when their triggers occur and their conditions are met.
- Rule rowShows an automation rule with its name, trigger and action icons, summary text. Select a rule row to open it for editing.
 DeleteDeletes the selected automation rule. This action appears after you swipe a rule row.
 DisableDisables the selected automation rule. This action appears after you swipe an active rule row.
- Inactive sectionLists rules that are currently disabled. Rules in this section remain configured but do not run while inactive.
 AddOpens the New automation screen. Use it to create a new automation rule.
New automation screen
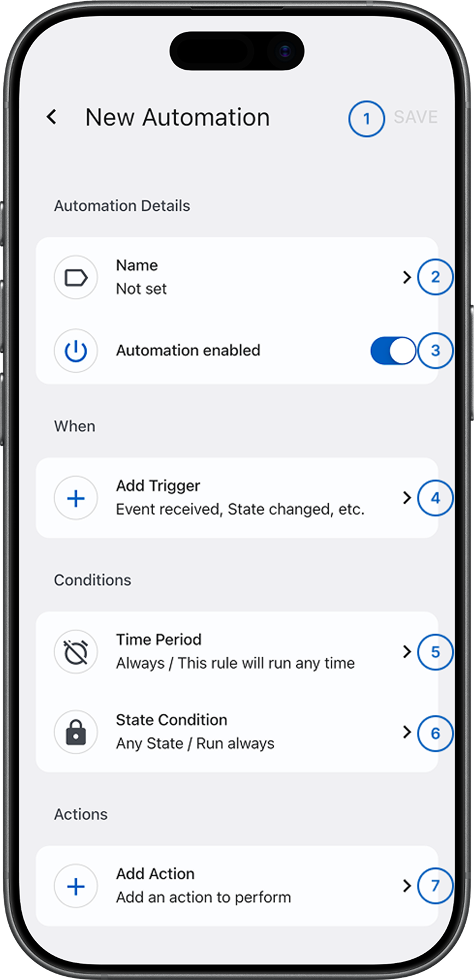
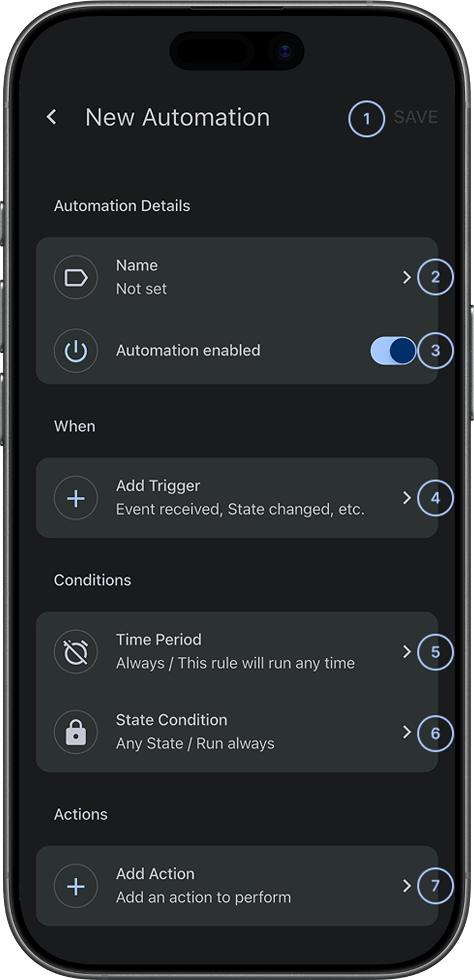
- SaveSaves the new automation rule.
- NameDefines the automation rule name.
- Automation enabledControls whether the rule is active.
- Add TriggerAdds the trigger that starts the rule.
- Time PeriodDefines the time condition for the rule.
- State ConditionDefines the panel-state condition for the rule.
- Add ActionAdds an action that the rule performs.
Edit automation screen
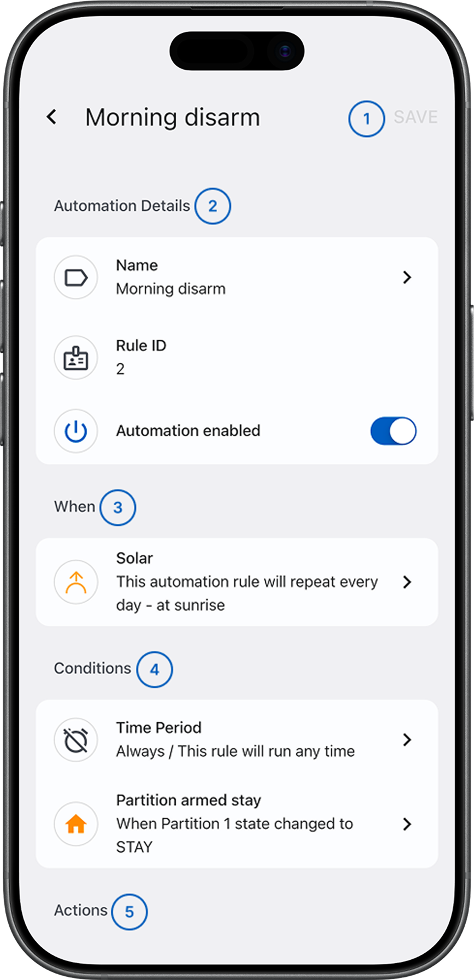
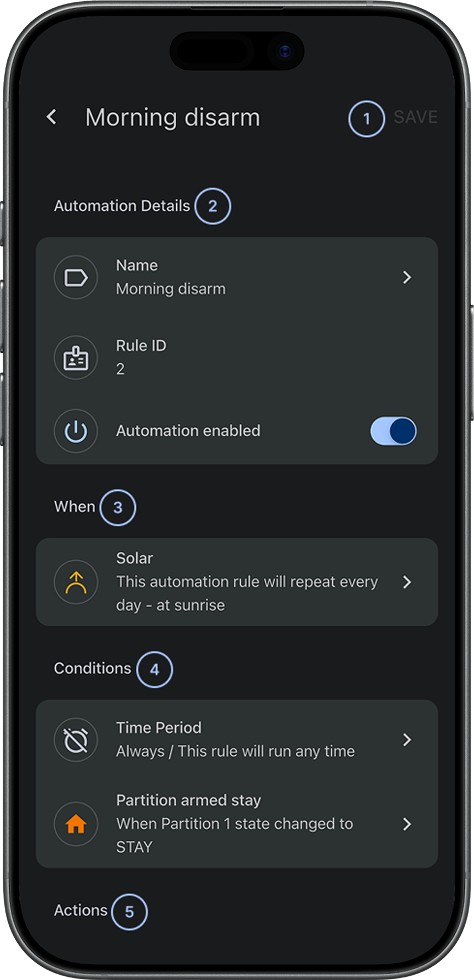
- SaveSaves changes to the rule.
- Automation Details sectionShows Name, Rule ID, and the Automation Enabled toggle. Rule ID is read-only.
- When sectionShows the rule trigger. You can edit the current trigger, but you cannot set or add a new trigger.
- Conditions sectionShows the rule conditions. You can edit the current conditions, but you cannot set or add a new condition.
- Actions sectionShows the rule actions. You can edit current actions and add a new action.
Triggers, conditions, and actions
When
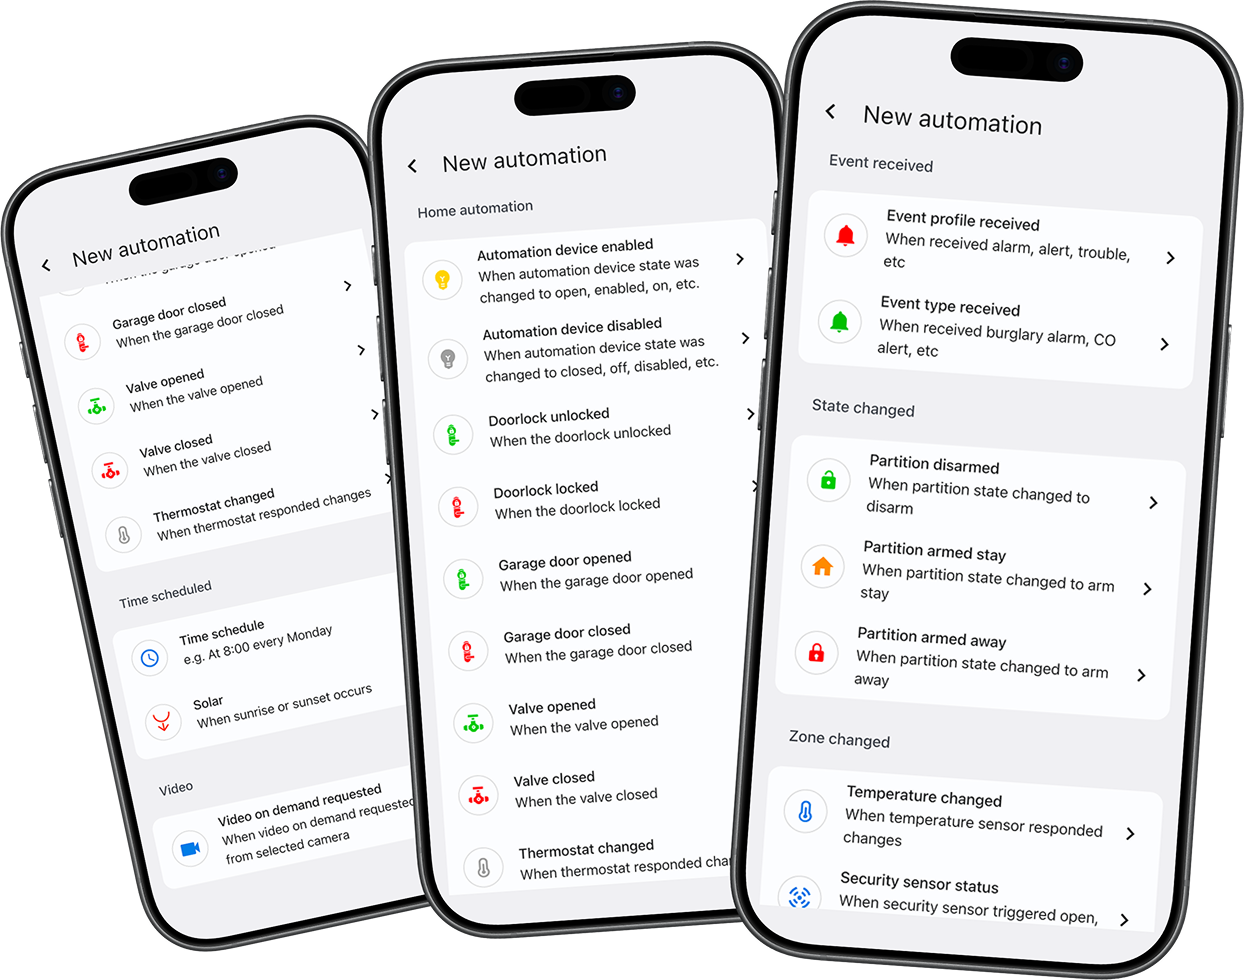
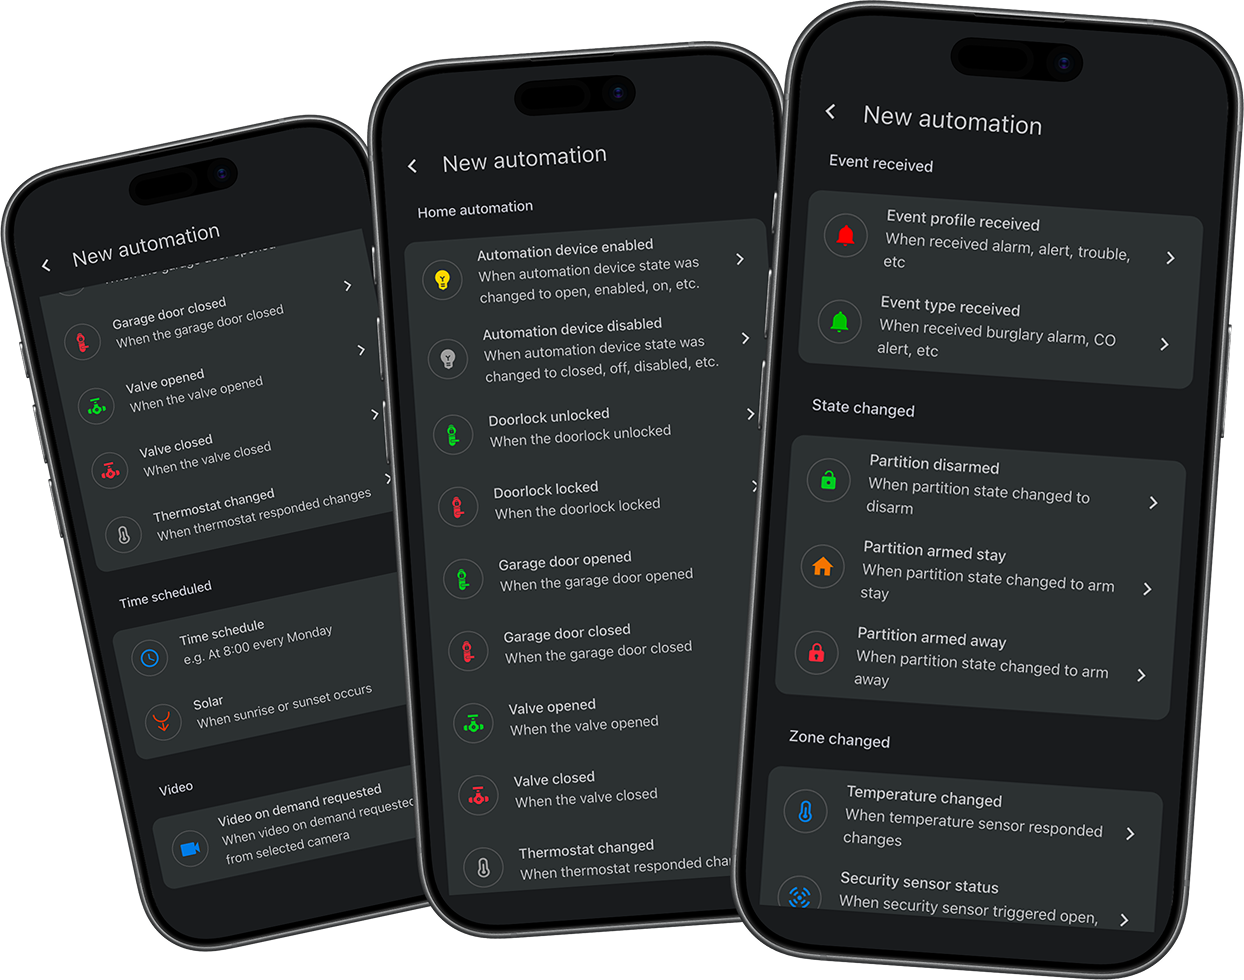
The When section defines the trigger that starts the rule. Select Add Trigger to choose one of the available triggers.
Event received
- Event profile receivedStarts the rule when an event profile, such as an alarm, alert, or trouble event, is received.
- Event type receivedStarts the rule when a specific event type, such as a burglary alarm or carbon monoxide alert, is received.
State changed
- Partition disarmedStarts the rule when the partition state changes to disarmed.
- Partition armed stayStarts the rule when the partition state changes to armed stay.
- Partition armed awayStarts the rule when the partition state changes to armed away.
Zone changed
- Temperature changedStarts the rule when a temperature sensor reports a change.
- Security sensor statusStarts the rule when a security sensor reports a status such as open, closed, active, or presence detected.
Home automation
- Automation device enabledStarts the rule when an automation device changes to a state such as open, enabled, or on.
- Automation device disabledStarts the rule when an automation device changes to a state such as closed, disabled, or off.
- Door lock unlockedStarts the rule when the door lock is unlocked.
- Door lock lockedStarts the rule when the door lock is locked.
- Garage door openedStarts the rule when the garage door is opened.
- Garage door closedStarts the rule when the garage door is closed.
- Valve openedStarts the rule when the valve is opened.
- Valve closedStarts the rule when the valve is closed.
- Thermostat changedStarts the rule when the thermostat reports a change.
Time scheduled
- Time scheduleStarts the rule at the configured time and recurrence, for example, at 8:00 every Monday.
- SolarStarts the rule at the sunset/sunrise, can include time offset and can be repeatable, for example, every week on Sunday, Tuesday - at sunrise.
Video
- Video on demand requestedStarts the rule when video on demand is requested from the selected camera.
Use this section to choose when the rule starts.
Conditions
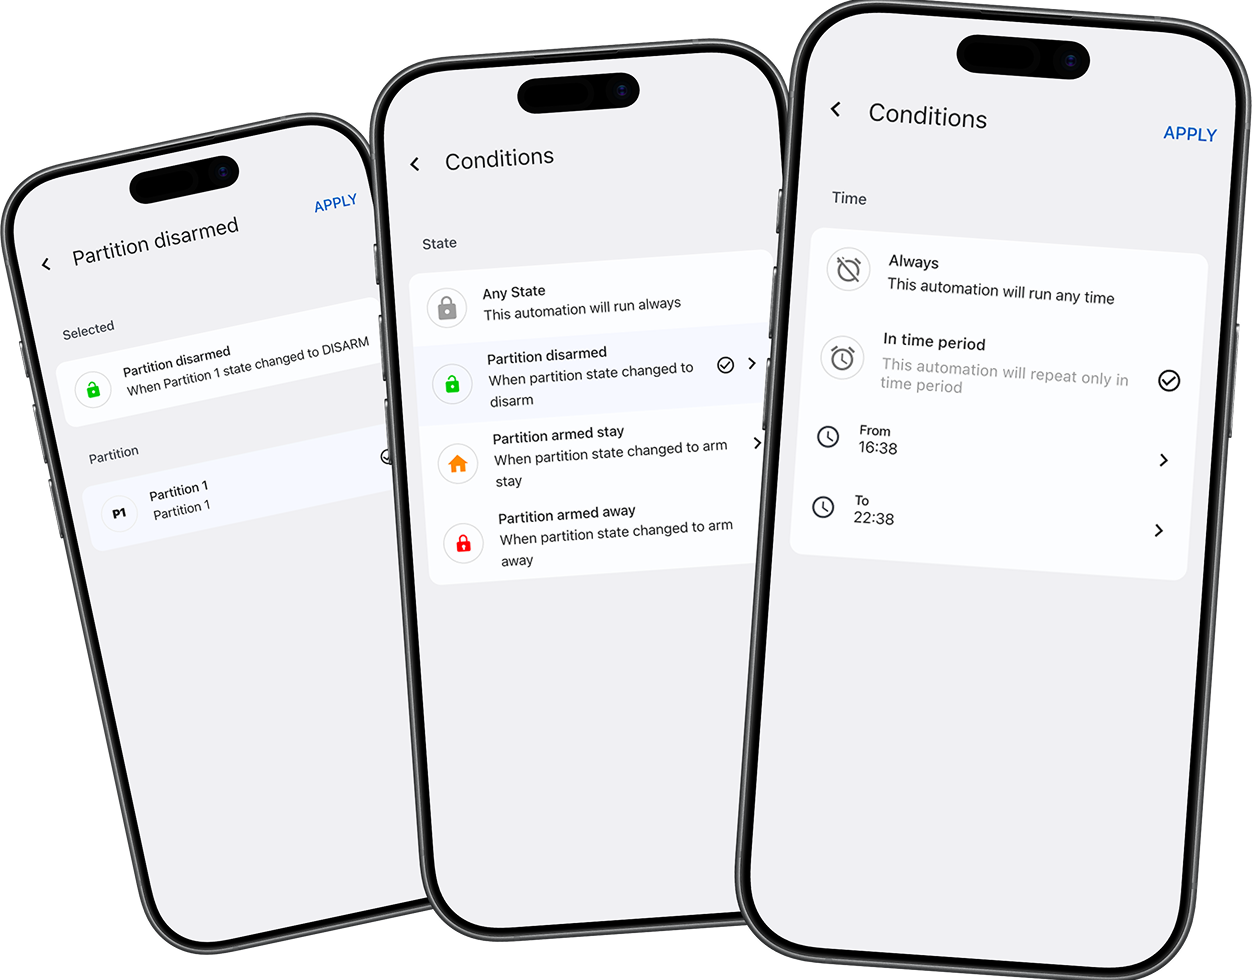
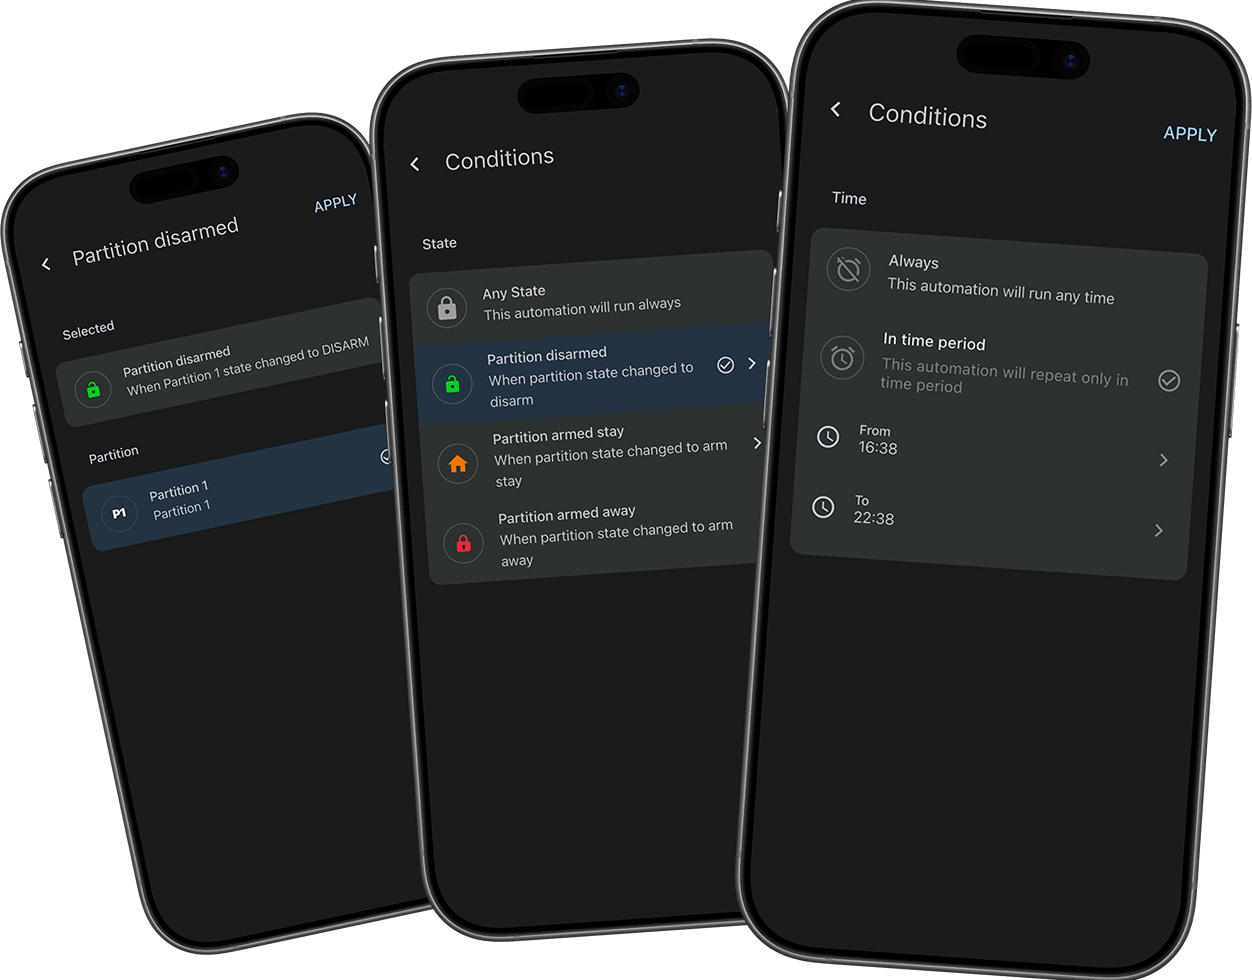
The Conditions section defines requirements that must be true before the rule can run.
- AlwaysAllows the rule to run at any time.
- Any StateAllows the automation to run in any panel state.
Select Time Period or State Condition to configure restrictions for when the rule can run.
Actions
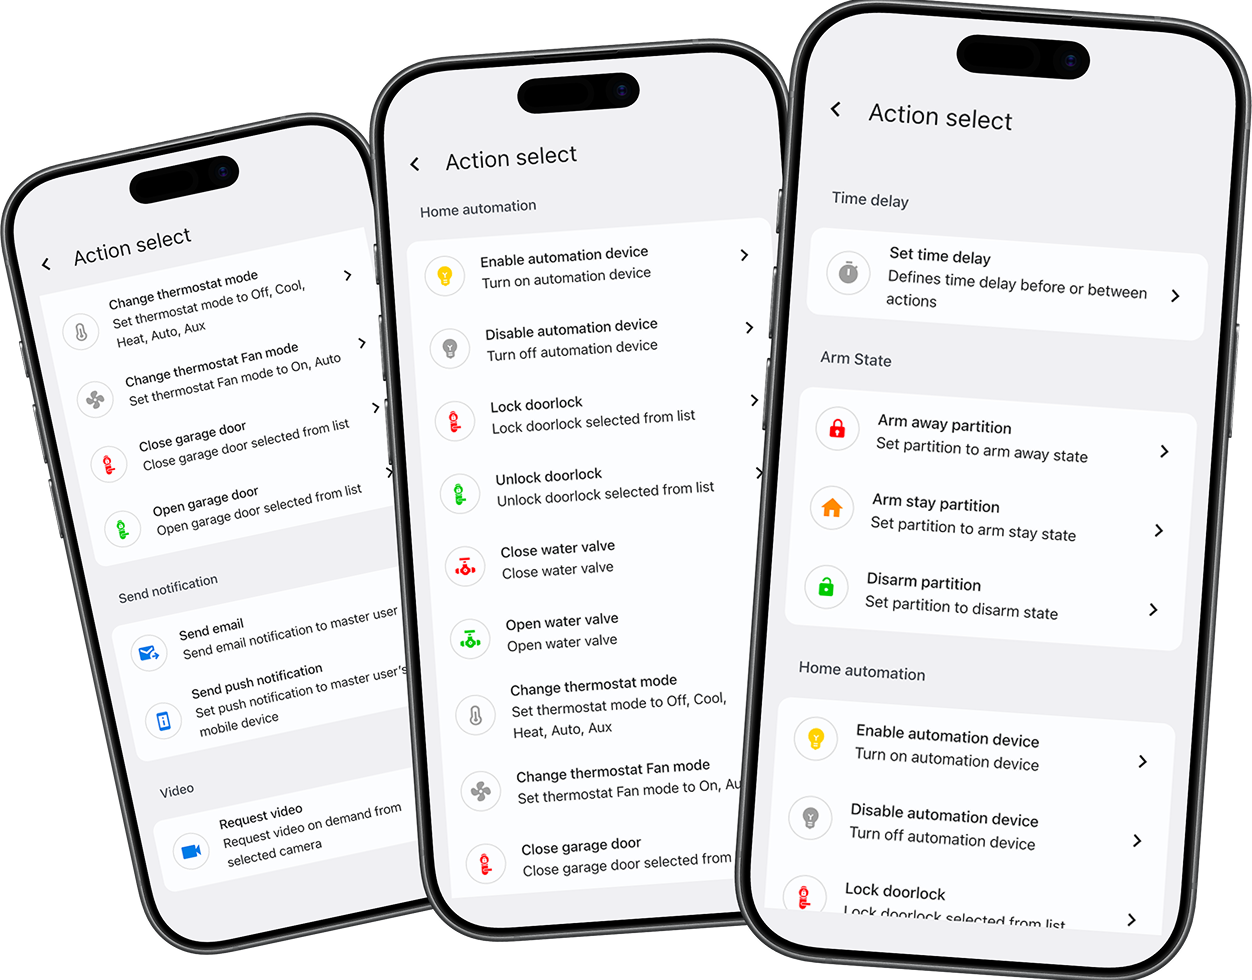
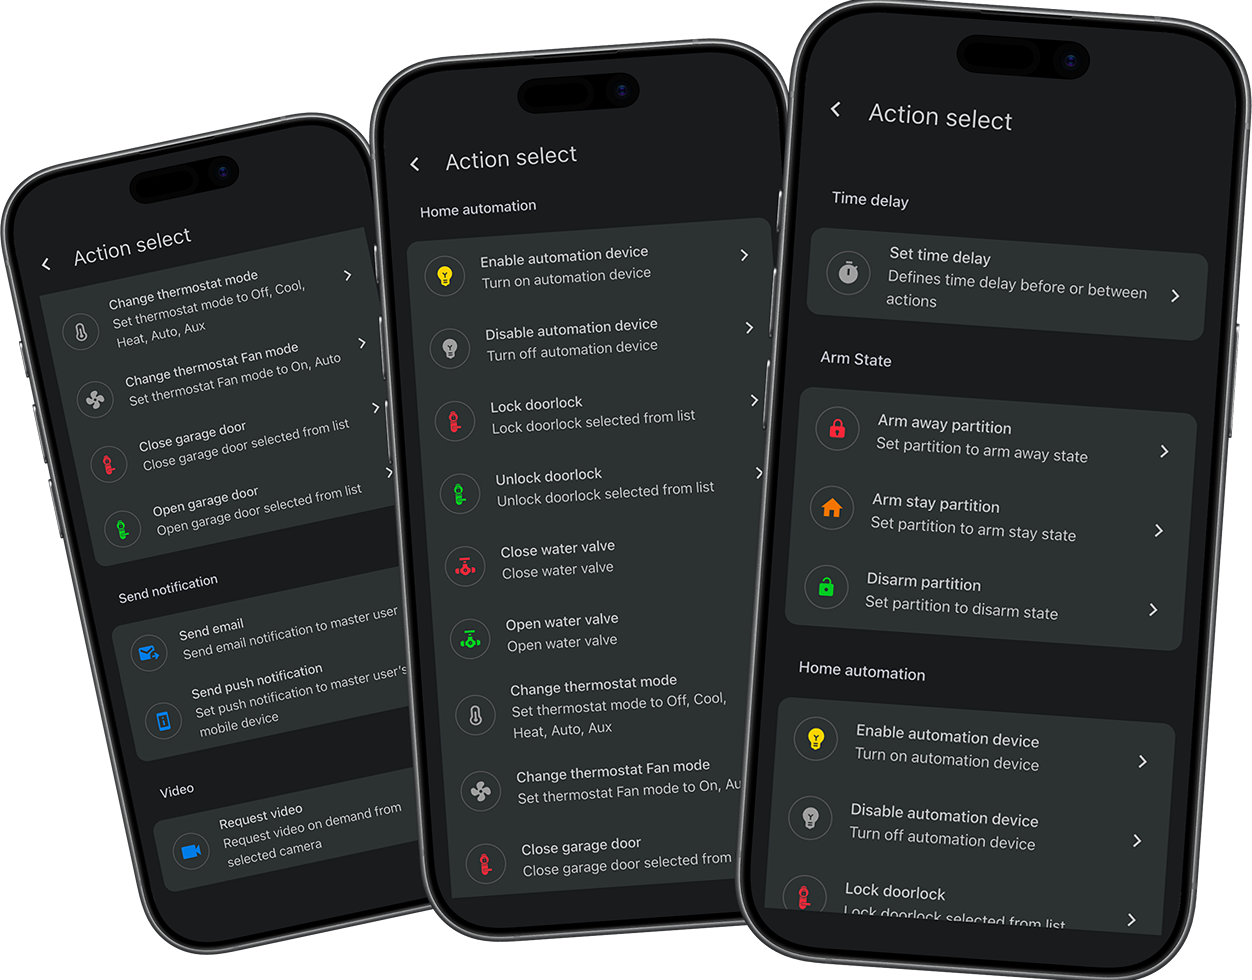
The Actions section defines the actions that the rule performs. Select Add Action to add one or more actions.
Time delay
- Set time delayDefines a time delay before or between actions.
Arm state
- Arm away partitionSets the partition to the arm away state.
- Arm stay partitionSets the partition to the arm stay state.
- Disarm partitionSets the partition to the disarmed state.
Home automation
- Enable automation deviceTurns on the selected automation device.
- Disable automation deviceTurns off the selected automation device.
- Enable outputTurns on the selected PGM.
- Disable outputTurns off the selected PGM.
- Lock door lockLocks the door lock selected from the list.
- Unlock door lockUnlocks the door lock selected from the list.
- Close water valveCloses the selected water valve.
- Open water valveOpens the selected water valve.
- Change thermostat modeSets the thermostat mode to Off, Cool, Heat, Auto, or Aux.
- Change thermostat fan modeSets the thermostat fan mode to On or Auto.
- Close garage doorCloses the selected garage door.
- Open garage doorOpens the selected garage door.
Send notifications
- Send emailSends an email notification to the master user.
- Send push notificationSends a push notification to the master user's mobile device.
Video
- Request videoRequests video on demand from the selected camera.
Use this section to add one or more actions.
A rule can include up to 20 actions.
Common scenarios
Open Home Automation
- Open ConnectAlarm.
- Sign in to your account.
- Open the required security panel.
- Open the
 menu.
menu. - Select Home Automation.
The Home Automation rule list appears.
Create a new automation rule
- Open Home Automation.
- Select Add.
- In Name, enter a rule name.
- Set Automation enabled to on or off.
- Select Add Trigger.
- Choose and configure the trigger.
- Configure Time Period or State Condition when required.
- Select Add Action.
- Choose and configure one or more actions.
- Select Save.
The rule appears in the Active section or Inactive section, depending on the Automation enabled setting.
Edit an automation rule
- Open Home Automation.
- Select the rule row that you want to edit.
- In Automation Details, update Name or Automation Enabled, when required.
- Review the read-only Rule ID.
- In When, edit the current trigger when required.
- In Conditions, edit the current conditions when required.
- In Actions, edit current actions or add a new action.
- Select Save.
The updated rule appears in the rule list.
On the Edit automation screen, you cannot set or add a new trigger or condition.
Disable an automation rule
- Open Home Automation.
- Find the rule in the Active section.
- Swipe the rule row to show the available actions.
- Select Disable.
The rule moves to the Inactive section and does not run while inactive.
Delete an automation rule
- Open Home Automation.
- Find the rule that you want to delete.
- Swipe the rule row to show the available actions.
- Select Delete.
- Confirm the deletion.
The rule is removed from the rule list.
Delete a rule only when it is no longer required.
Tips
- Use rule names that describe the result, such as Morning disarm or Enable light at evening.
- Review When, Conditions, and Actions before you select Save.
- Disable a rule when you might need it again. Delete a rule only when it is no longer required.
- Use conditions to prevent rules from running at the wrong time or in the wrong panel state.
- Keep rules focused. If a rule needs many actions, consider whether separate rules would be easier to manage.
Troubleshooting
A rule does not run
Possible causes:
- The rule is disabled.
- The trigger did not occur.
- One or more conditions were not met.
- The panel or target device is offline.
What to try:
- Confirm that the rule appears in the Active section.
- Open the rule and review its trigger.
- Review Time Period and State Condition.
- Review the configured actions.
- Confirm that the panel and target devices are online.
- Select Save after you make any changes.
A rule runs at the wrong time
Possible causes:
- The time schedule is configured incorrectly.
- The rule uses a different trigger than expected.
- The conditions are too broad.
What to try:
- Open the rule.
- Review the configured trigger.
- Review Conditions.
- Update the rule as required.
- Select Save.
An expected trigger, condition, or action is missing
Possible causes:
- The related device or partition is not configured.
- The panel does not support the option.
- The latest panel configuration is not available in the app.
What to try:
- Confirm that the related device or partition is configured.
- Confirm that you opened the correct panel.
- Check the panel connection.
- If the option remains unavailable, contact your administrator or installer.
Save is not available
Possible causes:
- The rule name is missing.
- A trigger has not been configured.
- An action has not been configured.
- A displayed rule setting is incomplete.
What to try:
- Complete Name.
- Configure Add Trigger.
- Review Conditions.
- Configure at least one action in Actions.
- Review all displayed settings.
- Select Save.
A disabled rule still appears
Disabling a rule does not delete it. The rule remains configured in the Inactive section.
What to try:
- Check the Inactive section.
- Open the rule and confirm that Automation enabled is off.
- Delete the rule only when it is no longer required.