Manage devices
Overview
Use the  Devices screen in ConnectAlarm to review and manage devices connected to your security panel. You can filter the list, review device status, rename supported devices, bypass supported zones, and add keyfobs or cameras.
Before you begin
- Sign in to ConnectAlarm.
- Open the required panel.
- Confirm that the security panel is connected to PowerManage before you perform an action that requires live communication.
- Confirm that the device is configured and ready for enrollment.
Bypass a zone only when site procedures allow it. While bypassed, the zone doesn't participate in normal monitoring.
Device categories and available actions depend on the panel configuration, your permissions, and installer settings.
Screen layout
The device workflow includes the Devices screen, which has filters, and the Add device screen.
Devices screen and filters
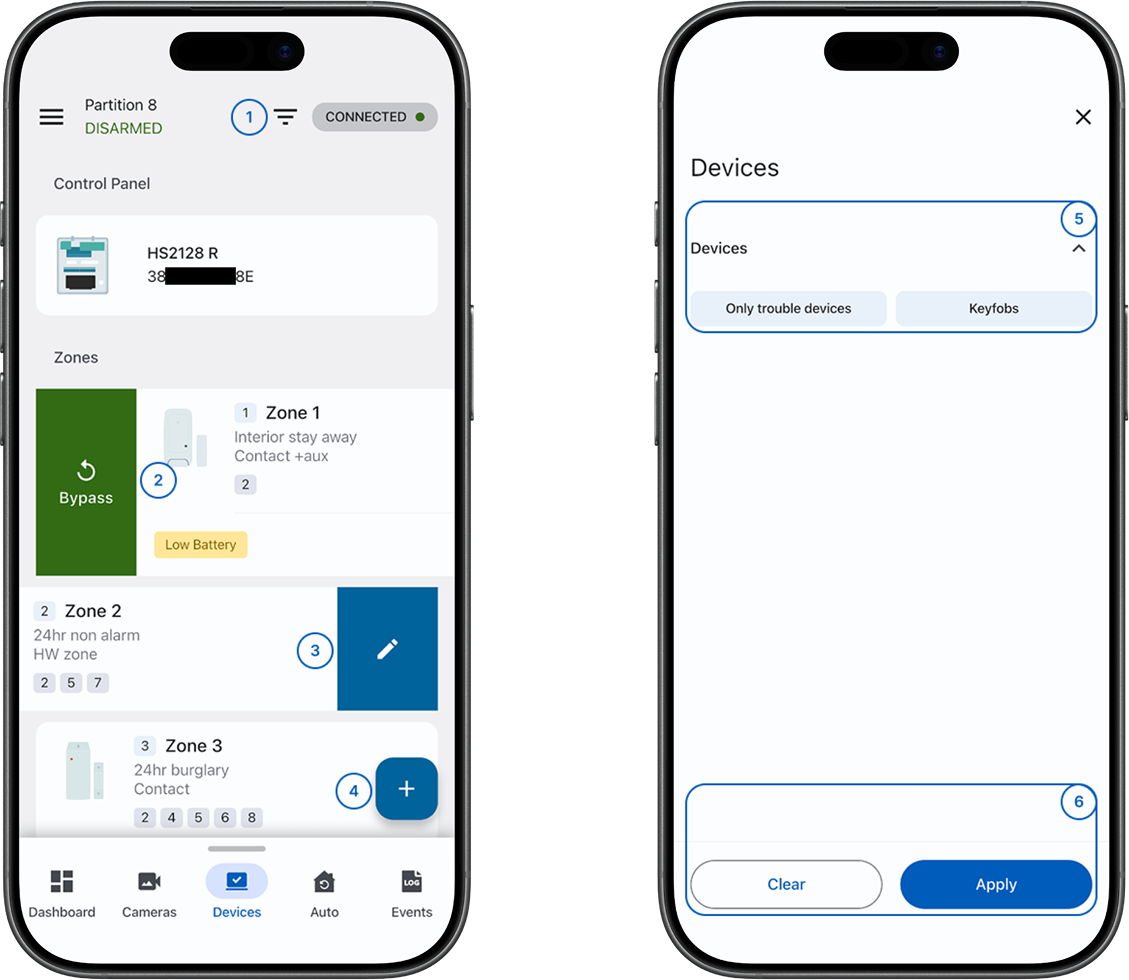
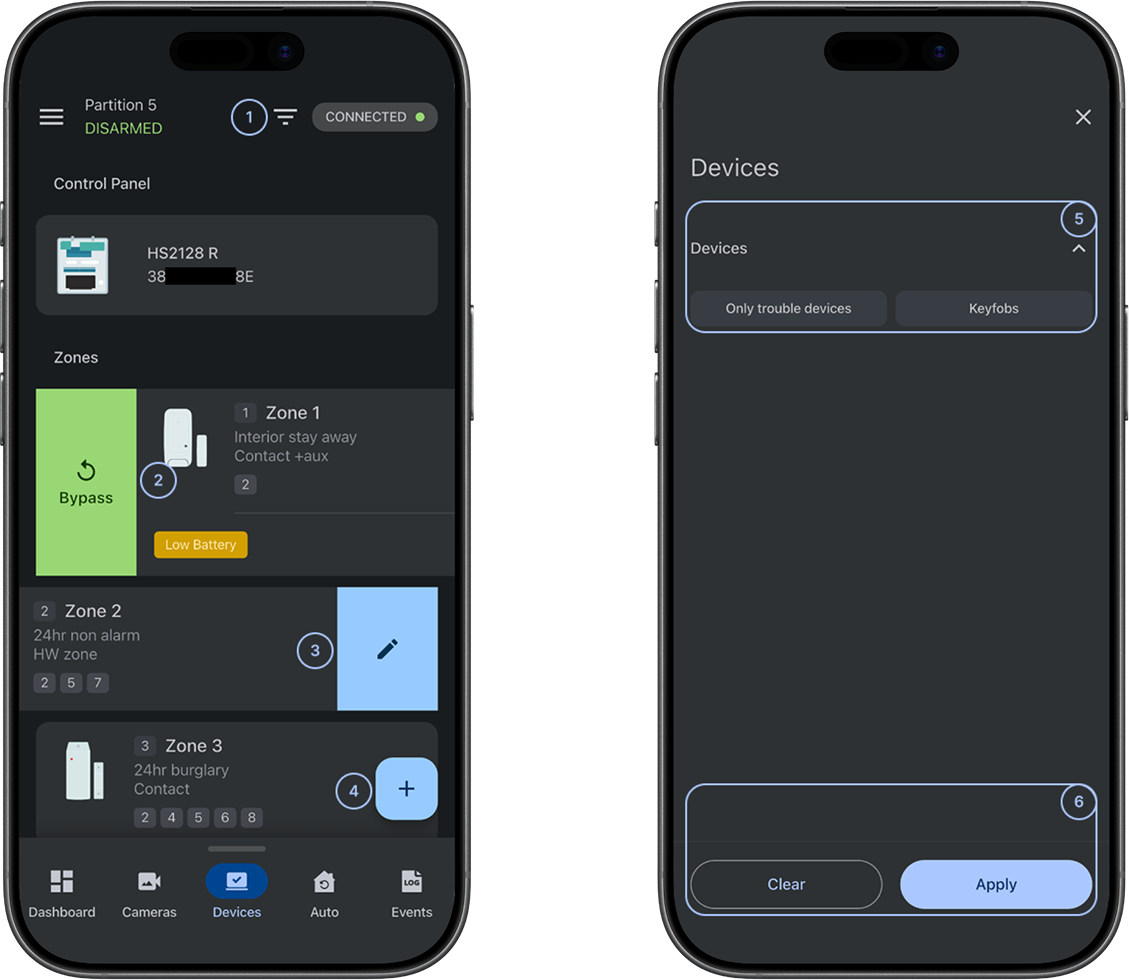
 Device filtersOpens the Filters screen.
 BypassAppears when you swipe right on a supported zone and temporarily excludes the zone from normal monitoring.
 EditAppears when you swipe left on a supported device or zone and opens the name-editing screen.
 AddOpens Adding new device and starts the workflow for adding a supported device.
- FiltersShows available filters.
- Clear and ApplyClear removes the selected filters. Apply applies the selected filters to the device list.
Control panel section
The Control panel section shows the connected panel and its current status.
If the panel shows an alarm or trouble status, follow your site's response procedures before you change device settings.
Zones section
The Zones section shows configured zones and detectors. Swipe right on a supported zone to display Bypass. Swipe left to display Rename.
Modules section
The Modules section shows enrolled panel modules. Swipe left to display Rename.
Accessories section
The Accessories section shows supported accessory devices connected to the panel. Swipe left to display Rename for supported accessories, and Edit or Remove for keyfobs.
Extenders section
The Extenders section shows enrolled extenders. Swipe left to display Rename.
Sirens section
The Sirens section shows enrolled indoor and outdoor sirens. Swipe left to display Rename.
Outputs section
The Outputs section shows configured programmable outputs. Swipe left to display Rename.
Wi-Fi cameras section
The Wi-Fi cameras section shows enrolled Wi-Fi cameras such as RTSP or ONVIF cameras. Swipe left to display Rename, Edit, or Remove.
Home automation devices section
The Home automation devices section shows supported automation devices available for control. Swipe left to display Rename.
Add device
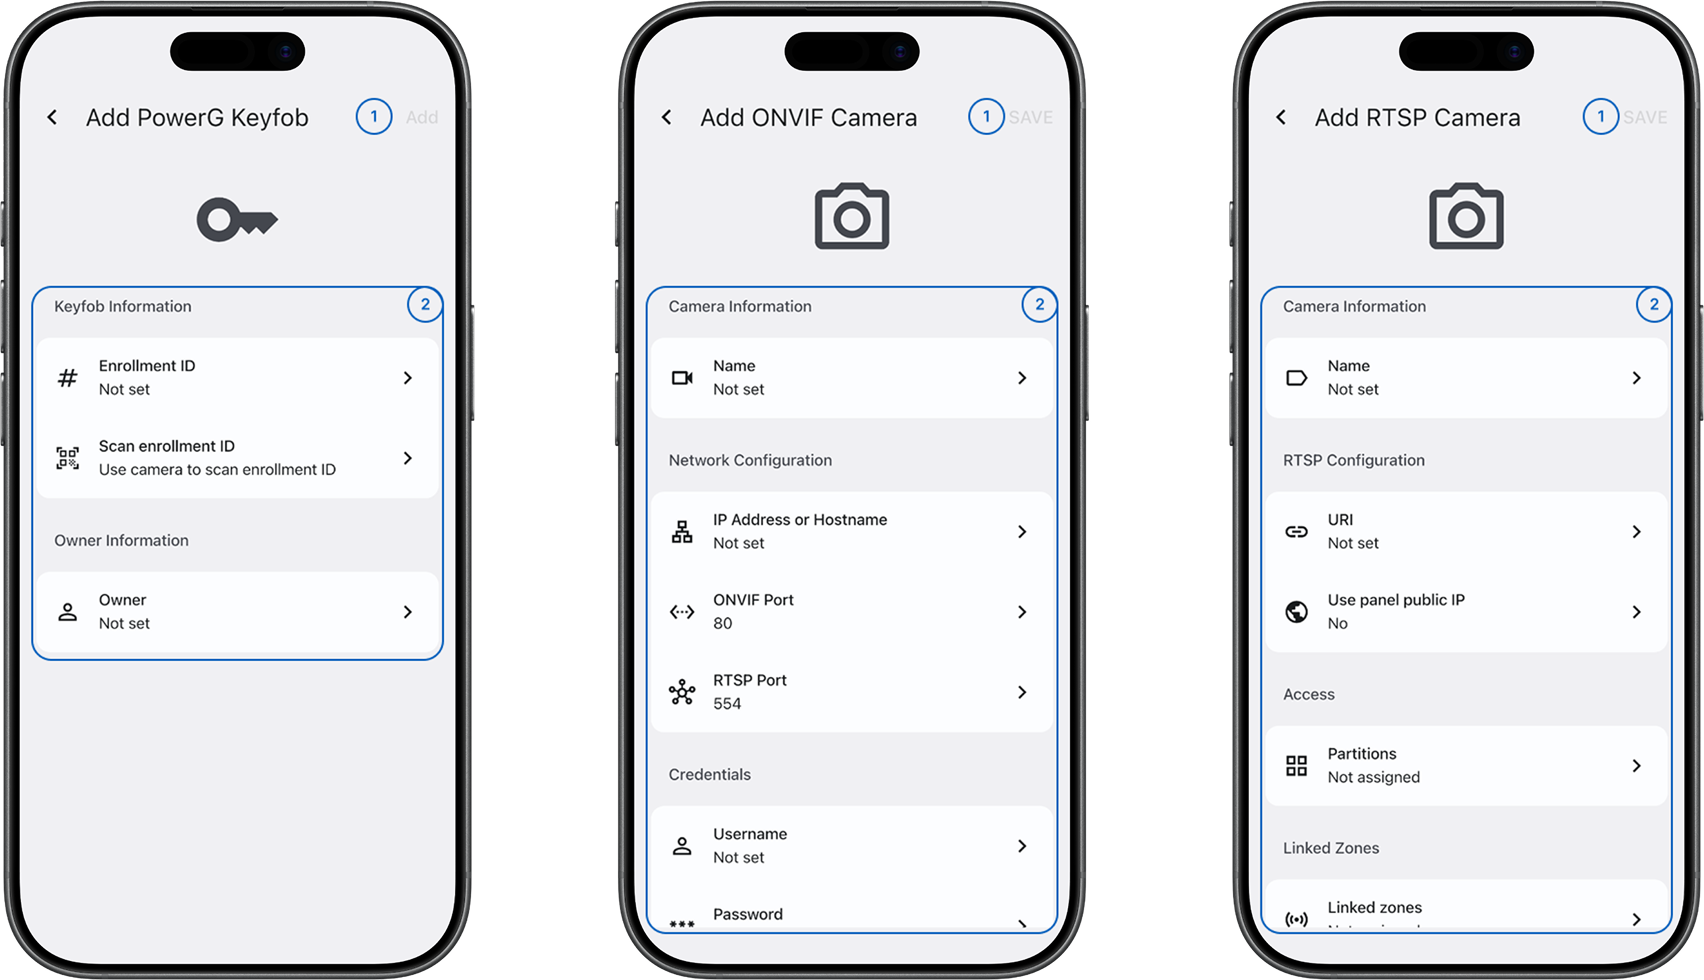
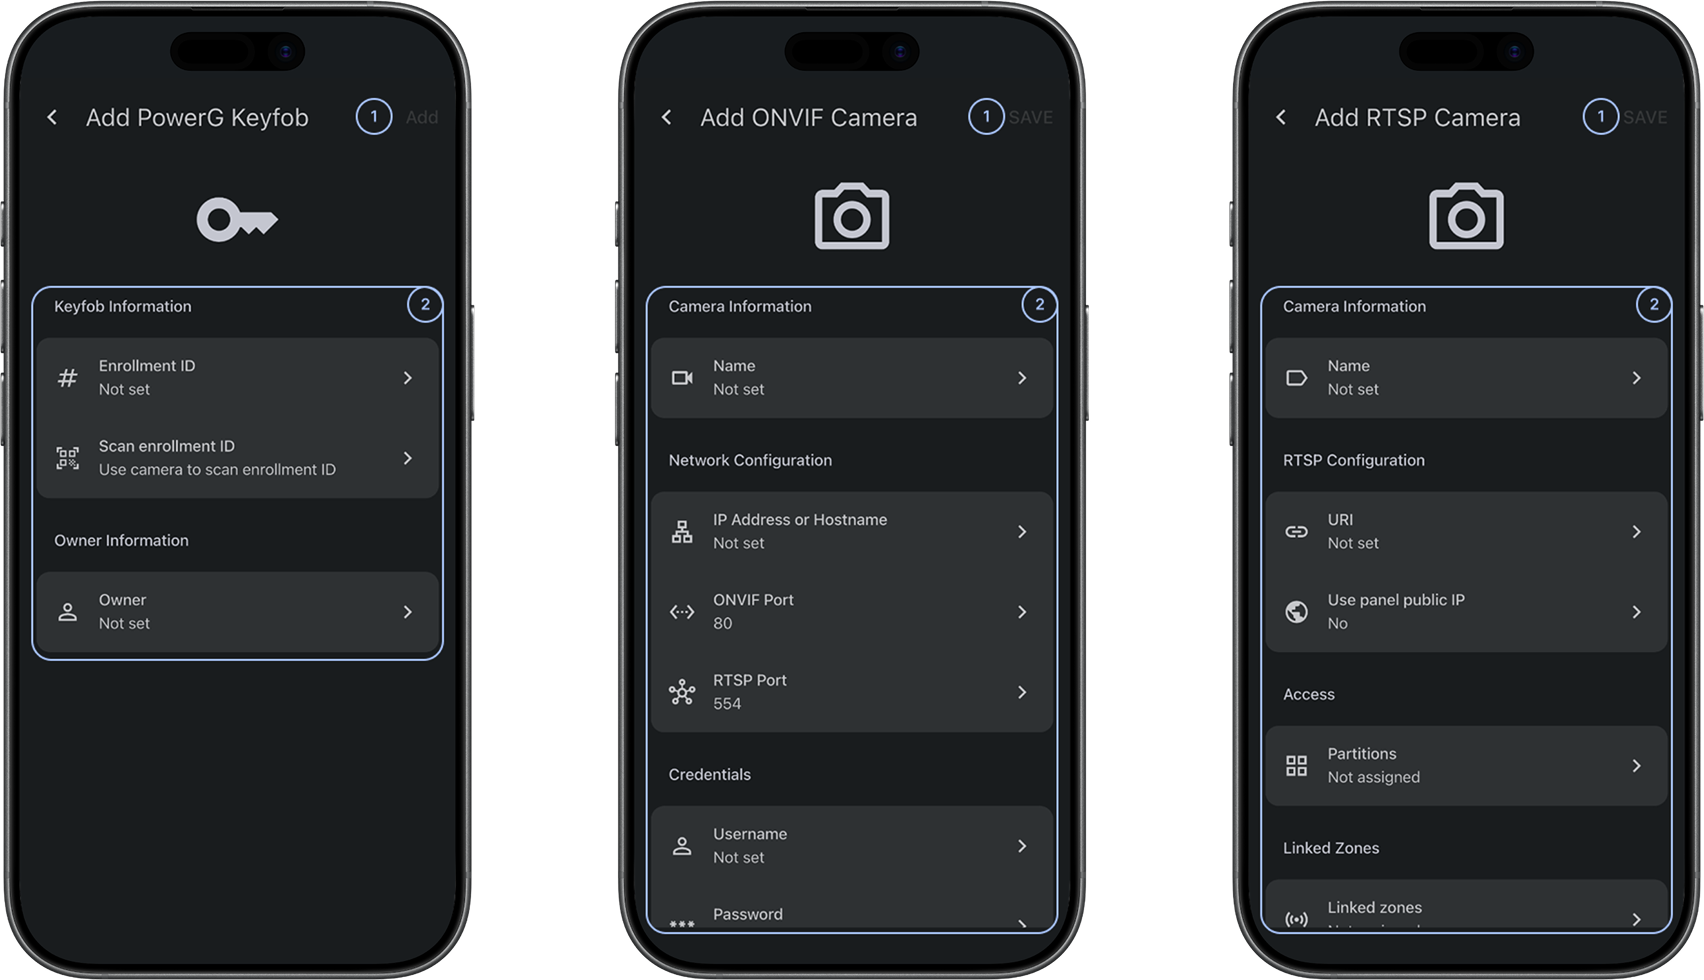
- SaveAdds the device to the panel when all required device option fields contain valid information.
- Device optionsContains fields such as Enrollment ID, Name, Partitions, and other required values.
Select the back arrow to return to the previous screen without enrolling the device.
Before adding a keyfob, confirm that the selected owner is correct. Depending on the configuration, a keyfob can control security-system functions.
Common scenarios
View devices
- Open the ConnectAlarm app.
- Sign in to your account.
- Open your panel.
- Go to Devices.
- Review the available device sections:
- Control panel
- Zones
- Modules
- Accessories
- Extenders
- Sirens
- Outputs
- Wi‑Fi cameras
- Home automation devices
The Devices screen shows the device sections that are available for the selected panel and its configuration.
Filter devices
- Open the ConnectAlarm app.
- Sign in to your account.
- Open your panel.
- Go to Devices.
- Select Device filters.
- Select the filters that you want to use.
- Select Apply.
- Review the filtered device list.
The Devices screen shows devices that match the selected filters.
Clear device filters
- Go to Devices.
- Select Device filters.
- Select Clear.
- Select Apply.
The Devices screen shows the device list without the cleared filters.
Review the control panel status
- Open the ConnectAlarm app.
- Sign in to your account.
- Open your panel.
- Go to Devices.
- Find the Control panel section.
- Review the panel name, identifier, and status.
If the panel shows an alarm or trouble status, follow your site's response procedures before you change device settings.
Bypass a zone
- Open the ConnectAlarm app.
- Sign in to your account.
- Open your panel.
- Go to Devices.
- Find the zone that you want to bypass in the Zones section.
- Swipe right on the zone to show the available action.
- Select Bypass.
- Wait for the app to show the updated zone state.
The zone is excluded from arming until you remove the bypass.
Bypass a zone only when site procedures allow it.
Rename a device
You can rename supported items in the Zones, Modules, Accessories, Extenders, Sirens, Outputs, Wi-Fi cameras, and Home automation devices sections.
- Open the ConnectAlarm app.
- Sign in to your account.
- Open your panel.
- Go to Devices.
- Find the item that you want to rename.
- Swipe left on the item to show the available actions.
- Select Rename.
- Enter the new name.
- Select Save.
- Wait for the updated name to appear in the device list.
Edit an accessory or Wi-Fi camera
- Open the ConnectAlarm app.
- Sign in to your account.
- Open your panel.
- Go to Devices.
- Find the item in Accessories or Wi-Fi cameras.
- Swipe left on the item to show the available actions.
- Select
 Edit.
Edit. - Update the available settings.
- Select Save.
- Wait for the app to show the updated item.
Available settings depend on the device type and panel configuration.
Remove a keyfob or Wi-Fi camera
- Open the ConnectAlarm app.
- Sign in to your account.
- Open your panel.
- Go to Devices.
- Find the keyfob in Accessories or the camera in Wi-Fi cameras.
- Swipe left on the item to show the available actions.
- Select
 Remove.
 - Complete the confirmation shown by the app.
- Wait for the item to disappear from the device list.
Remove a keyfob or Wi-Fi camera only when it should no longer be available.
Add a device
- Open the ConnectAlarm app.
- Sign in to your account.
- Open your panel.
- Go to Devices.
- Select Add.
- Complete the required device options.
- Review the entered information.
- Select Save.
- Wait for the device to appear in the applicable section of the device list.
Available fields depend on the device type and panel configuration.
When you add a keyfob, make sure the selected owner is correct before you select Save. Depending on the configuration, a keyfob can control security-system functions.
Add an RTSP camera
- Open the ConnectAlarm app.
- Sign in to your account.
- Open your panel.
- Go to Devices.
- Select Add.
- Select the RTSP camera enroll.
- Select the Configure Camera.
- In Camera Information, enter the camera Name.
- In RTSP Configuration, enter the RTSP URI.
- Turn on Use panel public IP if the camera must be accessed through the panel public IP address.
- In Access, select the Partitions to associate with the camera.
- In Linked Zones, select the zones to associate with the camera.
- Review the entered information.
- Select Save.
Use the stream link format required by the camera. A typical RTSP link can include the camera user name, password, IP address, port, and stream path.
Associating a camera with a zone can make the camera available from event-related video actions for that zone.
Add an ONVIF camera manually
- Open the ConnectAlarm app.
- Sign in to your account.
- Open your panel.
- Go to Devices.
- Select Add.
- Select the ONVIF camera enroll.
- Select the Add manually.
- In Camera Information, enter the camera Name.
- In Network Configuration enter the camera IP Address or Hostname.
- In Network Configuration, enter the camera ONVIF Port.
- In Network Configuration, enter the camera RTSP Port.
- In Credentials, enter the camera Username and Password.
- In Access, select the Partitions to associate with the camera.
- In Linked Zones, select the zones to associate with the camera.
- Review the entered information.
- Select Save.
Confirm camera credentials, URLs, ports, and network routing before you select Save.
Add an ONVIF camera automatically
- Open the ConnectAlarm app.
- Sign in to your account.
- Open your panel.
- Go to Devices.
- Select Add.
- Select the ONVIF camera enroll.
- Wait while the app scans the local network for ONVIF-compatible cameras.
- Select the desired camera from the discovered list.
- In Credentials, enter the camera Username and Password.
- In Access, select the Partitions to associate with the camera.
- In Linked Zones, select the zones to associate with the camera.
- Review the entered information.
- Select Save.
Tips
- Use Device filters to focus on the devices that you need to review.
- Look in the section that matches the device type. For example, find keyfobs in Accessories and RTSP or ONVIF cameras in Wi‑Fi cameras.
- Check the panel connection before you add, rename, edit, remove, or bypass a device.
- Swipe left to show actions such as Rename, Edit, or Remove. Available actions depend on the device type.
- Swipe right on a supported zone to show Bypass.
- Review all device options before you select Save.
- When you add a keyfob, confirm the selected owner before you save it.
Troubleshooting
Expected devices do not appear
Possible causes:
- One or more filters are hiding the device.
- You are looking in a section that does not match the device type.
- The device is not configured or enrolled in the selected panel.
- The app has not received the latest panel status.
What to try:
- Select Device filters.
- Select Clear, and then select Apply.
- Check the section that matches the device type:
- Zones for zones and detectors.
- Modules for panel modules.
- Accessories for keyfobs and other supported accessories.
- Extenders for enrolled extenders.
- Sirens for indoor and outdoor sirens.
- Outputs for programmable outputs.
- Wi-Fi cameras for RTSP and ONVIF cameras.
- Home automation devices for supported automation devices.
- Confirm that you opened the correct panel.
- Check the panel connection status.
- Confirm that the device is configured or enrolled in the panel.
- If the device still does not appear, contact your administrator or installer.
Applied filters do not show the expected devices
Possible causes:
- The selected filters do not match the device status or type.
- The app has not received the latest device status.
What to try:
- Select Device filters.
- Review the selected filters.
- Select Clear, and then select Apply.
- Check the unfiltered device list.
- Apply one filter at a time to identify which filter hides the device.
- If the expected status is not shown, check the panel connection or contact your administrator.
Add is not available
Possible causes:
- You do not have permission to add devices.
- The selected panel or configuration does not support adding a device from the app.
What to try:
- Confirm that you opened the correct panel.
- Check the panel connection status.
- Ask your administrator to confirm your device-management permissions.
- Ask your administrator or installer whether the panel supports adding the device from ConnectAlarm.
Save is not available when adding or editing a device
Possible causes:
- A required device option field is empty.
- A field contains invalid information.
What to try:
- Review all fields on the current screen.
- Complete each required field.
- When adding a device, check Enrollment ID, Name, Partitions, and the other displayed values.
- Correct any highlighted field.
- Select Save.
A device is not added after you select Save
Possible causes:
- The panel is not connected to PowerManage.
- One or more device option values are not valid.
- The device cannot be added with the current panel configuration.
What to try:
- Check the panel connection status.
- Review the device-option fields for missing or invalid information.
- Confirm that you selected the correct panel and partitions.
- Select Save again.
- Check the section that matches the device type.
- If the device still is not added, contact your administrator or installer and provide the device type and the step that failed.
Rename is not available
Possible causes:
- The swipe did not show the available actions.
What to try:
- Swipe left on the item again.
- Confirm that the item is in a section that supports Rename.
- Ask your administrator to confirm your device-management permissions.
- If Rename is still unavailable, contact your administrator or installer.
Edit is not available
Possible causes:
- The selected item is not a supported accessory or Wi-Fi camera.
- The swipe did not show the available actions.
What to try:
- Confirm that the item is in Accessories or Wi-Fi cameras.
- Swipe left on the item again.
- Ask your administrator to confirm your device-management permissions.
- If Edit is still unavailable, contact your administrator or installer.
Remove is not available
Possible causes:
- The selected item is not a keyfob or Wi-Fi camera.
- The swipe did not show the available actions.
What to try:
- Confirm that the item is a keyfob in Accessories or a camera in Wi-Fi cameras.
- Swipe left on the item again.
- Ask your administrator to confirm your device-management permissions.
- If Remove is still unavailable, contact your administrator or installer.
Bypass is not available
Possible causes:
- The selected item is not a zone that supports bypass.
- The current system state does not allow bypass.
- The swipe did not show the available action.
What to try:
- Confirm that the selected item is in Zones and supports bypass.
- Swipe right on the zone again.
- Check the panel connection and system state.
- Ask your administrator to confirm your permissions.
- If Bypass is still unavailable, contact your administrator or installer.
RTSP camera enroll is not available
Possible causes:
- You do not have permission to add cameras.
- The panel is not connected to PowerManage.
What to try:
- Check the panel connection status.
- Ask your administrator to confirm your device-management permissions.
No video after an RTSP camera is saved
Possible causes:
- The RTSP URI is incorrect or incomplete.
- The Use panel public IP setting does not match the network configuration.
What to try:
- Go to Devices.
- Swipe left on the camera and select Edit.
- In RTSP Configuration, review the RTSP URI. Confirm that the link is correct.
- Confirm that the Use panel public IP setting matches the camera location and network routing.
- Check that the camera is powered on and connected to the network.
- Select Save.
- If there is still no video, contact your administrator or installer and provide the camera model and RTSP URI format.
ONVIF camera enroll is not available
Possible causes:
- You do not have permission to add cameras.
- The panel is not connected to PowerManage.
What to try:
- Check the panel connection status.
- Ask your administrator to confirm your device-management permissions.
ONVIF camera does not connect with manually entered details
Possible causes:
- The IP address or hostname is incorrect.
- The ONVIF port or RTSP port is incorrect.
- The camera credentials are wrong.
- The camera is not reachable from the panel network.
- The camera does not support a compatible ONVIF profile.
What to try:
- Confirm that the camera is powered on and connected to the network.
- In Network Configuration, verify the camera IP Address or Hostname.
- In Network Configuration, verify the ONVIF Port and RTSP Port. Check the camera documentation for the correct port values.
- In Credentials, re-enter the camera Username and Password.
- Confirm that the camera supports ONVIF Profile S or Profile T.
- Select Save.
- If the camera still does not connect, contact your administrator or installer and provide the camera model, IP address, and port values.
No cameras found during automatic discovery
Possible causes:
- The mobile device is not on the same local network as the camera.
- The camera does not support ONVIF discovery (WS-Discovery).
- The camera is powered off or not connected to the network.
- A firewall or network configuration is blocking multicast traffic.
- The camera is already enrolled in the panel.
What to try:
- Confirm that your mobile device is connected to the same local network as the camera.
- Confirm that the camera is powered on and connected to the network.
- Check the camera documentation to confirm that it supports ONVIF WS-Discovery.
- Ask your network administrator to confirm that UDP multicast traffic is not blocked.
- Check that the camera is not already enrolled.
- Try the scan again.
- If the camera is still not found, select Add manually and enter the camera details.