Home Automation
Overview
The Home Automation page in ConnectAlarm lets users create and manage automation rules for a security panel.
Use this page when users need to:
- View active and inactive automation rules.
- Edit an existing automation rule.
- Enable or disable an automation rule.
- Delete an automation rule.
- Configure rule triggers, conditions, and actions.
Automation rules help users run system or device actions automatically. For example, a rule can repeat every day at a set time and change the panel state or turn on a connected device.
Before you begin
Preconditions
- The user is signed in to the ConnectAlarm app.
- The selected security panel is available.
- At least one supported trigger, condition, or action is available.
- The user can access the Home Automation page from the app navigation.
- The network connection is available when the user saves, disables, deletes, or updates rules.
Dependencies
- Automation rules depend on supported panel features and connected devices.
- Rule triggers depend on available schedules, events, and state changes.
- Rule actions depend on configured partitions, panel states, and automation devices.
- Device actions require communication between the PowerManage server, panel, and target device.
Limitations
- Automation actions may fail if the panel is disconnected or the target device is offline.
- Rules will not run if required conditions are not met.
- Disabling a rule stops the rule from running but keeps the rule configuration.
- Deleting a rule removes it from the automation list. There is no UNDO option.
- The rule can include up to 20 actions.
- Available options may vary by system configuration and permissions.
Page layout
The Home Automation workflow includes these screens:
- Home Automation rule list
- New automation
- Edit Automation
Home Automation rule list
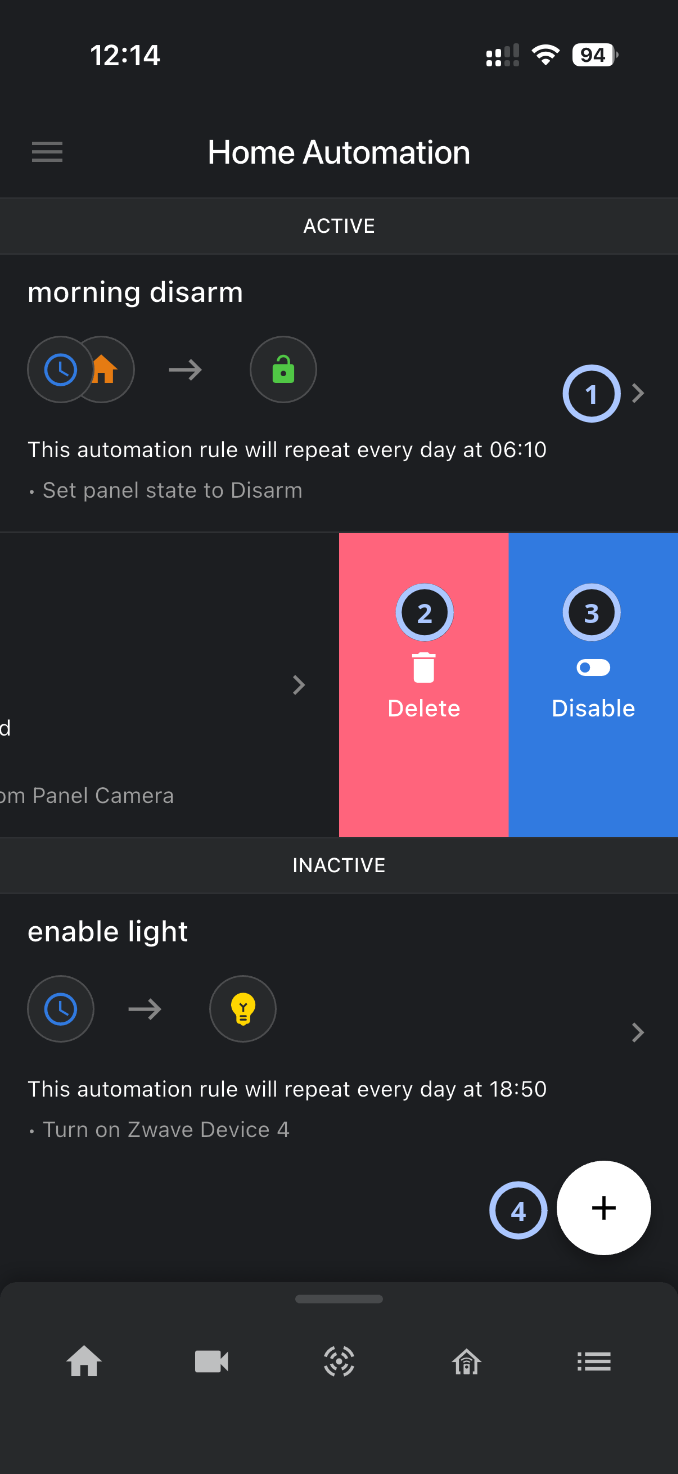
| Callout | UI element | Description | When to use |
|---|---|---|---|
| 1 | Rule row | Shows an automation rule with its name, trigger and action icons, summary text, and navigation chevron. | Use to review a rule or open the rule for editing. |
| 2 |  | Deletes the selected automation rule. This action appears after swiping a rule row. | Use when the rule is no longer required. |
| 3 |  | Disables the selected automation rule. This action appears after swiping an active rule row. | Use to stop a rule from running without deleting it. |
| 4 | Add button | Opens the New automation page. | Use to create a new automation rule. |
Active section
The ACTIVE section lists rules that are currently enabled.
Rules in this section can run when their triggers occur and their conditions are met.
Inactive section
The INACTIVE section lists rules that are currently disabled.
Rules in this section remain configured but do not run while inactive.
Rule row
A rule row shows the main information for one automation rule.
A rule row can include:
- Rule name.
- Trigger icon.
- Direction arrow.
- Action icon.
- Schedule or trigger summary.
- Action summary.
- Navigation chevron.
Select a rule row to open the rule in Edit Automation, if editing is allowed.
New automation page
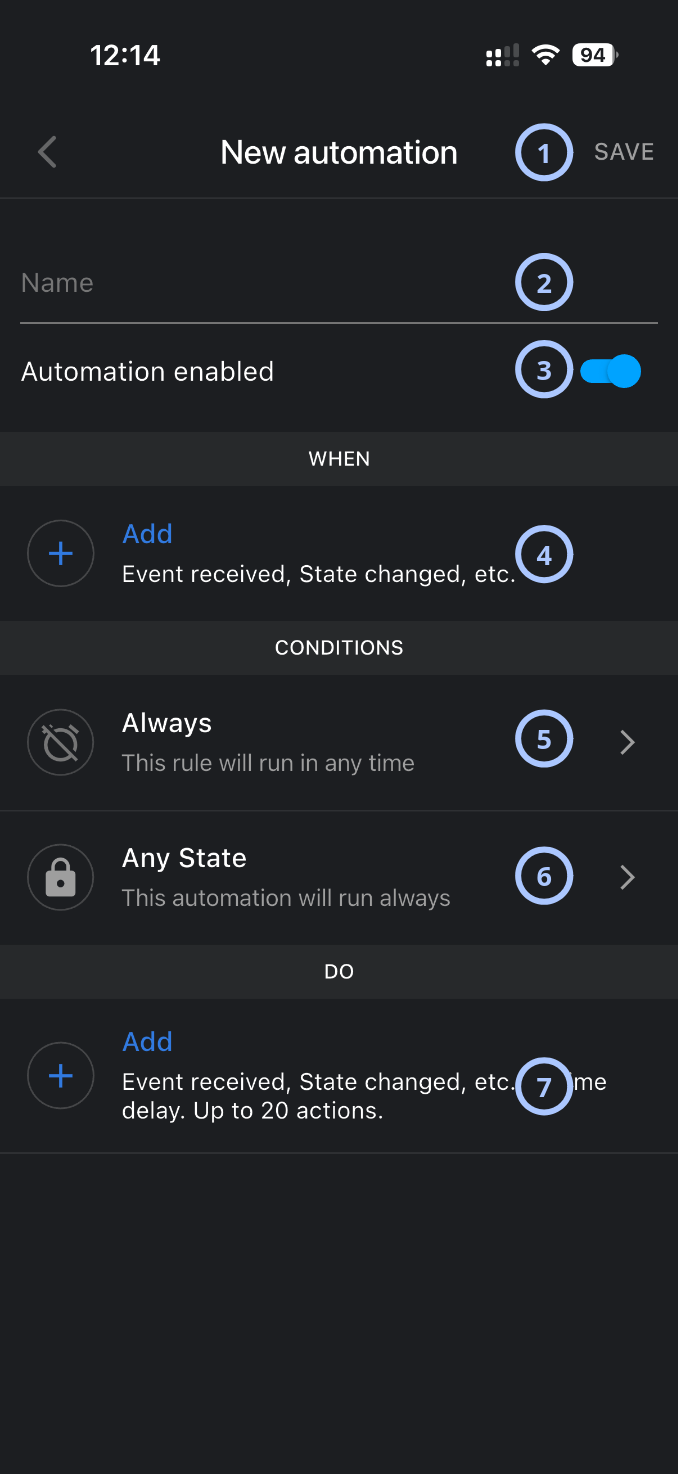
| Callout | UI element | Description | When to use |
|---|---|---|---|
| 1 | SAVE | Saves the new automation rule. | Use after the rule name, trigger, conditions, and actions are configured. |
| 2 | Name field | Defines the automation rule name. | Use to enter a name that identifies what the rule does. |
| 3 | Automation enabled toggle | Controls whether the new rule is active after saving. | Use to save the rule as active or inactive. |
| 4 | WHEN row | Adds the trigger for the rule. | Use to define when the automation should start. |
| 5 | Time condition | Indicates the rule can run at a defined time. | Use to specify when the rule runs if the trigger occurs. |
| 6 | State condition | Indicates the rule can run based on the panel state. | Use to specify the security panel state when the rule runs if the trigger occurs. |
| 7 | DO row | Adds actions for the rule. | Use to specify what the rule does when it runs. |
WHEN section
The WHEN section defines the trigger that starts the rule.
The Add row includes:
| Trigger type | Trigger | Description |
|---|---|---|
| Event received | Event profile received | When received alarm, alert, trouble, etc |
| Event type received | When received burglary alarm, CO aler, etc | |
| State changed | Partition disarmed | When partition state changed to disarm |
| Partition armed stay | When partition state changed to arm stay | |
| Partition armed away | When partition state changed to arm away | |
| Zone changed | Temperature changed | When tenperature sensor responded changes |
| Security sensor status | When security sensor triggered open, close, active, presence, etc | |
| Home Automation | Automation device enabled | When automation device state was changed to open, enabled, on, etc |
| Automation device disabled | When automation device state was changed to closed, off, disabled, etc | |
| Doorlock unlocked | When the doorlock unlocked | |
| Doorlock locked | When the doorlock locked | |
| Garage door opened | When the garage door opened | |
| Garage door closed | When the garage door closed | |
| Valve opened | When the valve opened | |
| Valve closed | When the valve closed | |
| Thermostat changed | When thermostat responded changes | |
| Time scheduled | Time schedule | e.g. At 8:00 every Monday |
| Video | Video on demand requested | When video on demand requested from selected camera |
Use this section to choose when the rule should start.
CONDITIONS section
The CONDITIONS section defines requirements that must be true before the rule can run.
Default conditions include:
- Always: This rule will run in any time.
- Any State: This automation will run always.
Select a condition row to configure restrictions when the rule should run.
DO section
The DO section defines the actions that the rule performs.
The Add row includes:
| Action type | Action | Description |
|---|---|---|
| Time delay | Set time delay | Defines time delay before or between actions |
| Arm state | Arm away partition | Set partition to arm away state |
| Arm stay partition | Set partition to arm stay state | |
| Disarm partition | Set partition to disarm | |
| Home automation | Enable automation device | Turn on automation device |
| Disable automation device | Turn off automation device | |
| Lock doorlock | Lock doorlock selected from list | |
| Unlock doorlock | Unlock doorlock selected from list | |
| Close water valve | Close water valve | |
| Open water valve | Open water valve | |
| Change thermostat mode | Set thermostat mode to Off, Cool, Heat, Auto, Aux | |
| Change thermostat Fan mode | Set thermostat Fan mode to On, Auto | |
| Close garage door | Open garage door | |
| Send notifications | Send email | Send email notification to master user |
| Send push notification | Send push notification to master user's mobile device | |
| Video | Request video | Request video on demand from selected camera |
Use this section to add one or more actions.
A rule can include up to 20 actions.
Edit Automation rule screen
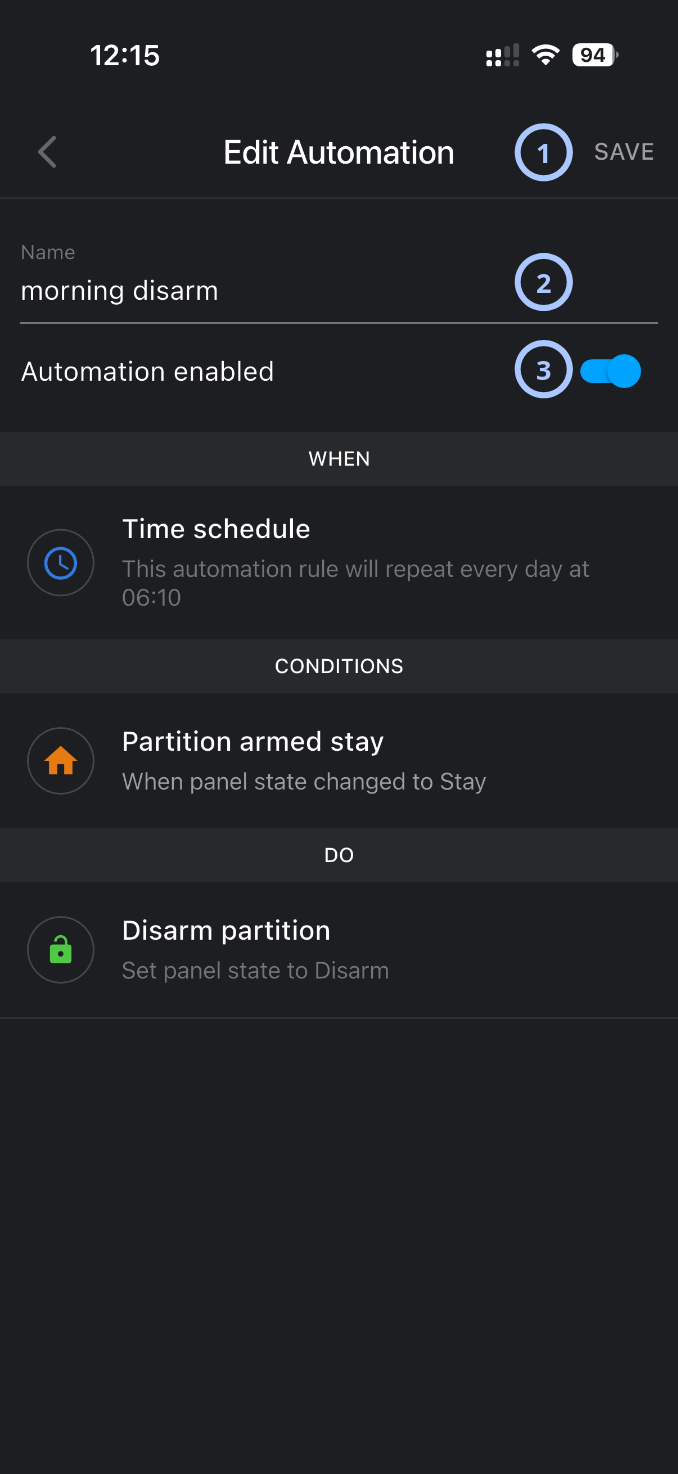
| Callout | UI element | Description | When to use |
|---|---|---|---|
| 1 | SAVE | Saves changes made to the automation rule. | Use after editing the rule name or enabled state. |
| 2 | Name field | Shows and edits the automation rule name. | Use to rename the rule. |
| 3 | Automation enabled toggle | Turns the rule on or off. | Use to enable or disable the rule without deleting it. |
How to use this page
Open Home Automation
- Open the ConnectAlarm app.
- Sign in to your account.
- Sign in to your security panel.
- Open the
 menu.
menu. - Select Home Automation.
Create a new automation rule
- Open Home Automation.
- Select the + add button.
- In the Name field, enter a rule name.
- Set Automation enabled to on or off.
- In the WHEN section, select Add.
- Choose and configure the trigger.
- Review or configure the CONDITIONS section.
- In the DO section, select Add.
- Choose and configure one or more actions.
- Select SAVE.
Edit an automation rule
- Open Home Automation.
- Select the rule row to edit.
- On the Edit Automation page, update the rule name or enabled state.
- Review the updated fields.
- Select SAVE.
Disable a rule from the rule list
- Open Home Automation.
- Find the active rule to disable.
- Swipe the rule row to reveal actions.
- Select .
Delete an automation rule
- Open Home Automation.
- Find the rule to delete.
- Swipe the rule row to reveal actions.
- Select .
- Confirm the deletion.
Undo option is not supported. Delete rules only when the rule is no longer needed.
Tips
- Use rule names that describe the result, such as Morning disarm or Enable light at evening.
- Review the WHEN, CONDITIONS, and DO sections before saving a rule.
- Disable a rule if the rule may be needed again later. Delete a rule only when it is no longer required.
- Use conditions to prevent rules from running at the wrong time or in the wrong panel state.
- Keep automation rules focused. If a rule needs many actions, review whether separate rules would be easier to manage.
Troubleshooting
| Problem | Possible cause | What to try |
|---|---|---|
| A rule does not run |
|
|
| A rule runs at the wrong time |
|
|
| The expected trigger, condition, or action is missing |
|
|
| A disabled rule still appears in the list |
|
|