Managing devices
Overview
The Devices page in ConnectAlarm lets users view, filter, manage, and add devices.
Use this page when users need to:
- Check security panel information.
- View zones, detectors, PGMs, and other connected devices.
- Filter devices by status or device type.
- Bypass a zone when supported.
- Edit a device name.
- Add supported devices, such as keyfobs or cameras.
- Enroll a keyfob and assign an owner.
This page helps users manage connected security devices from one place and find devices that need attention.
Before you begin
Preconditions
- The user is signed in to the ConnectAlarm app.
- The security panel is connected to the PowerManage when performing actions that require live system communication.
- Devices, zones, PGMs, cameras, or keyfobs are configured or available for enrollment.
Limitations
- Device categories may vary by security panel configuration.
- Some devices may be visible but not editable, depending on permissions or installer settings.
- Bypassing a zone can reduce protection for the related area. Use bypass only when required and allowed by site procedures.
- Adding a device may fail if the security panel is disconnected, the device is already enrolled or the enrollment ID is invalid.
Page layout
The Devices workflow includes three main screens:
- Devices list
- Adding new device
Devices list
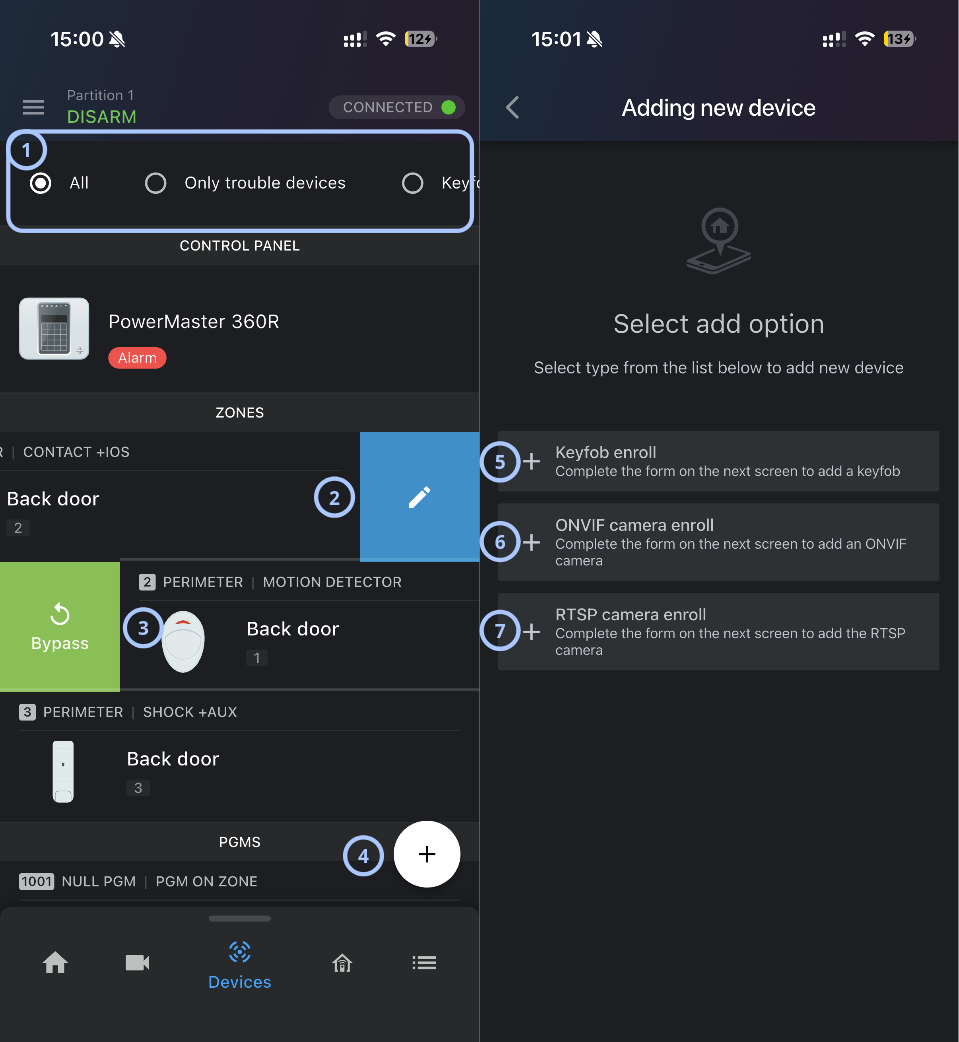
| Callout | UI element | Description | When to use |
|---|---|---|---|
| 1 | Device filters | Filters the device list by status or device type. The available options such as All, Only trouble devices, and a partially visible Keyfobs option. | Use to narrow the list when reviewing all devices, troubleshooting problem devices, or locating a specific device type. |
| 2 |  | Swipe zone left opens editing devive name form for the selected device or zone. Edit action appears as a blue row action with a pencil icon. | Use to change device name. |
| 3 |  | Swipe right bypasses the selected zone. A green row action labeled Bypass. | Use when a supported zone must be temporarily excluded from normal monitoring. |
| 4 | Add button | Opens the Adding new device screen. | Use to start adding a supported new device, such as a keyfob or camera. |
| 5 | Keyfob enroll | Starts the keyfob enrollment workflow. User must complete the form on the next screen to add a keyfob. | Use to add a keyfob and assign it to an owner. |
| 6 | ONVIF camera enroll | Starts the ONVIF camera enrollment workflow. User must complete the form on the next screen to add an ONVIF camera. | Use to add an ONVIF-compatible camera when supported by the system. |
| 7 | RTSP camera enroll | Starts the RTSP camera enrollment workflow. User must complete the form on the next screen to add an RTSP camera. | Use to add an RTSP camera stream when supported by the system. |
Device filters
The filter bar appears under the header. It uses radio-style options.
Visible options include:
- All: Shows all available devices and device groups.
- Only trouble devices: Shows devices that have a trouble, fault, or attention state.
- Keyfobs: Shows all enrolled keyfobs.
Control panel section
The CONTROL PANEL section shows the connected control panel.
Use this section to confirm the connected panel and review its current status.
If the control panel shows an alarm or trouble status, follow site procedures before making device changes.
Zones section
The ZONES section groups configured zones and detectors.
A zone row supports swipe actions. Zone row can be swiped to show Bypass (swipe right) and Edit (swipe left) actions.
PGM section
The PGMS section lists programmable outputs.
Use this section to review configured PGMs when the system includes programmable outputs.
Add keyfob
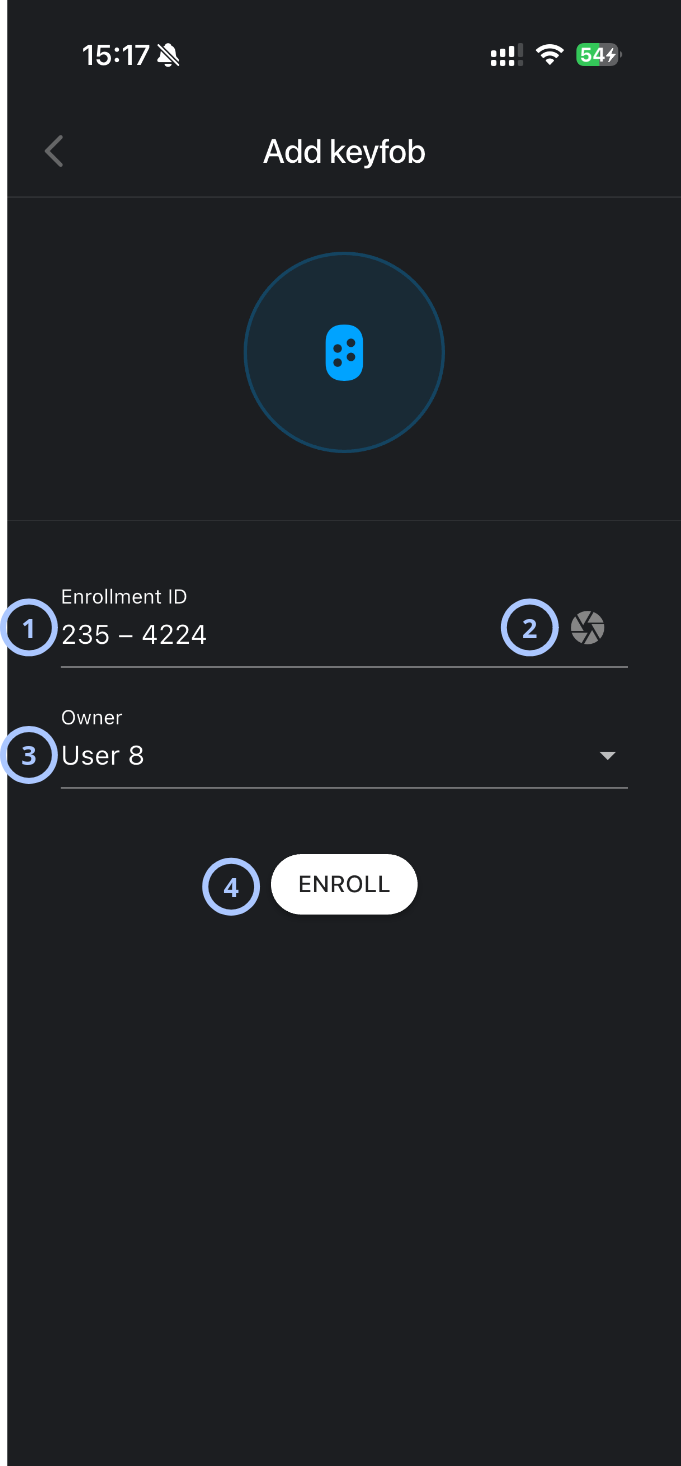
| Callout | UI element | Description | When to use |
|---|---|---|---|
| 1 | Enrollment ID field | Stores the keyfob enrollment identifier. | Use to enter or review the keyfob enrollment ID before enrolling the keyfob. |
| 2 | Scan icon | Appears next to the Enrollment ID field. The icon suggests scanning or capturing an enrollment code. | Use when the enrollment ID can be captured by the device camera. |
| 3 | Owner field | Assigns the keyfob to a user. | Use to select the user who will own or use the keyfob. |
| 4 | ENROLL button | Submits the keyfob enrollment form. | Use after entering a valid enrollment ID and selecting an owner. |
Back button
The back arrow returns the user to the previous screen.
Use the back button to leave the keyfob form without enrolling the keyfob.
Enroll a keyfob only for the correct owner. A keyfob may provide control of security system functions, depending on configuration.
How to use this page
View all devices
- Open the ConnectAlarm app.
- Sign in to your account.
- Select the Devices tab from the bottom navigation bar.
- Select the All filter.
View only devices with trouble conditions
- Open the Devices tab.
- Select Only trouble devices in the filter bar.
- Review the filtered list.
Review control panel status
- Open the Devices tab.
- Review the CONTROL PANEL section.
- Check the panel name, identifier, and status badge.
If the panel indicates an alarm or trouble condition, follow local response procedures before changing device settings.
Bypass a zone
- Open the Devices tab.
- Find the zone to bypass.
- Swipe the zone row right to show available actions.
- Select Bypass.
Bypassing a zone can reduce protection for the related area. Use this action only when authorized.
Edit a device or zone name
- Open the Devices tab.
- Find the device or zone to edit.
- Swipe the zone row left to show available actions.
- Select the .
- Update the name.
- Save changes.
Add a keyfob
- Open the Devices tab.
- Select the Add button.
- Select Keyfob enroll.
- On the Add keyfob screen, enter the Enrollment ID.
- If supported, select the scan icon to capture the enrollment ID.
- Select the Owner field.
- Choose the user who will own the keyfob.
- Select ENROLL.
Confirm the owner before selecting ENROLL. Assigning a keyfob to the wrong user can create access and accountability issues.
Add an ONVIF camera
- From the same(internal) network
- From the outside(external) network
- Open the Devices tab.
- Select the Add button.
- Select ONVIF camera enroll.
- App starts to scan your local network.
- Select the camera you want to add by tapping it.
- Complete the form by entering camera name, username and password.
- Open the Devices tab.
- Select the Add button.
- Select ONVIF camera enroll.
- Select Use panel public IP.
- Assign security zones, if you want direct access from push to cameras.
- Save changes.
You need to configure the router, forward ports, and open ONVIF and RTSP ports to the camera. ONVIF typically uses port 80 and RTSP 554, but this depends on your camera brand. ONVIF typically uses port 80 and RTSP 554, but this depends on your camera brand.
Please check: Conformant products - ONVIF for details about your camera or its manufacturer.
Tips
- Use Only trouble devices before changing device settings. This helps focus on devices that need attention.
- Check the connection status before adding or editing devices.
- Use the scan icon for device enrollment when available. Scanning can reduce entry errors in the enrollment ID.
- Review the owner selection before enrolling a keyfob. The owner assignment helps identify who can use the keyfob.
Troubleshooting
| Problem | Possible cause | What to try |
|---|---|---|
| The Devices tab does not show expected devices |
|
|
| Only trouble devices filter does not show any devices |
|
|
| The Add button is not visible |
|
|
| The scan icon does not work |
|
|
| The Owner field does not show the expected user |
|
|
| Bypass action is not available |
|
|