Viewing connected cameras
Overview
The Cameras page in ConnectAlarm lets users request, view, and review camera images or video clips from connected cameras.
Use this page when users need to:
- Request video from all available cameras.
- Open a camera.
- View a captured image or video from a selected camera.
- Open the camera view in full-screen mode.
- Share a captured camera video, if sharing is available.
- Request a new capture from the selected camera.
Before you begin
Preconditions
- The user is signed in to the ConnectAlarm app.
- The the security system is connected to PowerManage when requesting new camera media.
- At least one compatible camera is configured.
- The mobile device has network connectivity.
Dependencies
- Camera availability depends on the connected security panel and system configuration.
- Media loading depends on the connection between the app, PowerManage, and the security panel.
- Sharing depends on mobile operating system sharing options and app permissions.
- Full-screen viewing depends on the mobile phone resolution.
Limitations
- Camera media may not be available immediately after a request. The app can show intermediate states such as Making video....
- Cameras may not return video if the device is offline, busy, not configured, or outside supported conditions.
- Supported SHARE destinations depend on the mobile device and installed apps.
- Camera media may contain sensitive information. Follow site privacy and security policies before viewing or sharing images or videos.
Page layout
The camera workflow shown in the screenshot includes two related screens:
- Cameras list
- Camera media detail
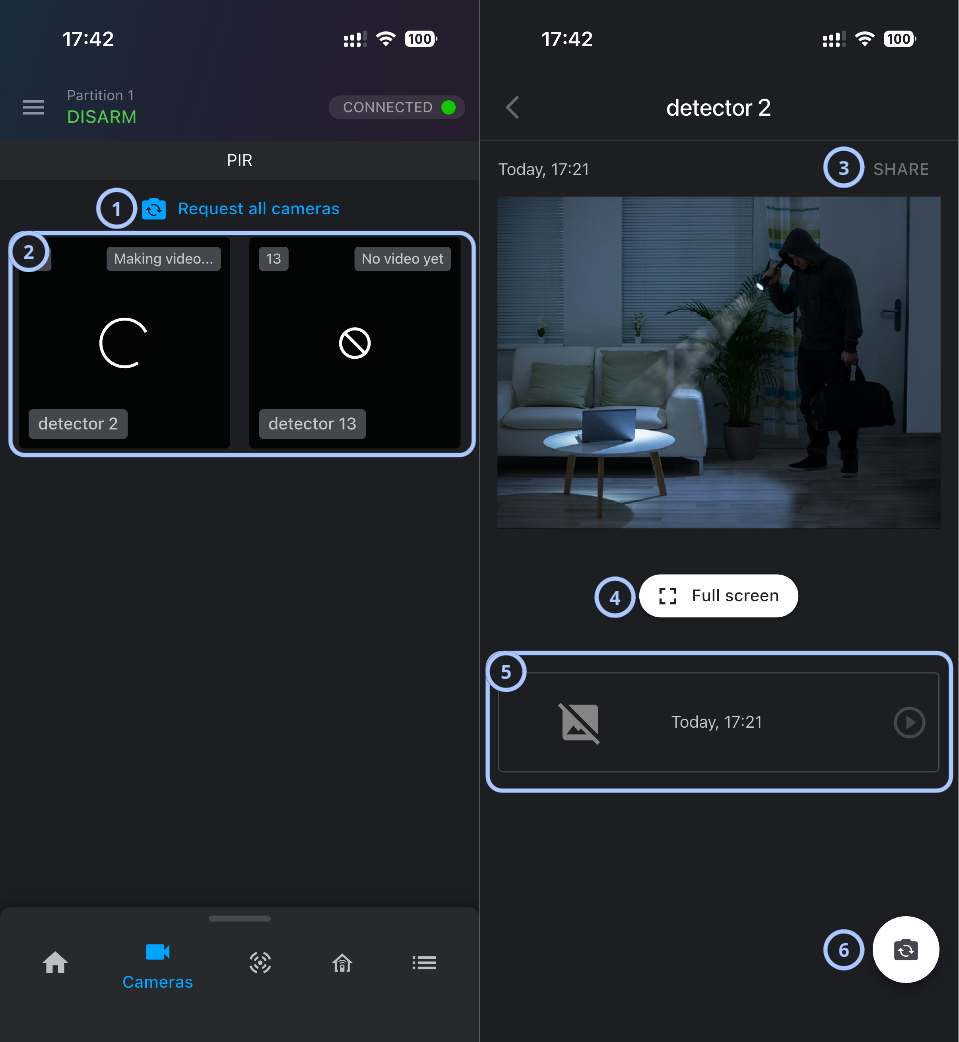
| Callout | UI element | Description | When to use |
|---|---|---|---|
| 1 | Request all cameras | Starts a request for media from all available cameras. | Use when visual information is needed from all connected cameras. |
| 2 | Camera preview tiles | Shows available camera devices and their current media request status. | Use to check whether a camera has media available, is generating video, or has no video yet. |
| 3 | SHARE | Opens sharing options for the selected camera media, if sharing is available. | Use to send or save the captured media according to site policy. |
| 4 | Full screen | Opens the selected image or video in full-screen mode. | Use when a larger view is needed for review. |
| 5 | Media item | Shows a captured media entry with a timestamp, placeholder or thumbnail, and play control when applicable. | Use to review the history of available media items for the selected camera. |
| 6 | Camera request button | Requests a new video from the selected camera. | Use when updated media is needed for the selected camera. |
Camera group label
The camera list shows a group label named PIR.
This label appears above the camera list of PIR-related devices.
Available groups may vary by system configuration.
Back button
The back arrow returns the user to the previous screen.
Use the back button to return from a camera detail page to the camera list.
Timestamp
The media detail page shows a timestamp above the displayed media.
Media preview
The media preview area displays the selected camera image or video frame.
Use this area to review visual activity from the selected camera.
Camera media may include private or sensitive information. View and share media only when authorized.
How to use this page
Open the Cameras page
- Open the ConnectAlarm app.
- Sign in to your account.
- Sign in to your panel.
- Select the Cameras tab from the bottom navigation bar.
Request media from all cameras
- Open the Cameras page.
- Confirm that the app shows CONNECTED.
- Select Request all cameras.
- Wait for camera tiles to update.
Some cameras may take longer to return media than others.
View camera media in full screen
- Open the Cameras page.
- Open a camera detail page.
- Confirm that media is visible in the preview area.
- Select Full screen.
Share camera media
- Open the Cameras page.
- Open a camera detail page.
- Confirm that the correct media item is selected.
- Select SHARE.
- Choose an available sharing option from the mobile device.
- Complete the sharing flow.
Share camera media only with authorized recipients and according to site privacy and security policies.
Request new media from a selected camera
- Open the Cameras page.
- Open the camera detail page for the required camera.
- Select the floating camera request button.
- Wait for the request to complete.
- Review the updated preview or media item list.
Tips
- Check the connection status before requesting camera media. Requests are more likely to complete when the app shows CONNECTED.
- Use Request all cameras when the situation requires a broad review. Use the camera request button on the detail page when only one camera needs updated media.
- Review timestamps before sharing or acting on camera media. This helps confirm that the media matches the event being investigated.
- If a tile shows Making video..., wait for the request to finish before selecting the tile again or sending another request.
Troubleshooting
| Problem | Possible cause | What to try |
|---|---|---|
| A camera tile shows Making video... for a long time |
|
|
| A camera tile shows No video yet |
|
|
| Share is not available or does not work |
|
|
| The expected camera is not listed |
|
|