Central stations
Overview
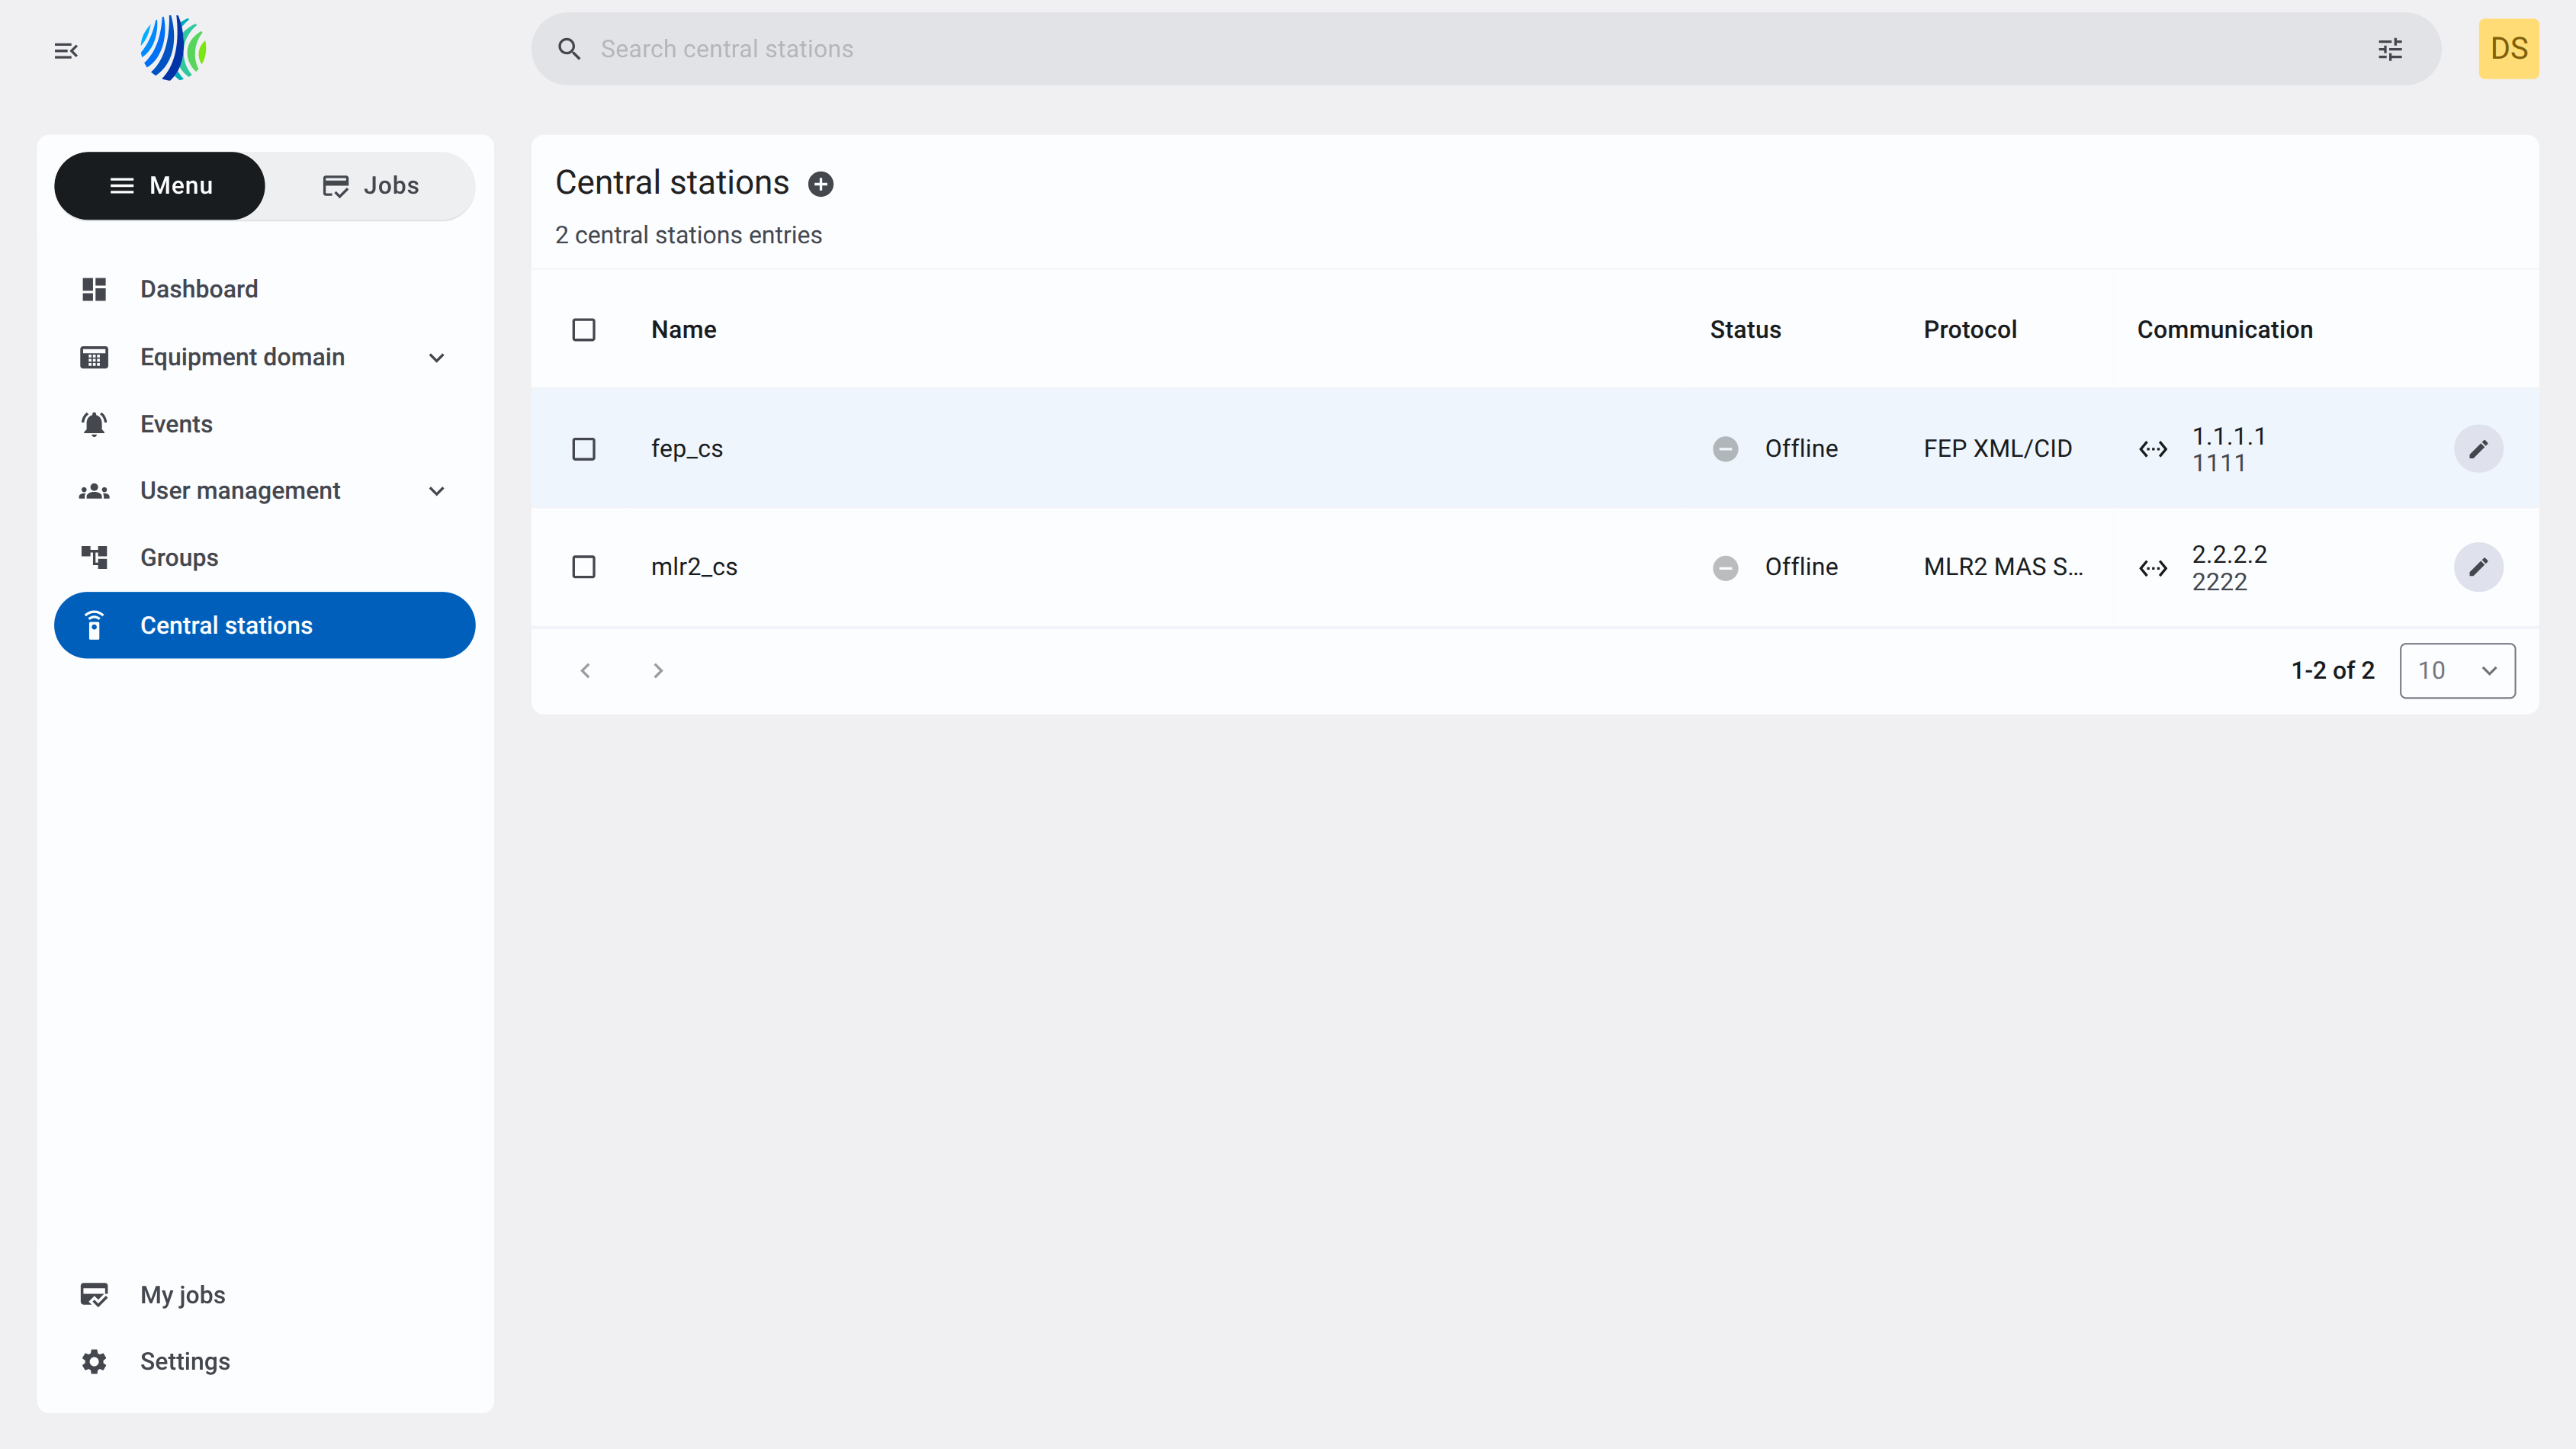
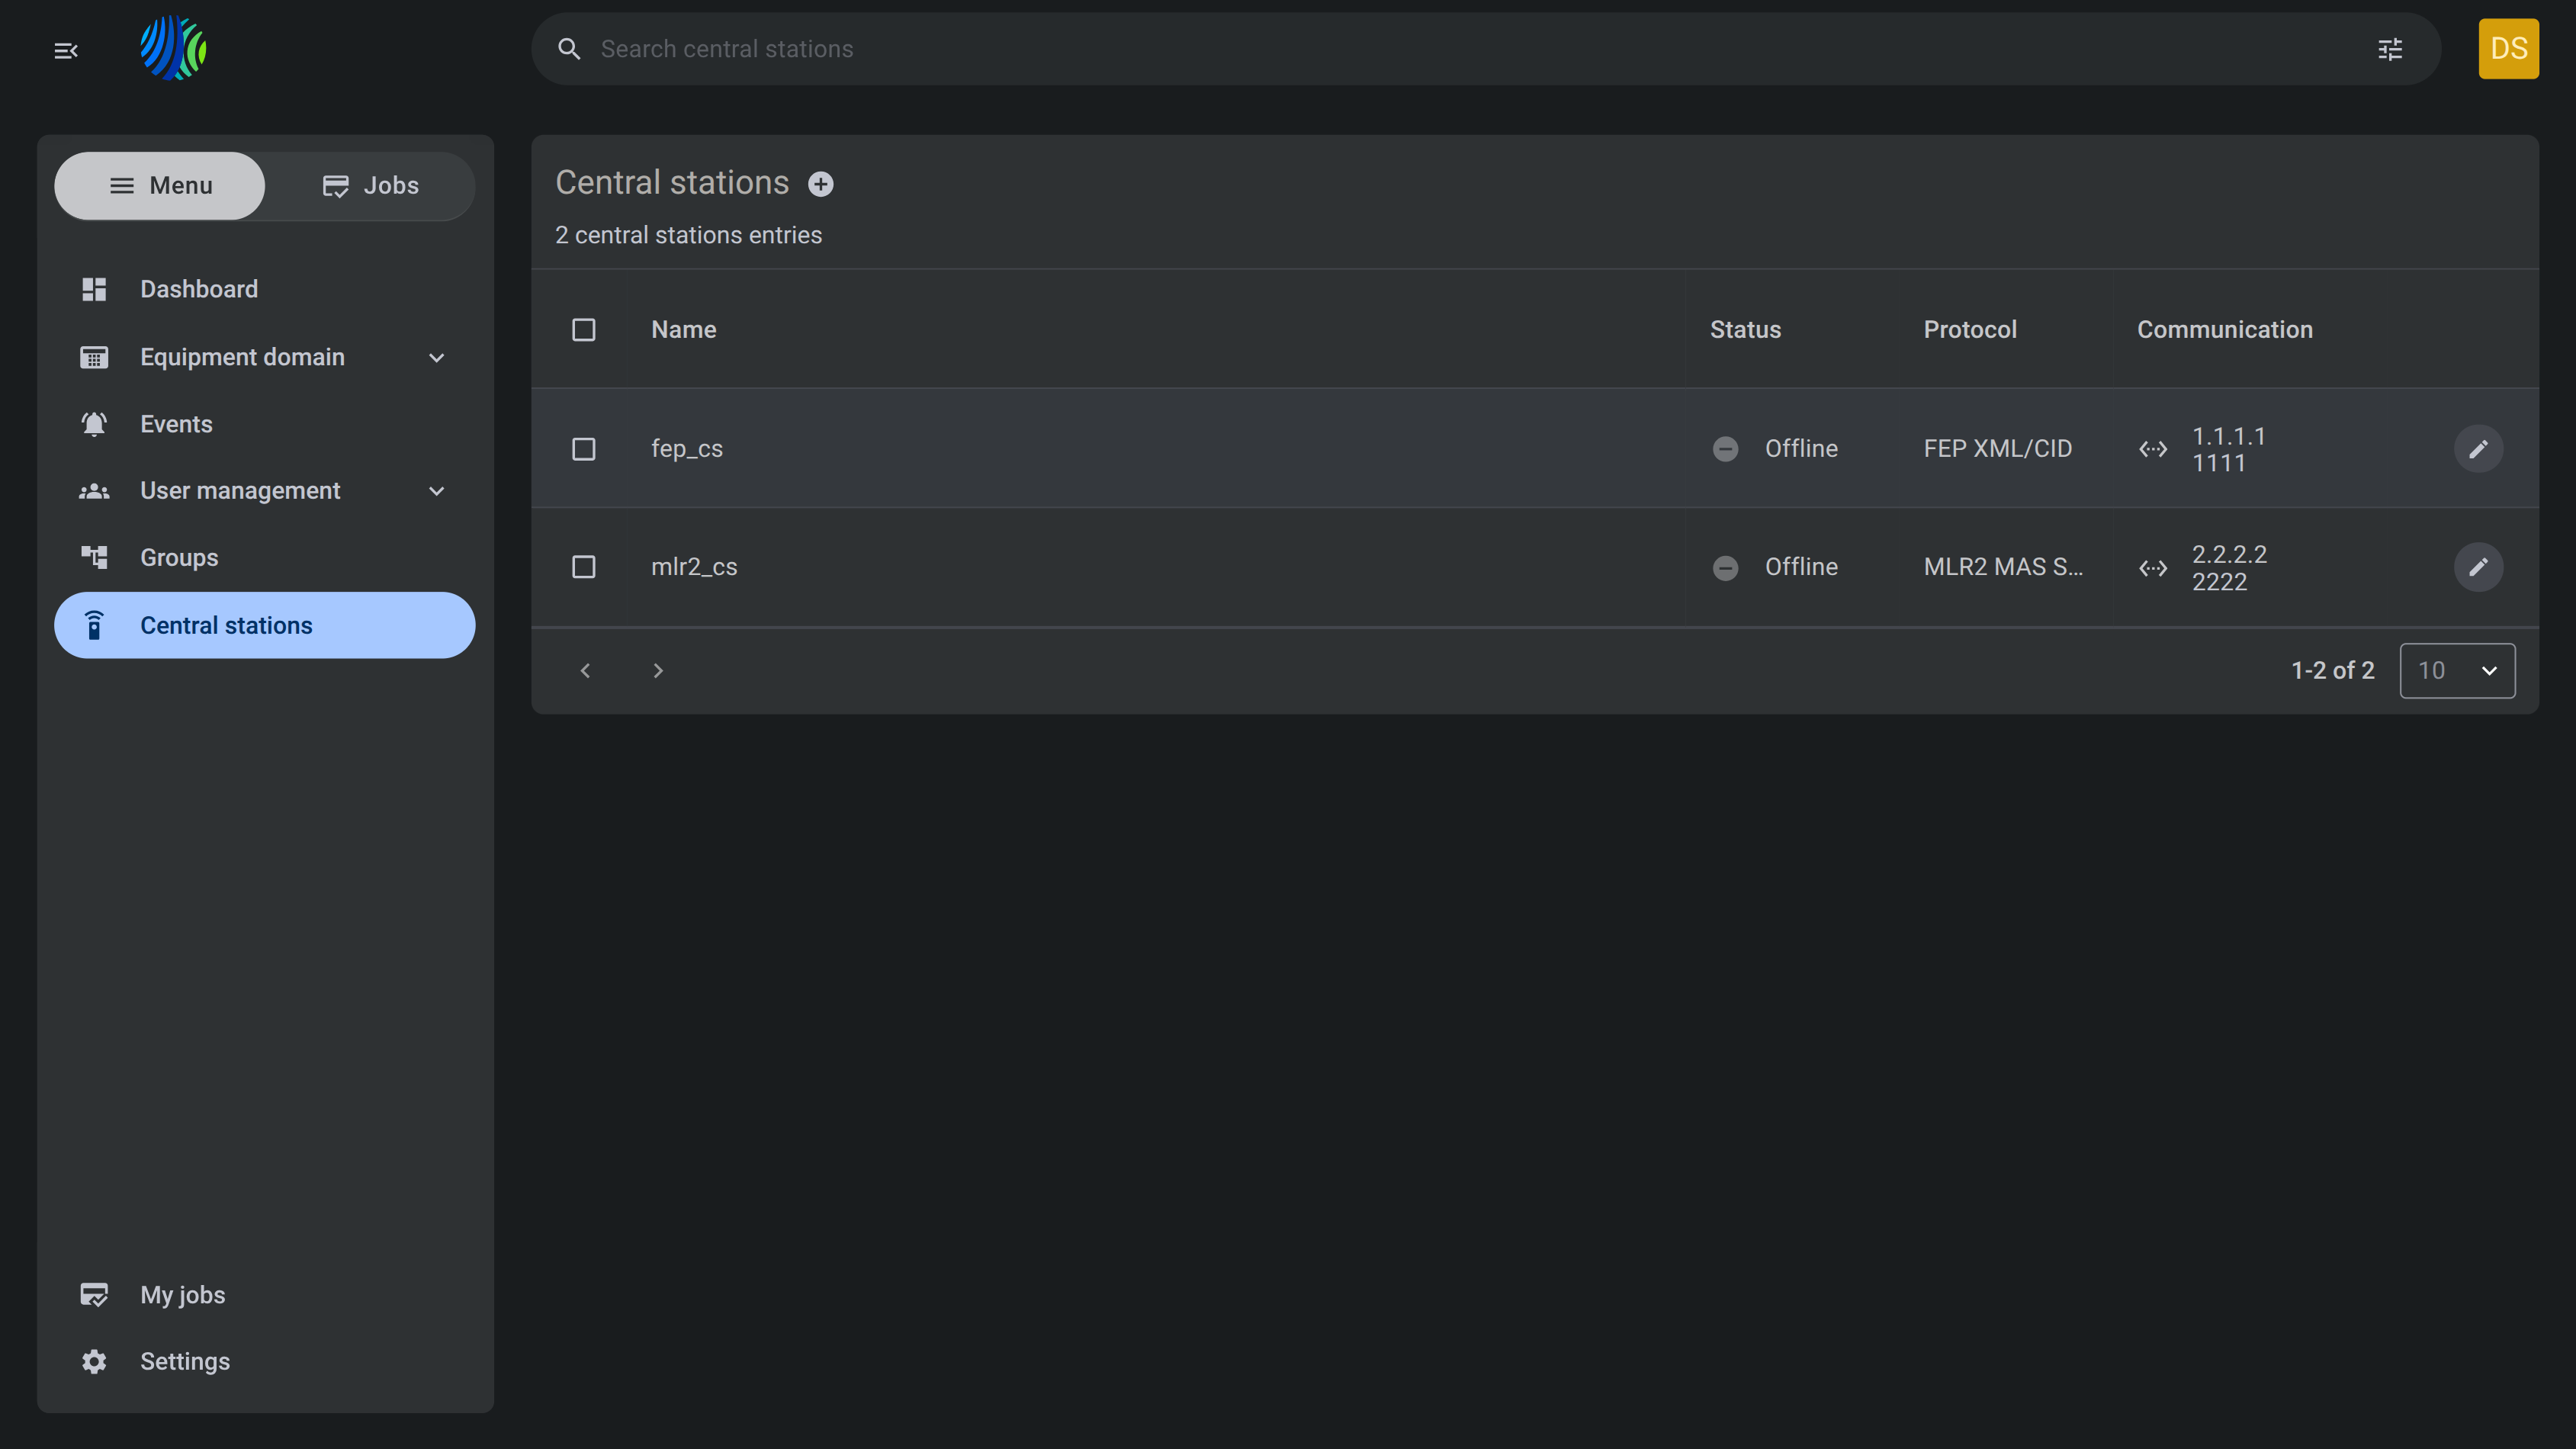
The Central stations page is used to view and manage central station communication entries.
Use this page to:
- Review status, protocol, and communication settings.
- Add or edit central stations.
This page helps administrators review how PowerManage communicates with configured central stations and manage which event profiles are enabled for communication.
Before you begin
Required permissions
- You must have permission to add, edit, remove, list Central stations.
- Your role and assigned groups can affect which Central stations entries are visible.
Access to the Central stations page is controlled by the role permission group named Central stations.
Preconditions
- You must be signed in to PowerManage.
- At least one central station entry must exist to display records in the table.
Dependencies
- Central station communication depends on the selected protocol.
Important limitations
- Incorrect host, port, protocol, security, receiver, or line settings will prevent communication with the central station.
Page layout
The page header identifies the page and shows the number of available entries.


| Callout | UI element | Description | When to use |
|---|---|---|---|
| 1 | Page title | Shows the current page name | Use to confirm that you are on the page. |
| 2 | Page entries count | Shows the total number of entries | Use to understand how many entries are available. |
| 3 | Add icon | Plus icon next to the page title. Opens the Add central station wizard. | Use to add central station. |
Central stations grid
The Central stations grid lists configured central station entries and their communication state.
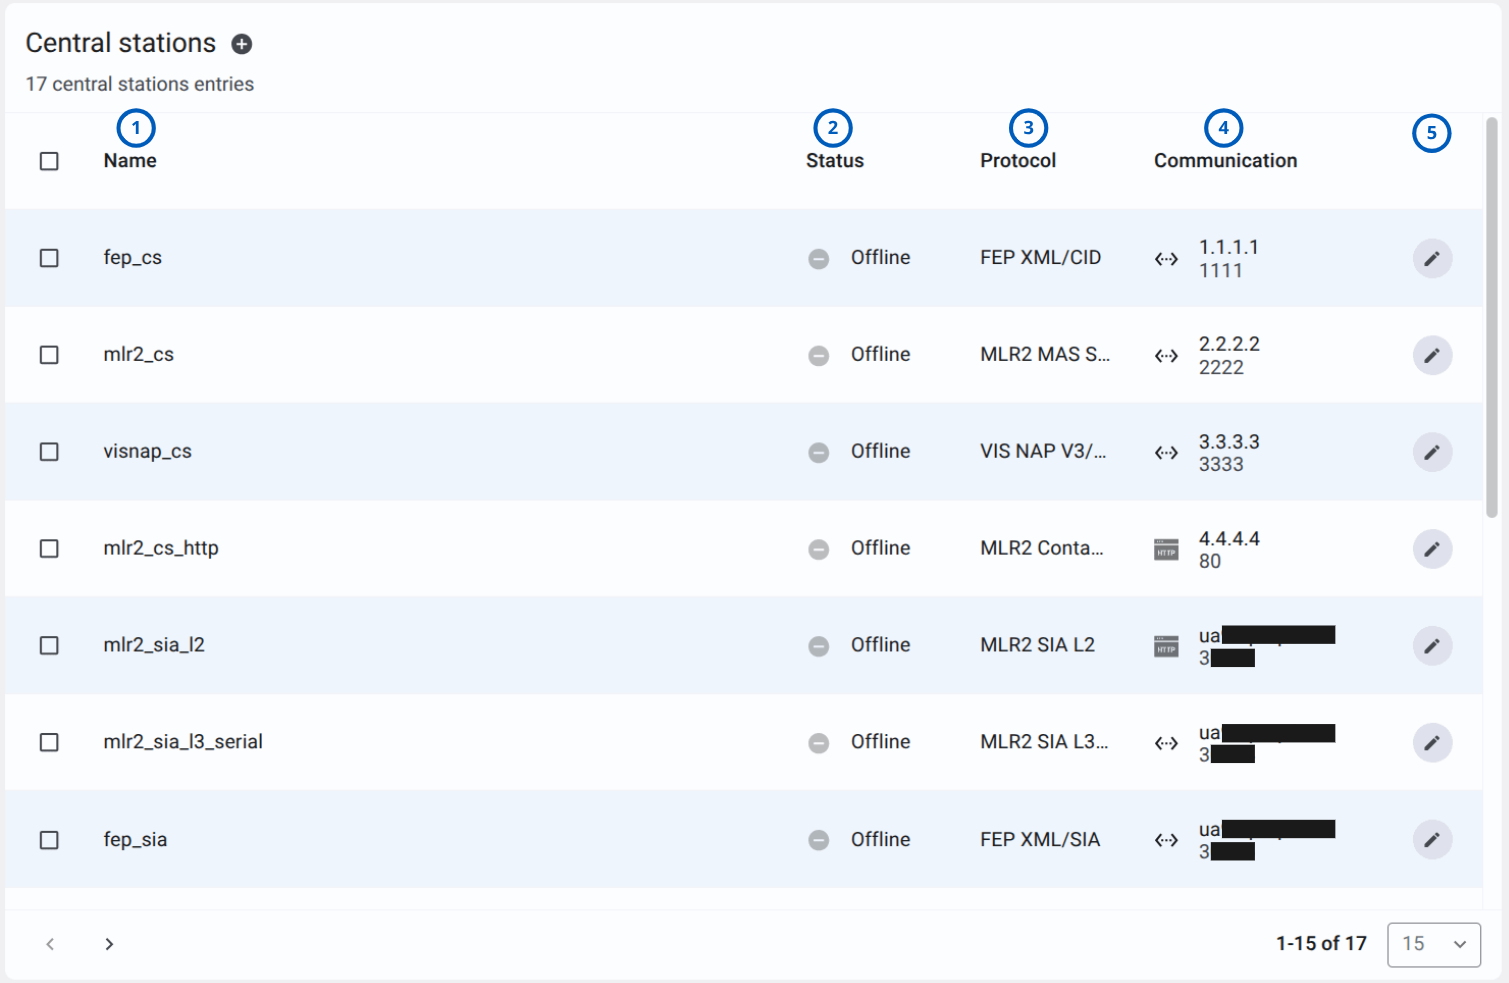
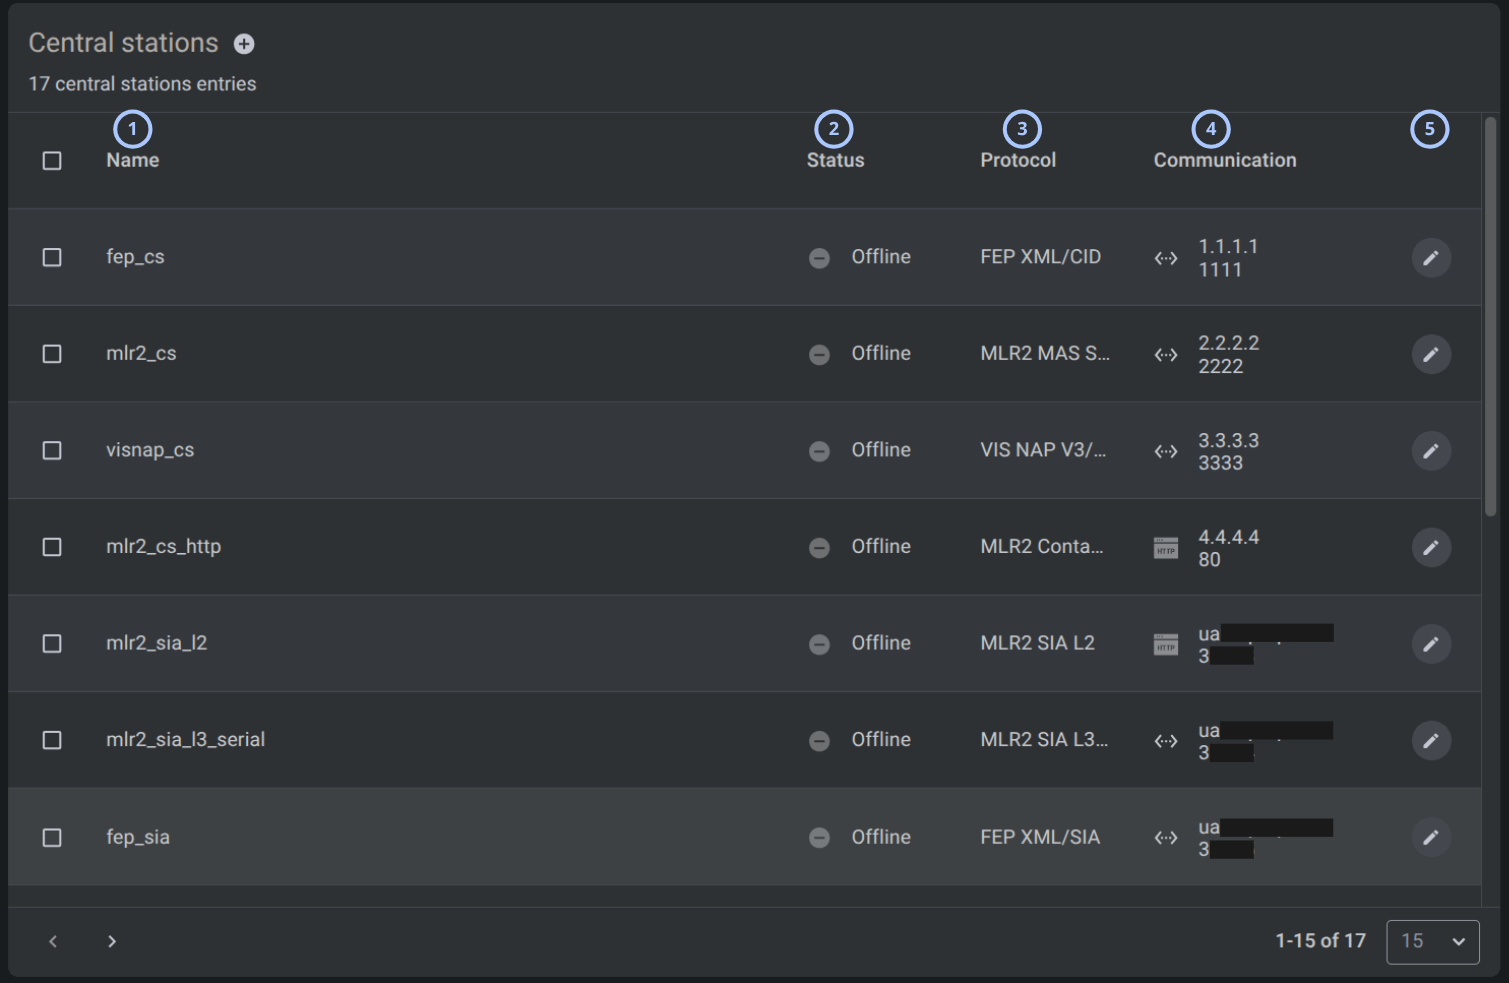
| Callout | UI element | Description | When to use |
|---|---|---|---|
| 1 | Name column | Shows the central station name. | Use to identify the central station entry. |
| 2 | Status column | Shows the current central station status. | Use to understand whether a central station is online or offline. |
| 3 | Protocol column | Shows the communication protocol. | Use to confirm which protocol is configured for the central station. |
| 4 | Communication column | Shows the communication method and connection values. | Use to review central station connection information. |
| 5 | Edit icon | Pencil icon at the end of each row. | Use to open the central station communication settings for the selected row. |
Pagination controls
Pagination controls appear at the bottom of the entries grid.


| Callout | UI element | Description | When to use |
|---|---|---|---|
| 1 | Previous and next arrows | Shows left and right arrows, such as < and >, to move between pages. | Use when the entries list has more records than the current page can show. |
| 2 | Range indicator | Shows the current range and total number of entries | Use to understand where you are in the entries list. |
| 3 | Entries per page selector | Controls how many entries appear on one page. | Use to show fewer or more entries in the grid. |
Add central station modal
The Add central station modal opens when you select the + add icon. The modal uses a scrollable form.
- Connection Type TCP/IP
- Connection Type Serial
- Connection Type HTTP
- Connection Type TCP/IP server
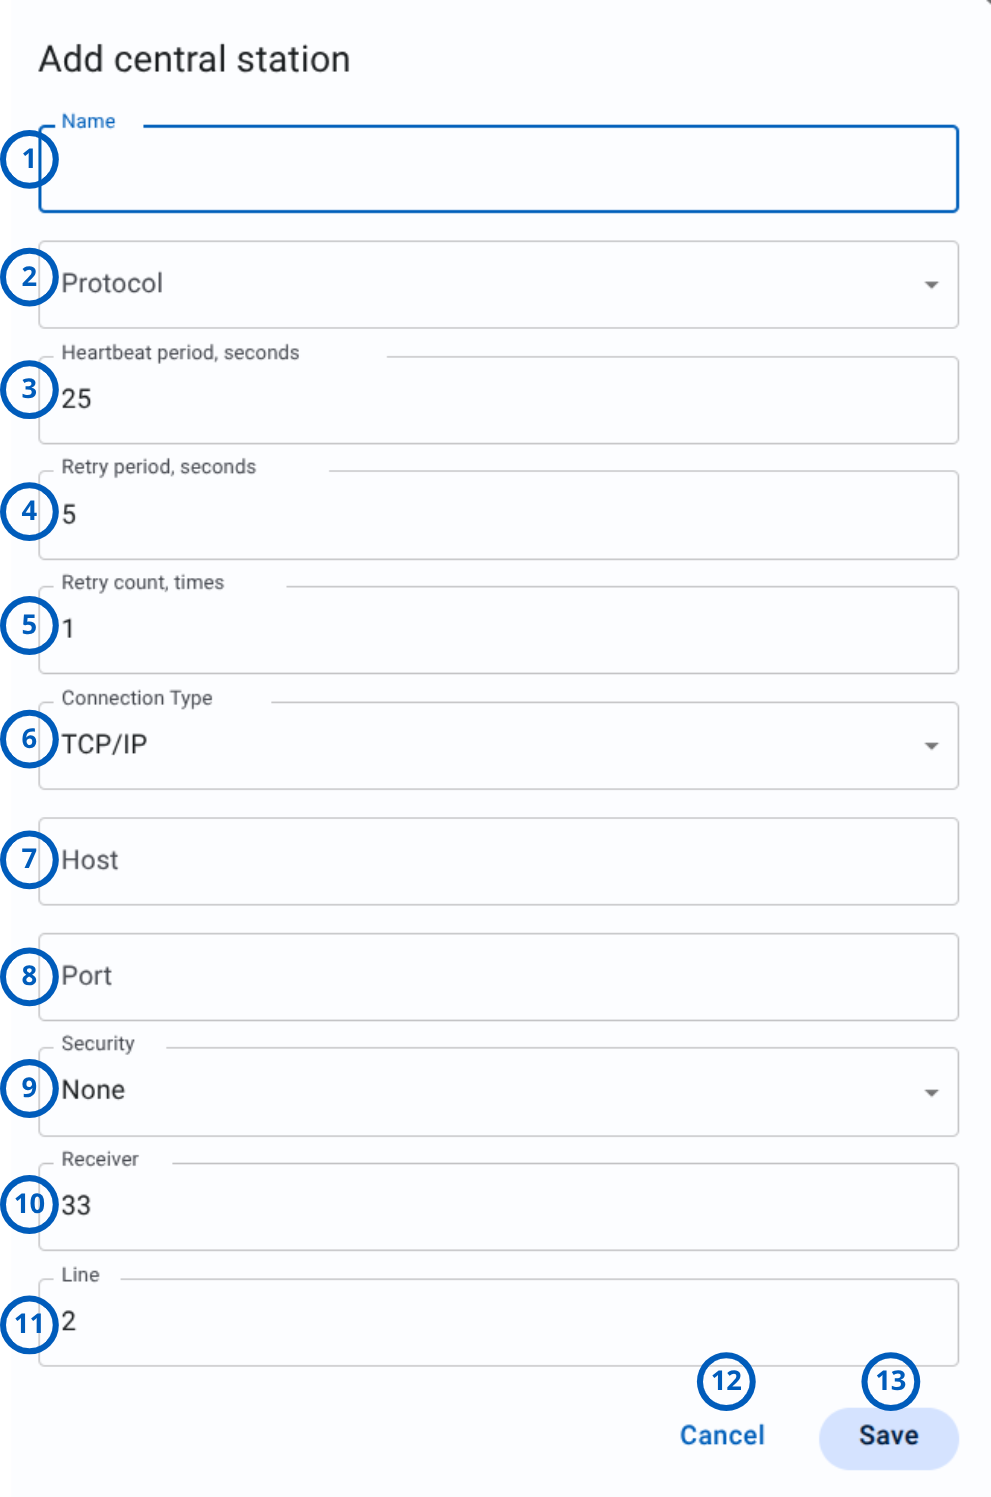
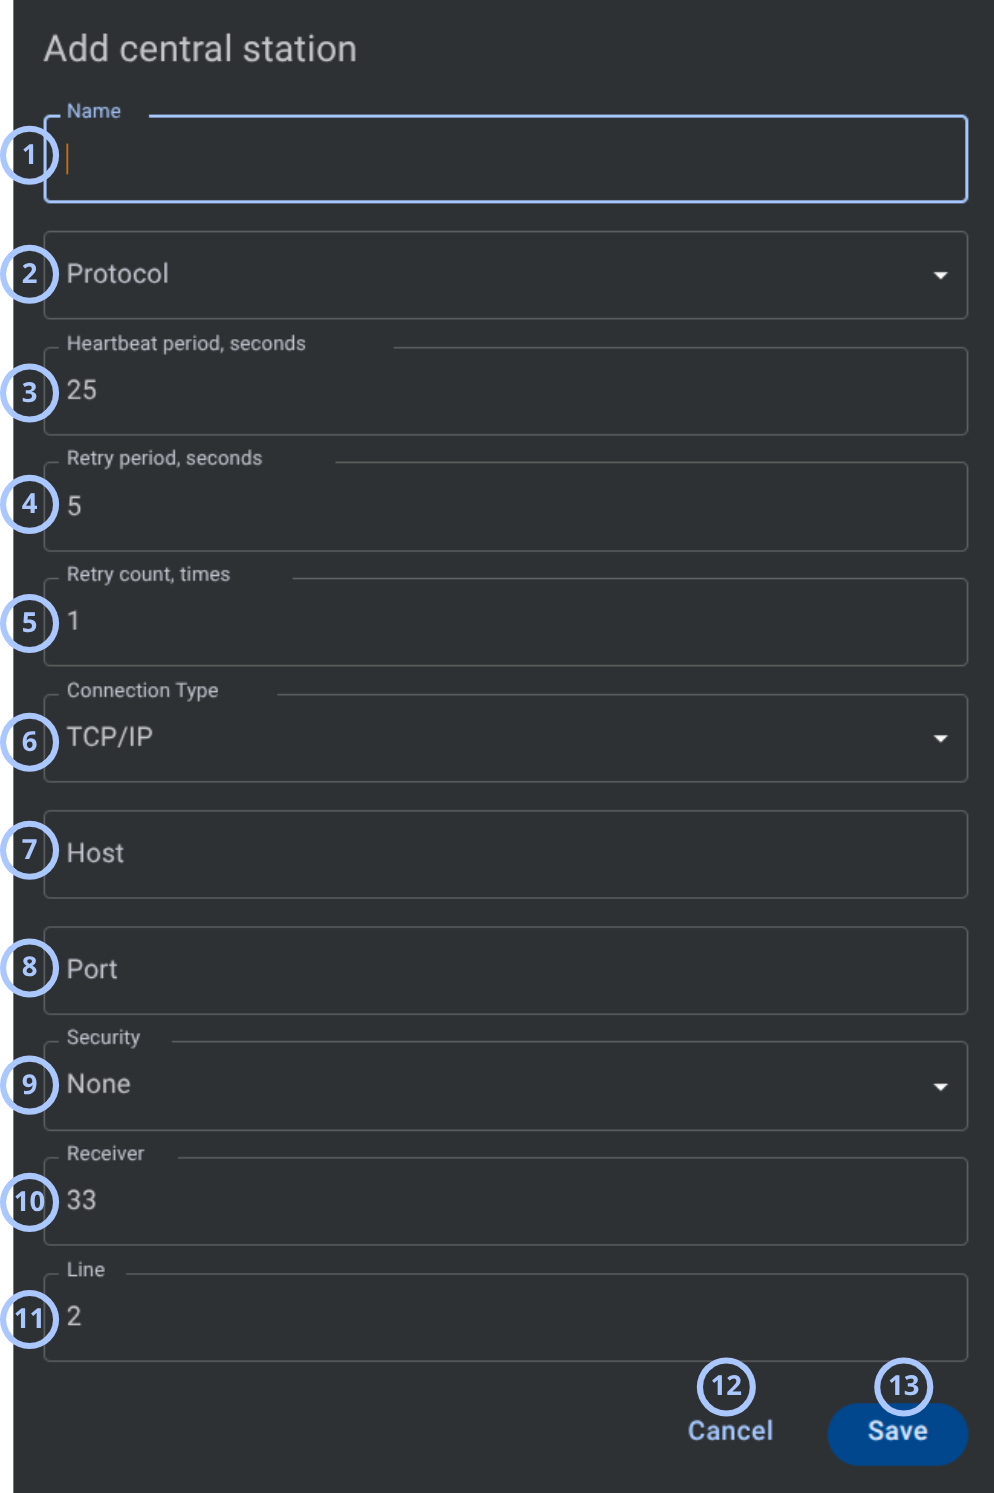
| Callout | UI element | Description | When to use |
|---|---|---|---|
| 1 | Name field | Stores the central station name. | Use to enter a name that identifies the central station in the grid. |
| 2 | Protocol field | Dropdown field for selecting the central station protocol. | Use to choose the protocol used for communication. |
| 3 | Heartbeat period, seconds field | Stores the heartbeat interval. | Use to define how often the heartbeat is sent, in seconds. |
| 4 | Retry period, seconds field | Stores the retry interval. | Use to define how long the system waits between retries, in seconds. |
| 5 | Retry count, times field | Stores the number of retry attempts. | Use to define how many retry attempts the system can make. |
| 6 | Connection Type field | Dropdown field for selecting the connection type. | Use to select the connection method. |
| 7 | Host field | Stores the host address. | Use to enter the central station host value. |
| 8 | Port field | Stores the port value. | Use to enter the port used for central station communication. |
| 9 | Security field | Dropdown field for selecting security. | Use to select the security protocol for the connection. |
| 10 | Receiver field | Stores the receiver value. | Use to enter the receiver value required by the central station configuration. |
| 11 | Line field | Stores the line value. | Use to enter the line value when required by the selected protocol. |
| 12 | Cancel button | Cancels central station creation and closes the Add central station dialog. | Use to exit the dialog without saving changes. |
| 13 | Save button | Saves the central station settings. | Use after entering the required central station details. |
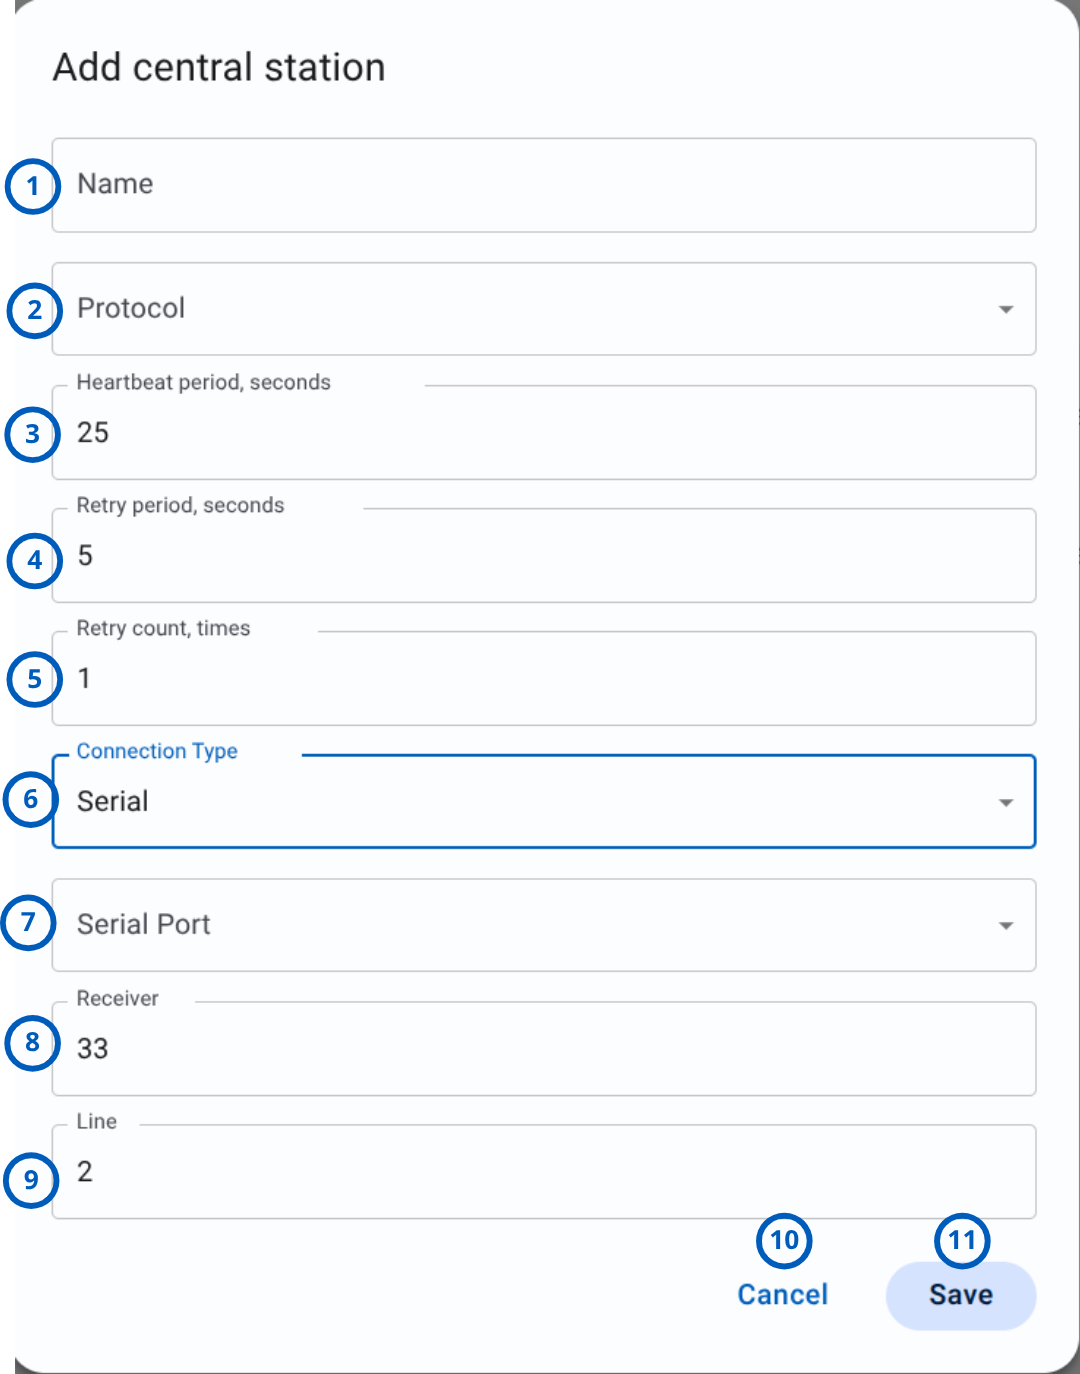
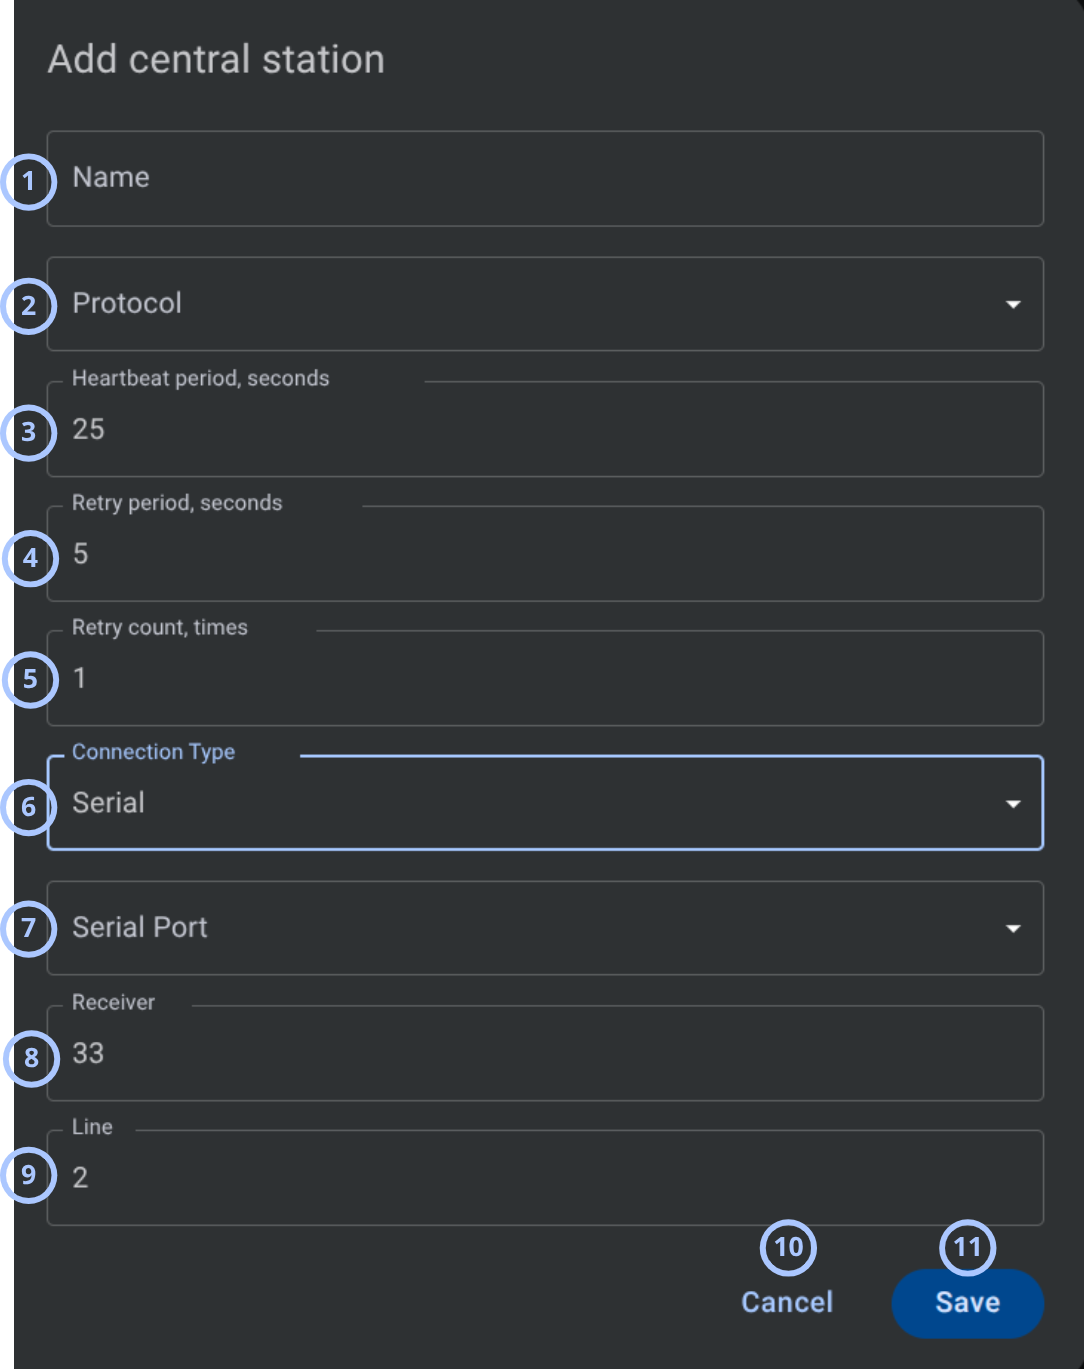
| Callout | UI element | Description | When to use |
|---|---|---|---|
| 1 | Name field | Field for entering the central station name. | Use to define a name that identifies the central station in the Central stations list. |
| 2 | Protocol dropdown | Dropdown for selecting the communication protocol used by the central station. | Use to choose the protocol required for communication with the central station. |
| 3 | Heartbeat period field | Field for entering the heartbeat interval in seconds. | Use to define the heartbeat period for the central station connection. |
| 4 | Retry period field | Field for entering the retry interval in seconds. | Use to define how long the system waits before retrying communication. |
| 5 | Retry count field | Field for entering the number of retry attempts. | Use to define how many retry attempts are allowed. |
| 6 | Connection Type dropdown | Dropdown for selecting the connection type. | Use to choose how the central station connects to the system. |
| 7 | Serial Port dropdown | Dropdown for selecting the serial port used by the central station connection. | Use when the selected connection type is Serial. |
| 8 | Receiver field | Field for entering the receiver number. | Use to configure the receiver identifier for the central station. |
| 9 | Line field | Field for entering the line number. | Use to configure the line identifier for the central station. |
| 10 | Cancel button | Cancels central station creation and closes the Add central station dialog. | Use to exit the dialog without saving changes. |
| 11 | Save button | Saves the central station settings. | Use after entering the required central station details. |
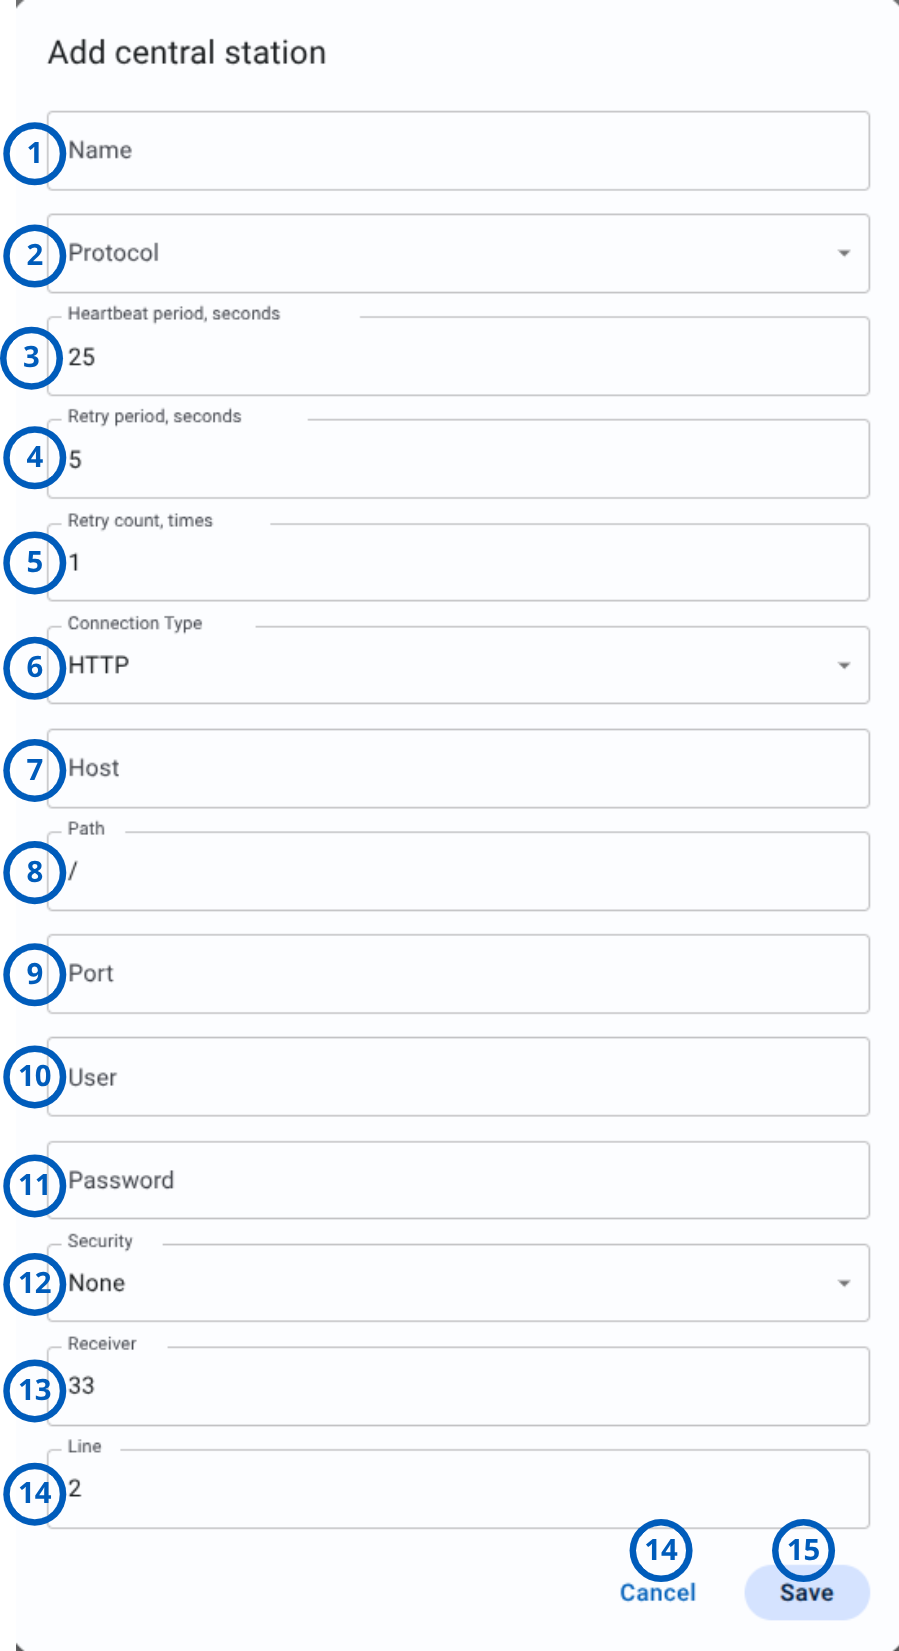
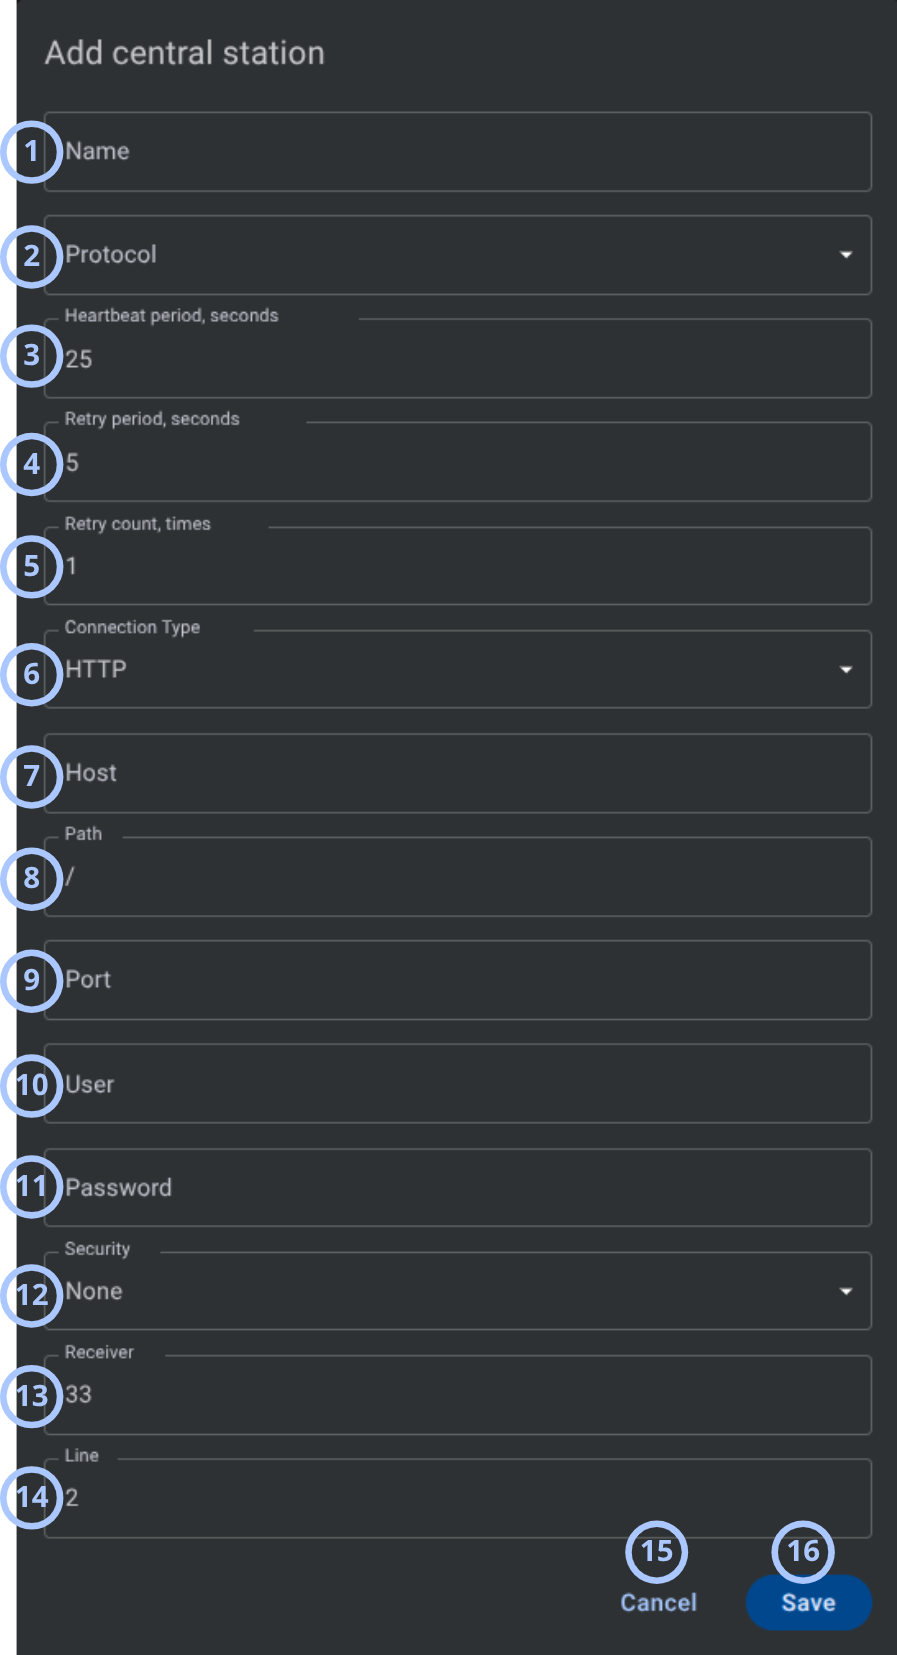
| Callout | UI element | Description | When to use |
|---|---|---|---|
| 1 | Name field | Field for entering the central station name. | Use to define a name that identifies the central station in the Central stations list. |
| 2 | Protocol dropdown | Dropdown for selecting the communication protocol used by the central station. | Use to choose the protocol required for communication with the central station. |
| 3 | Heartbeat period field | Field for entering the heartbeat interval in seconds. | Use to define the heartbeat period for the central station connection. |
| 4 | Retry period field | Field for entering the retry interval in seconds. | Use to define how long the system waits before retrying communication. |
| 5 | Retry count field | Field for entering the number of retry attempts. | Use to define how many retry attempts are allowed. |
| 6 | Connection Type dropdown | Dropdown for selecting the connection type. | Use to choose how the central station connects to the system. |
| 7 | Host field | Field for entering the host address for the HTTP connection. | Use when the selected connection type is HTTP. |
| 8 | Path field | Field for entering the HTTP path used by the central station connection. | Use to define the endpoint path for the HTTP connection. |
| 9 | Port field | Field for entering the port number used by the HTTP connection. | Use to define the network port for the central station connection. |
| 10 | User field | Field for entering the user name used for HTTP authentication. | Use when the HTTP connection requires authentication. |
| 11 | Password field | Field for entering the password used for HTTP authentication. | Use when the HTTP connection requires authentication. |
| 12 | Security dropdown | Dropdown for selecting the security option for the HTTP connection. | Use to configure the security mode required by the central station. |
| 13 | Receiver field | Field for entering the receiver number. | Use to configure the receiver identifier for the central station. |
| 14 | Line field | Field for entering the line number. | Use to configure the line identifier for the central station. |
| 14 | Cancel button | Cancels central station creation and closes the Add central station dialog. | Use to exit the dialog without saving changes. |
| 15 | Save button | Saves the central station settings. | Use after entering the required central station details. |
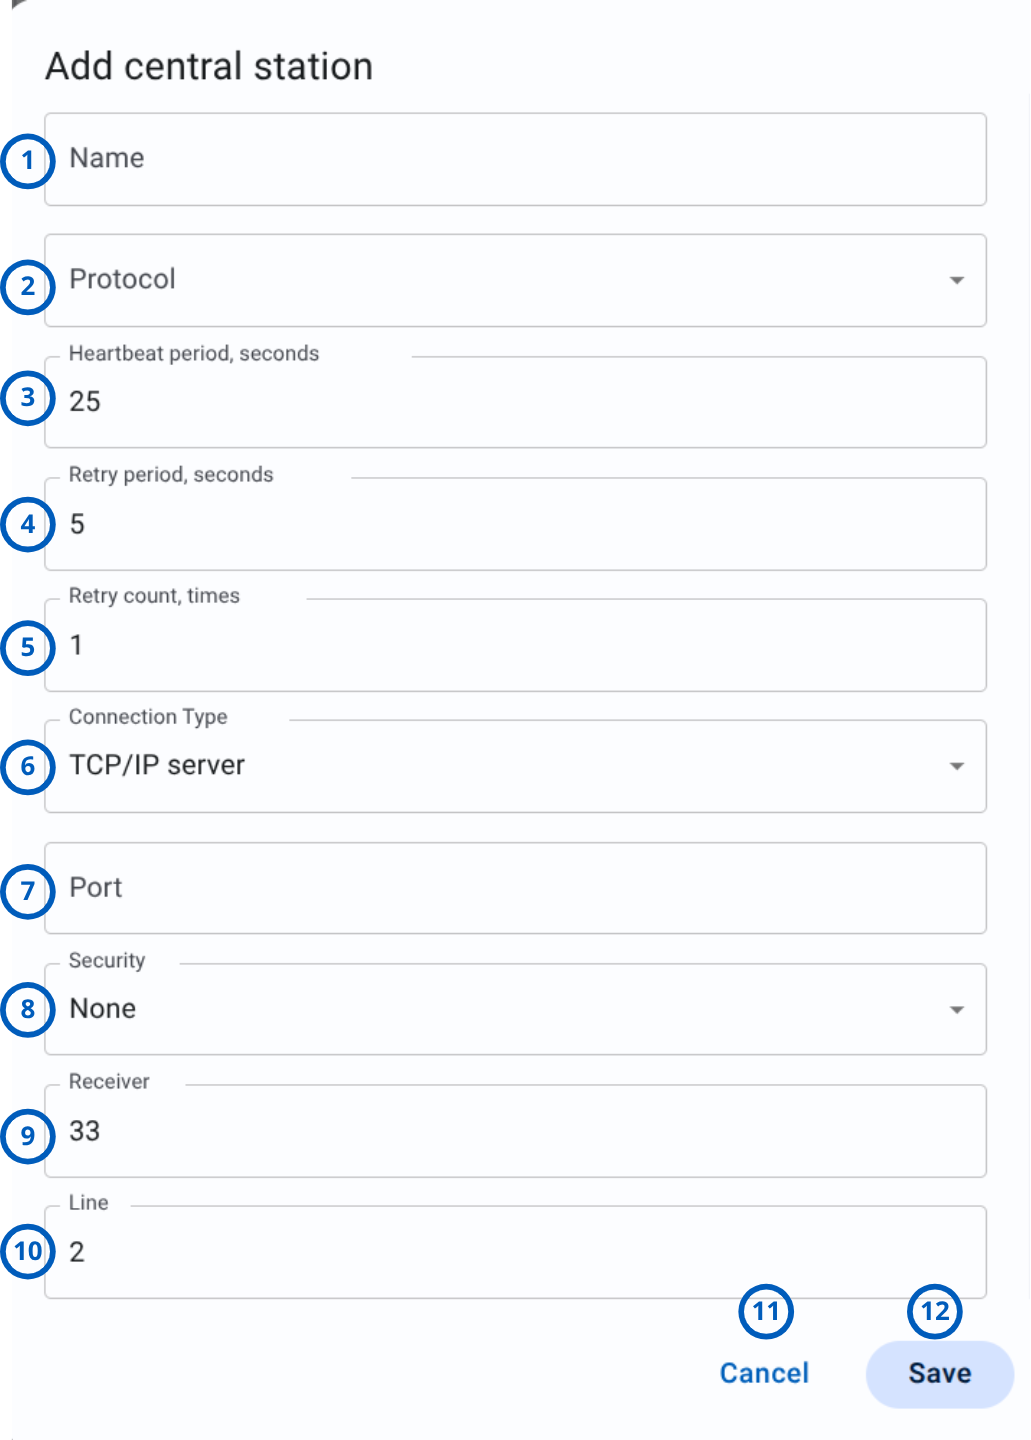
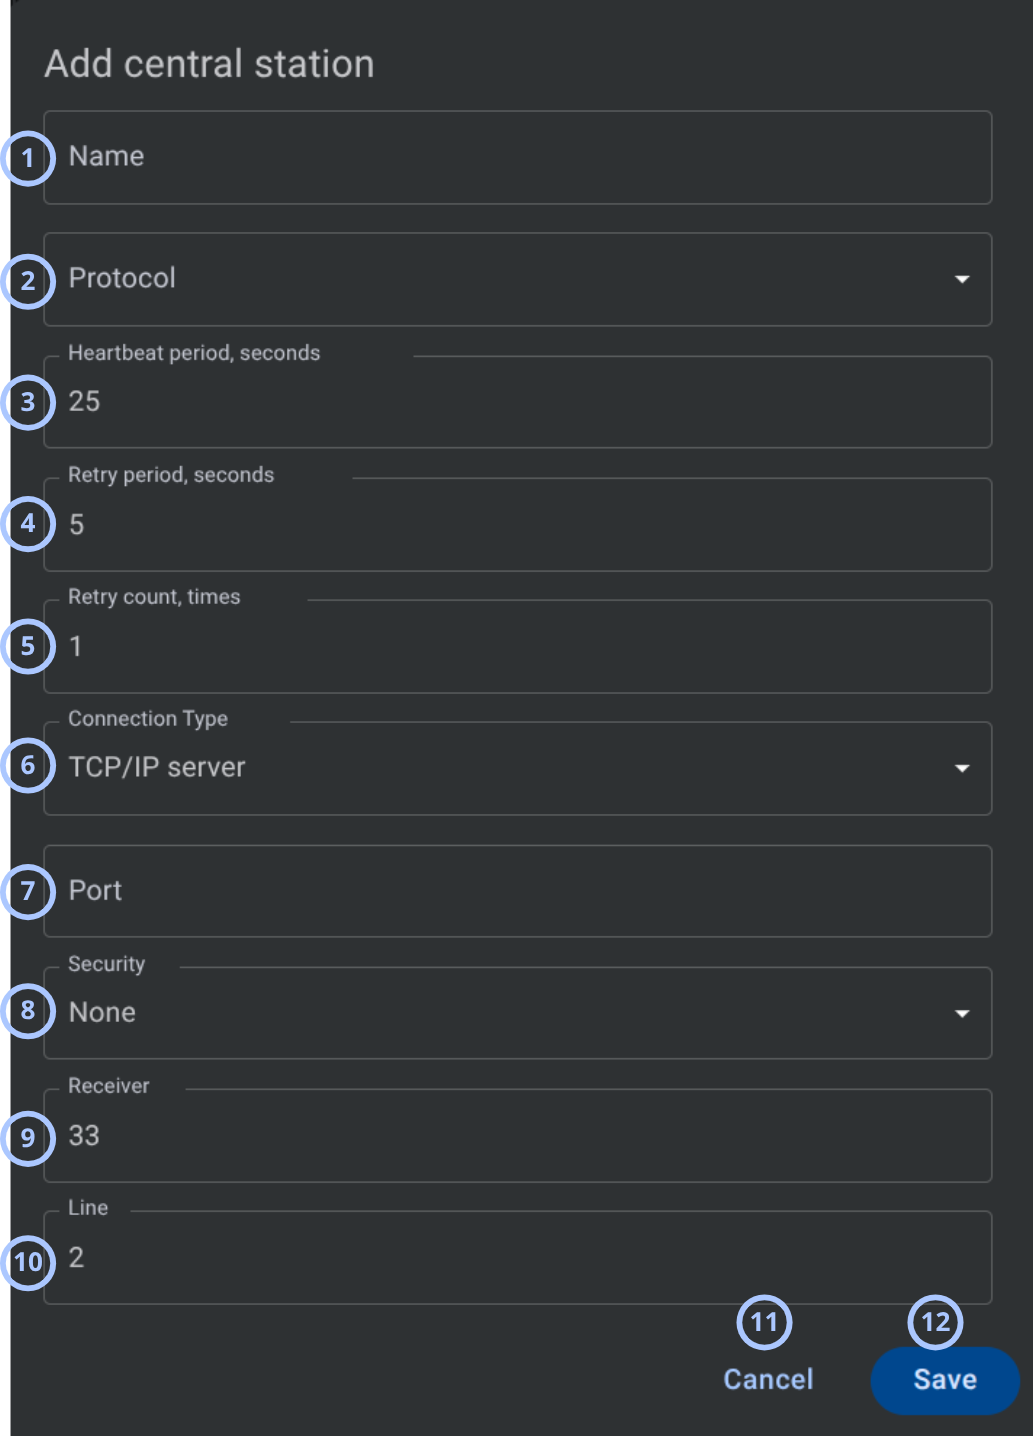
| Callout | UI element | Description | When to use |
|---|---|---|---|
| 1 | Name field | Field for entering the central station name. | Use to define a name that identifies the central station in the Central stations list. |
| 2 | Protocol dropdown | Dropdown for selecting the communication protocol used by the central station. | Use to choose the protocol required for communication with the central station. |
| 3 | Heartbeat period field | Field for entering the heartbeat interval in seconds. | Use to define the heartbeat period for the central station connection. |
| 4 | Retry period field | Field for entering the retry interval in seconds. | Use to define how long the system waits before retrying communication. |
| 5 | Retry count field | Field for entering the number of retry attempts. | Use to define how many retry attempts are allowed. |
| 6 | Connection Type dropdown | Dropdown for selecting the connection type. | Use to configure the central station as a TCP/IP server connection. |
| 7 | Port field | Field for entering the port number used by the TCP/IP server connection. | Use to define the network port that the central station uses for communication. |
| 8 | Security dropdown | Dropdown for selecting the security option for the TCP/IP server connection. | Use to configure the security mode required for the central station connection. |
| 9 | Receiver field | Field for entering the receiver number. | Use to configure the receiver identifier for the central station. |
| 10 | Line field | Field for entering the line number. | Use to configure the line identifier for the central station. |
| 11 | Cancel button | Cancels central station creation and closes the Add central station dialog. | Use to exit the dialog without saving changes. |
| 12 | Save button | Saves the central station settings. | Use after entering the required central station details. |
How to use this page
Setting up Visual alarm verification
PowerManage supports BOLD Manitou, One-click, and MASterMind using One-click for Visual alarm verification.
- BOLD Manitou
- One-click
- MASterMind using One-click
PowerManage supports the protocol used by BOLD Manitou. The protocol is selected and configured from the dialog menus of PowerManage during installation. The integration allows monitoring providers to view images (clips) related to events embedded in the Manitou application.
PowerManage supports any automation software that displays a web or hyperlink in the event information.
In this case the MLR2 protocol is used to relay the event information without the visual information. When the event is processed by the monitoring provider, the operator clicks once on a web link to view the visual images from the protected site. The link to event interface user allows you to see the last 15 events for last 5 minutes or initialize video on demand for specified panel and user. The operator can then view the most recent events, along with the images associated with them on-demand.
To configure the one-click option in PowerManage, select MLR2 and add a new user with the Event Interface User role in the System page of the PowerManage web page.
The one-click method requires adding a simple link to every account on the automation software, in the following format:
http://[powermanage-IP-address]/extern/login/in/e/[user]/p/[password]?page=/event/video/account/[account number]
Make sure to write or copy/paste this URL as one line, with no spaces; also, the brackets are placeholders for user-specific information and must not be typed.
Where:
[Powermanage IP address]is the address of PowerManage server.[user]and[password]are used to enable the event-user log on to PowerManage with the event-user role in PowerManage.[account number]represents the account number as recorded against that account in the PowerManage event log.
[user] and [password] relate to the user with Event Interface User role. The password must contain lowercase letters (a-z), uppercase letters (A-Z), digits (0-9) and special characters (only colon, dash, underscore, dot and tilde are admitted).
The one-click method is widely used by several monitoring providers, including those using MASterMind.
The hyperlink is usually added in Mastermind as part of defining the site and client information in a Procedure or a General Dispatch instruction (see the General Dispatch example in the following figure).
In the General Dispatch Instruction example above, the link to the monitoring user account is entered in the Dispatch Instructions box, using the following syntax:
<[number]>
Include the < and >; also, replace the text between the brackets with the relevant user-specific information - the brackets are placeholders and must not be typed.
Where:
[Powermanage IP address]is the address of PowerManage server.[user]and[password]are used to log on the user with the event-user role in PowerManage.[account number]represents the account number as recorded against that account in the PowerManage event log. See the example in the preceding figure.
Review central stations
Goal:
- View configured central stations and their communication status.
Steps:
- Open Central stations.
- Review the grid.
- Check the following columns:
- Name to identify the central station.
- Status to check whether the central station is online or offline.
- Protocol to confirm the communication protocol.
- Communication to review host, IP, or port information.
Expected result:
- You can identify configured central stations and review their communication state.
Add a central station
Goal:
- Create a central station entry.
Steps:
- Open Central stations.
- Select the + add icon.
- In the Add central station modal, enter a value in Name.
- Select a value in Protocol.
- Review or update Heartbeat period, seconds.
- Review or update Retry period, seconds.
- Review or update Retry count, times.
- Select a value in Connection Type.
- Enter Host.
- Enter Port.
- Select a value in Security.
- Enter Receiver.
- Enter Line if required by the selected protocol.
- Select Save.
Expected result:
- The central station is saved.
- The central station appears in the Central stations grid when creation succeeds.
Confirm the host, port, protocol, security, receiver, and line values before saving. Incorrect values can prevent central station communication.
Edit central station communications
Goal:
- Change communication profile settings for a central station.
Steps:
- Open Central stations.
- Locate the central station row.
- Select the edit icon at the end of the row.
- In the Edit central station communications modal, confirm the central station name and protocol.
- Turn profile switches on or off as needed.
- Select Save.
Expected result:
- The communication profile settings are saved for the selected central station.
Field and option reference
List of available protocols
| Protocol | Type |
|---|---|
| DC-09 | ADM-CID |
| SIA-DCS | |
| FEP XML | CID |
| SIA | |
| SYS | |
| MLR2 | Contact-Id |
| MAS SIA L3 | |
| SIA L2 | |
| SIA L3 with serial | |
| VIS NAP | CID |
| SIA | |
| Visonic | |
| VIS NAP V2 | Visonic |
| VIS NAP V3 | Visonic |
Tips
- Review the Status column before editing communication settings.
- Confirm the selected central station name and protocol in the edit modal before saving changes.
- Use clear central station names so entries are easier to identify in the grid.
- Check host and port values carefully before saving a new central station.
- Use the pagination range to confirm whether additional central station entries are available on another page.
Troubleshooting
The Central stations page is not visible
Possible causes
- Your role does not include permission to list Central stations.
What to do
- Confirm that you are signed in with the correct user account.
- Contact an administrator with role management permissions.
- Ask the administrator to verify your access to Central stations.
Central station status is Offline
Possible causes
- The host or port is incorrect.
- The selected protocol does not match the central station configuration.
- The connection type or security setting is not accepted by the target central station.
- The central station is unavailable or unreachable.
What to do
- Review the Communication column.
- Edit the central station and verify host, port, protocol, and security settings.
- Confirm that the central station endpoint is available.
- Contact support if the configuration appears correct but the status remains Offline.