Users
Overview
The Users tab in Equipment hub shows panel users for the selected panel and account assignments for those users.
Use this tab to:
- Review panel users and user roles.
- Check whether a panel user code is set.
- Review partitions assigned to panel users.
- Assign an account to a panel user.
- Review account status for assigned accounts.
- Disable a panel user when the action is available.
- Unassign, reset, or remove an assigned account when the action is available.
- Open user details and actions.
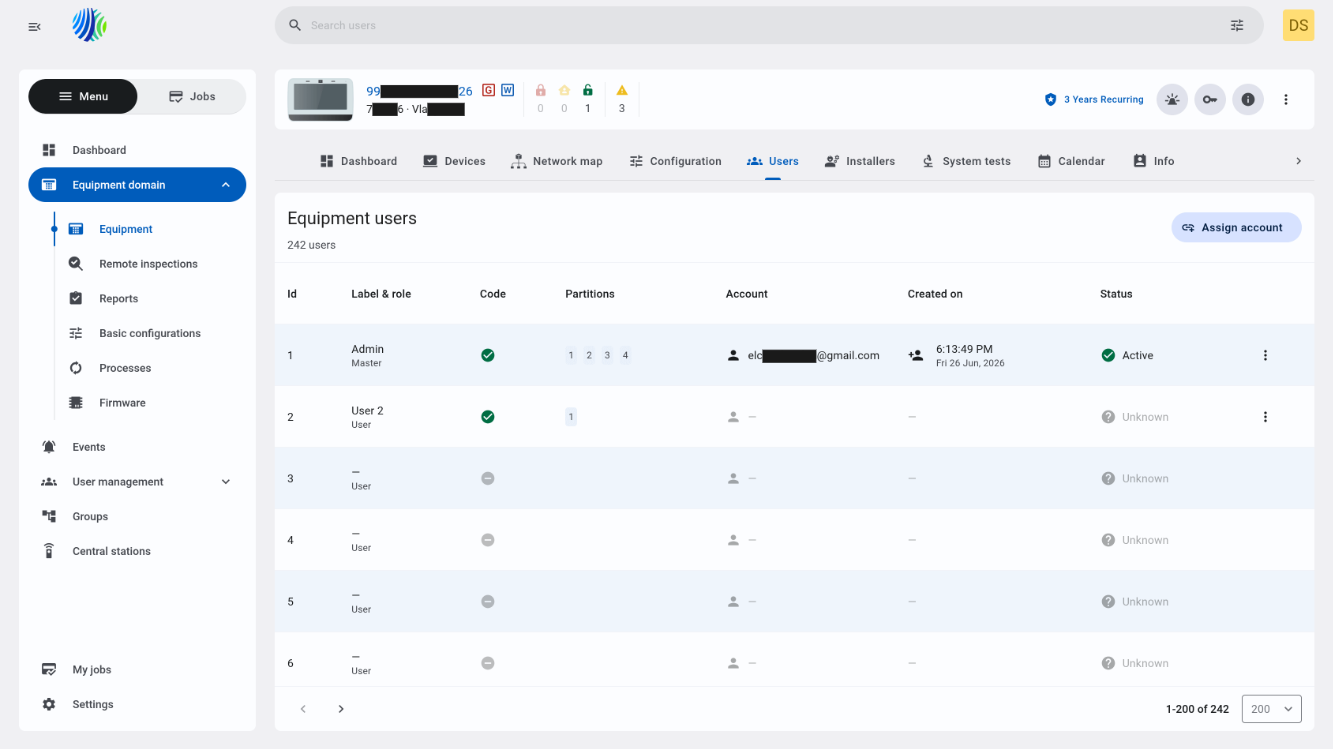
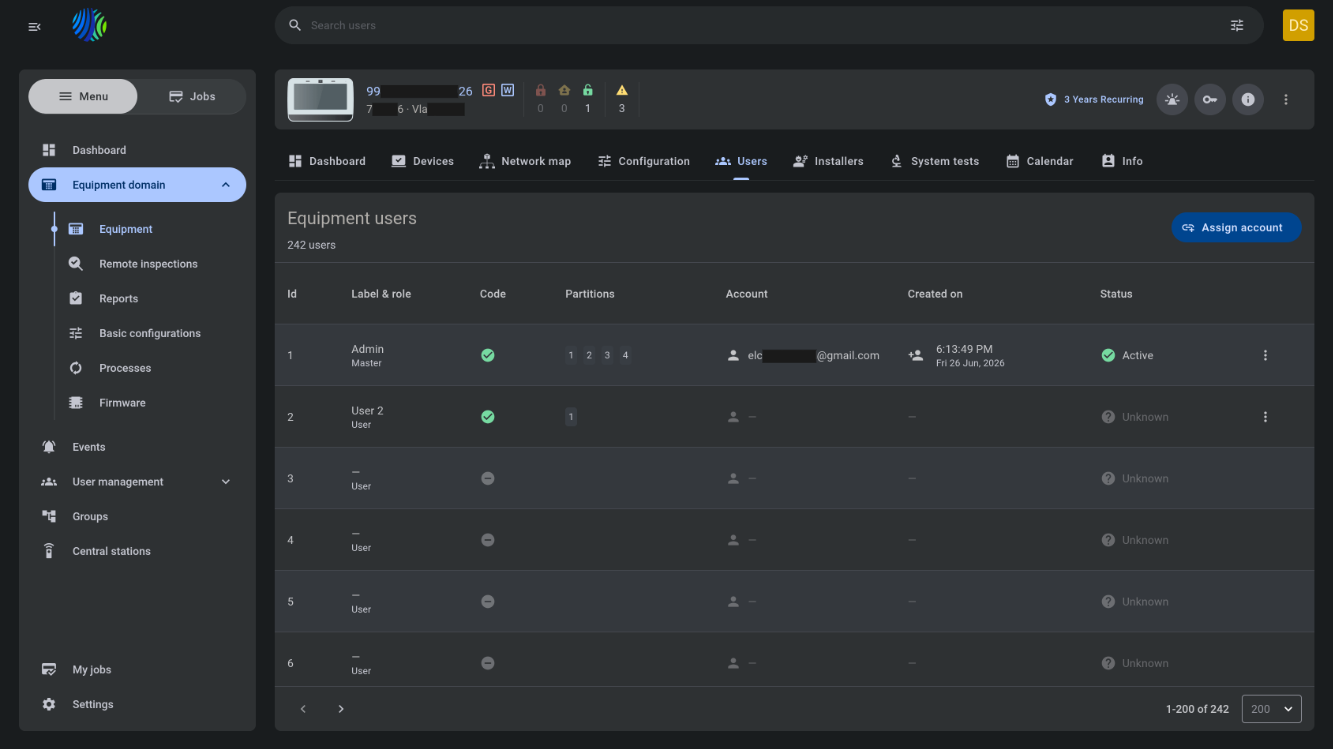
To open the Users tab, select a panel on the Equipment page, open Equipment hub, and then select the Users tab.
Before you begin
Required permissions
Required permissions depend on the action that you want to complete.
- You must have permission to open Equipment hub for the selected panel.
- You must have permission to view panel users.
- You must have permission to assign and unassign accounts if these actions are restricted by role.
- You must have permission to edit panel user code, label, partitions, door locks, or proximity tag assignments if these actions are restricted by role.
- You must have permission to reset a password or remove an account if these actions are restricted by role.
Access to the Equipment hub page and panel user management actions is controlled by the role permission group named Unit.
Preconditions
- Open Equipment hub by selecting a panel from the Equipment page.
- The selected panel must exist on the PowerManage server.
Dependencies
- Available panel user roles depend on panel type.
- Account assignment depends on existing customer accounts and account status.
- Partition assignment depends on the panel capabilities and whether the panel user code is set.
- Door locks and proximity tag assignments depend on panel type and configuration.
- Three dot menu actions depend on panel user code state, assigned account state, panel user role, and permissions.
Important limitations
- A suspended account cannot be assigned to a panel user.
- For a Master user, Disable panel user is not available.
- Partitions and labels cannot be changed until the panel user PIN or code is set.
- When a panel user is disabled, the user code is removed and the user no longer exists on the panel.
Page layout
Page header


The page header shows the tab name, the panel user count, and the account assignment action.
| Callout | UI element | Description | When to use |
|---|---|---|---|
| 1 | Page name and panel users count | Shows the page name: Equipment users; shows the number of panel users for the selected panel, for example, X users. The count can differ between panels. | Use to confirm that you are on the Users tab and to understand how many panel users are available for the selected panel. |
| 2 | Assign account button | Opens the Assign account to panel modal window. | Use to assign an account to a panel user. |
Assign account modal window
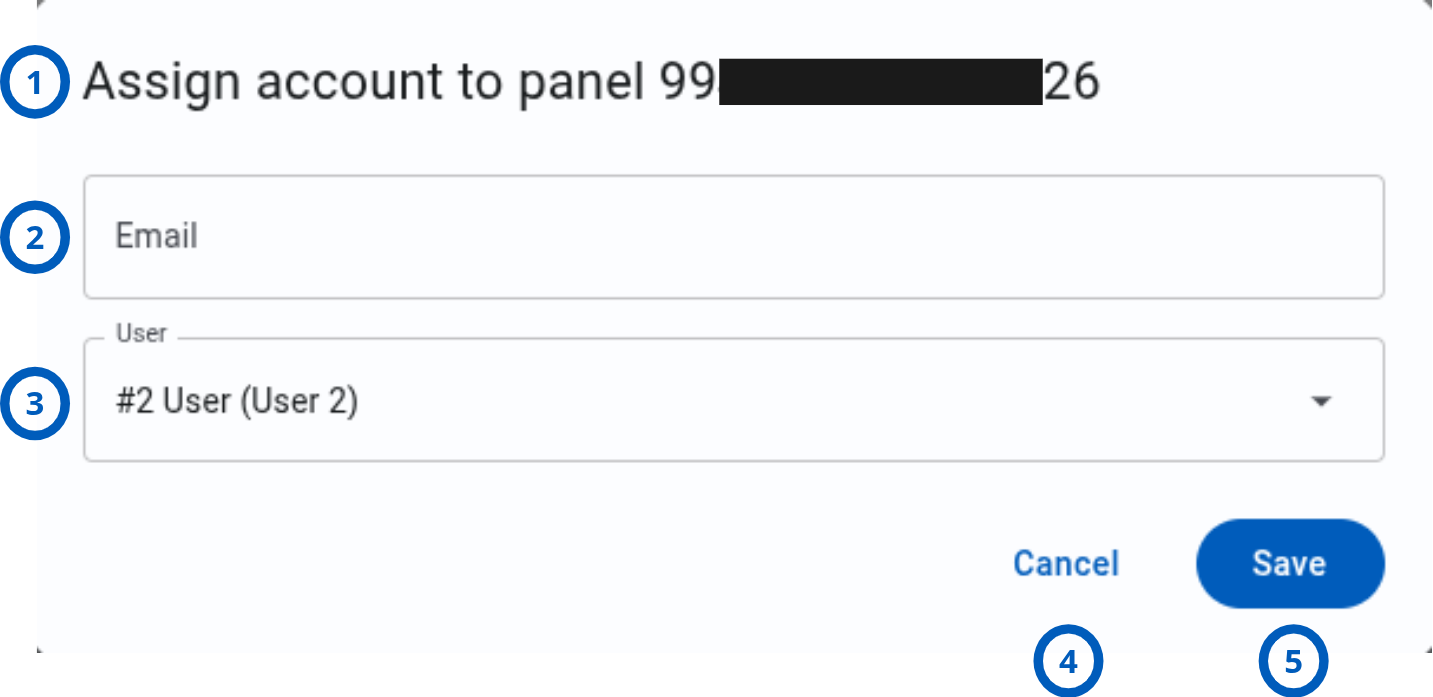
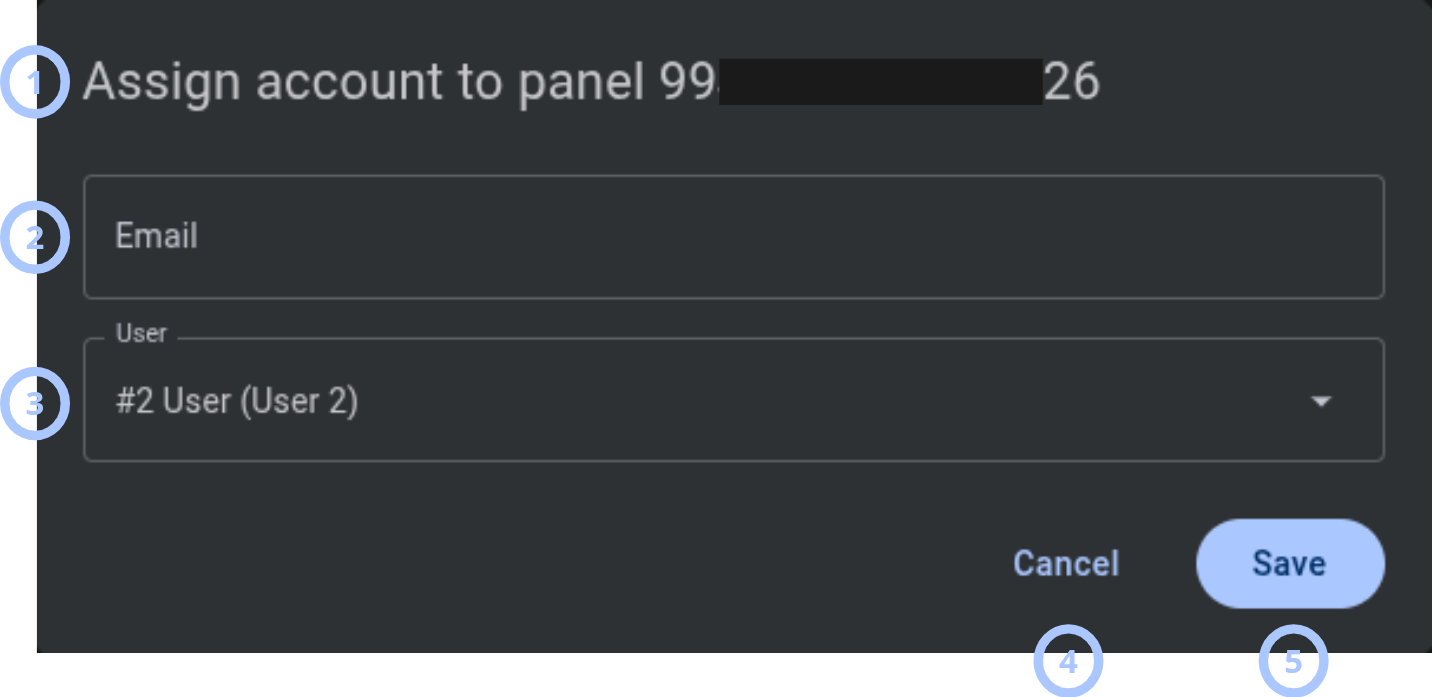
The Assign account to panel modal window lets you assign an account to a selected panel user.
| Callout | UI element | Description | When to use |
|---|---|---|---|
| 1 | Modal title | Shows the modal name: Assign account to panel. | Use to confirm that you are assigning an account to the correct panel. |
| 2 | Email field | Lets you enter an account email and select an account from suggestions. Suspended accounts cannot be assigned to a panel user. | Use to select the customer account that must be assigned. |
| 3 | User dropdown | Shows available panel users for the selected panel. | Use to select the panel user that the account will be assigned to. |
| 4 | Cancel button | Closes the modal window without saving changes. | Use when you do not want to assign an account. |
| 5 | Save button | Assigns the selected account to the selected panel user when valid values are entered. The Users grid then shows Account, Created on, and Status values for the panel user. | Use to save the account assignment. |
Users grid
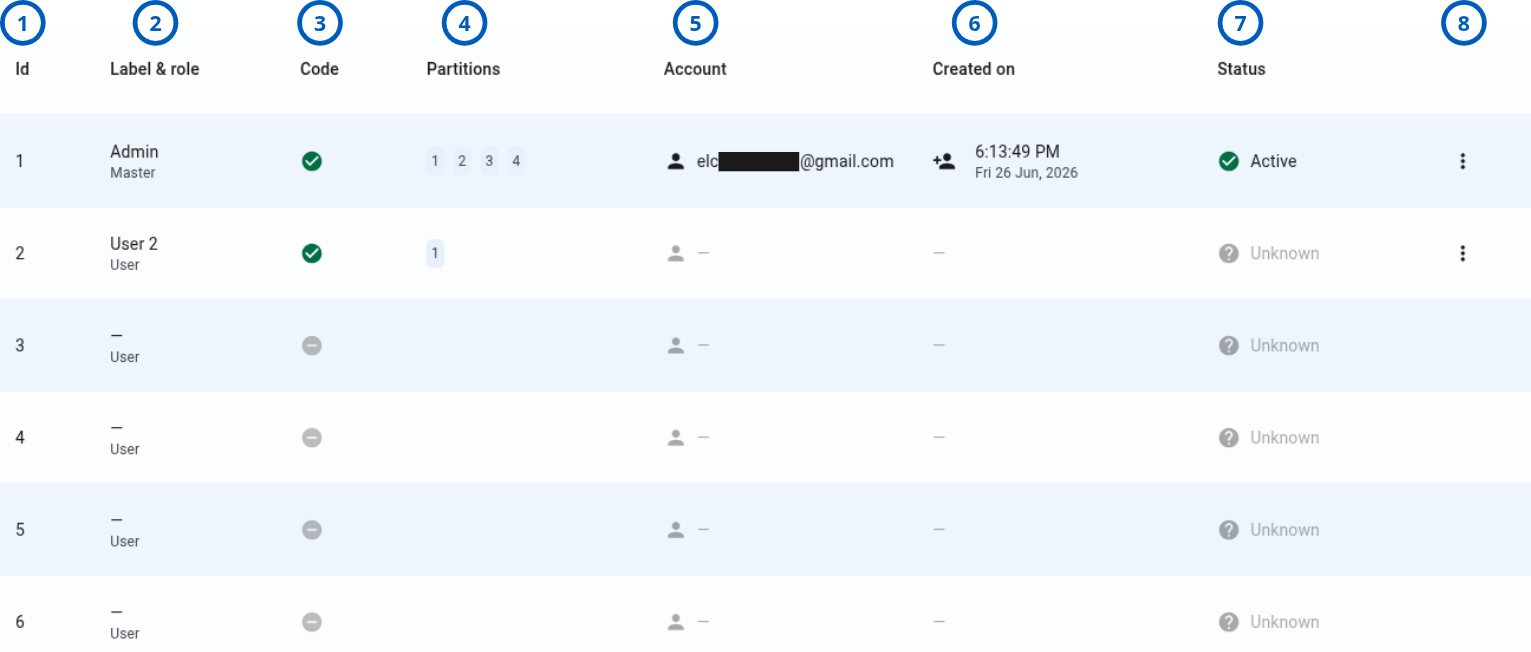
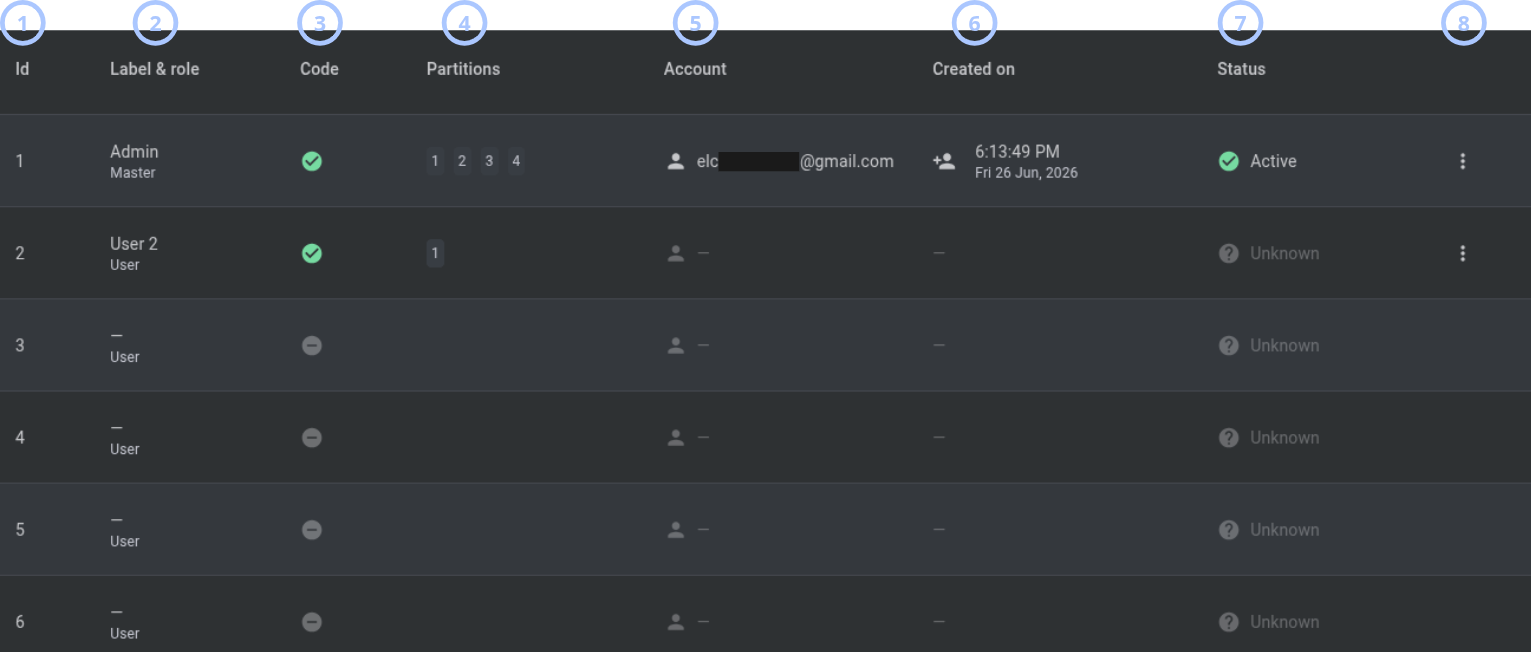
The Users grid shows panel users, code state, partitions, assigned account information, and available actions.
| Callout | UI element | Description | When to use |
|---|---|---|---|
| 1 | Id | Shows the panel user ID, for example, 1, 2, or 3. | Use to identify the panel user slot. |
| 2 | Label and role | Shows the panel user label and role. By default, labels can be User 1, User 2, and so on. The label can be changed after the panel user code is set. If a code is not set, a dash is shown. Available roles depend on panel type. | Use to review the panel user name and role. |
| 3 | Code | Shows whether the panel user code is set. A green checkbox icon means the code is set and the user exists on the panel. A grey minus icon means the code is not set and the user does not exist on the panel. | Use to check whether the panel user exists on the panel. |
| 4 | Partitions | Shows assigned partitions, for example, 1, 4, 6. Master users are always assigned to all panel partitions. Partitions cannot be changed until the panel user PIN or code is set. | Use to review panel user partition access. |
| 5 | Account | Shows the assigned account email. If no account is assigned, a dash is shown. | Use to review whether an account is assigned to the panel user. |
| 6 | Created on | Shows the account created date if an account is assigned, for example, 4:24:55 PM Wed 13 May, 2026. If no account is assigned, a dash is shown. | Use to review when the assigned account was created. |
| 7 | Status | Shows the account status when an account is assigned. If no account is assigned, Unknown is shown. Status values include Not confirmed, Active, and Suspended. | Use to understand whether the assigned account has customer application access. |
| 8 | Three dot menu | Shows available actions depending on conditions. If the user code is set, Disable panel user can be available. If a user code is set and an account is assigned, Disable panel user and Unassign account can be available. If the user code is not set, no menu is shown. For Master users, Disable panel user is not available. | Use to open allowed actions for the panel user. |
User details and actions modal
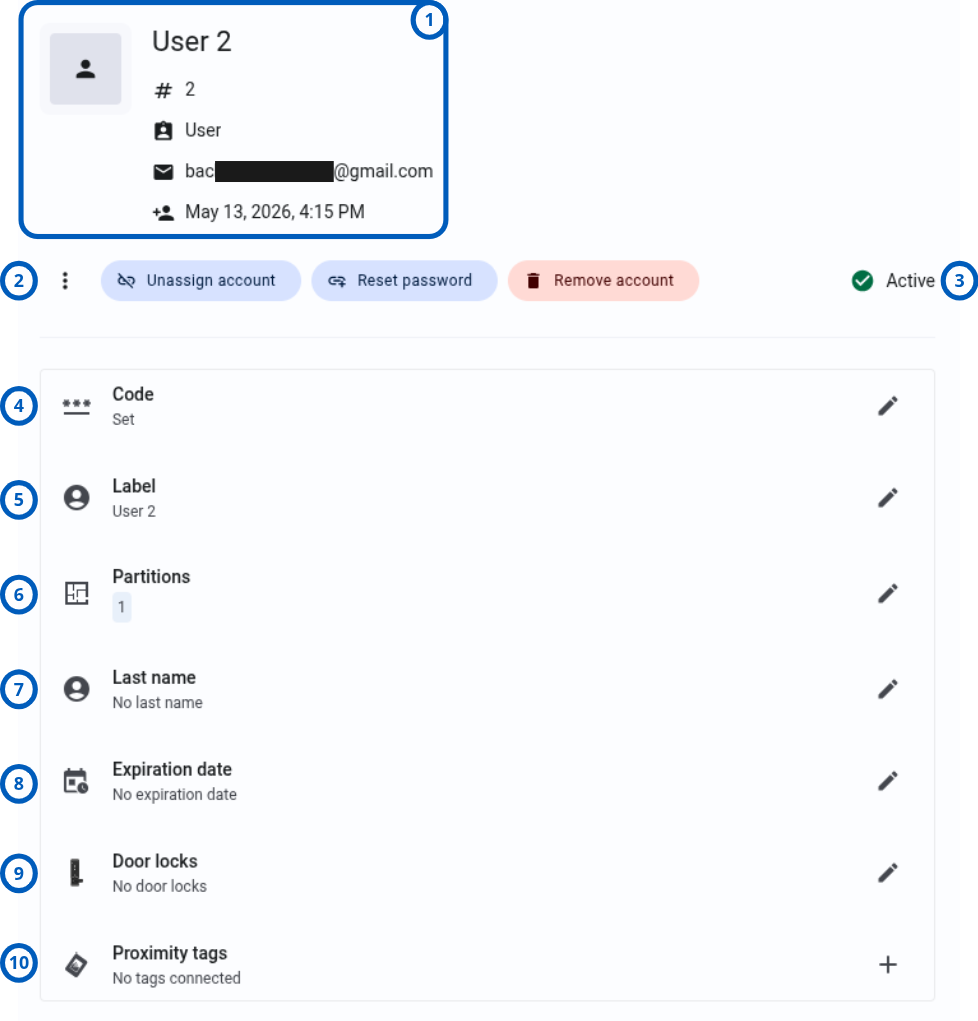
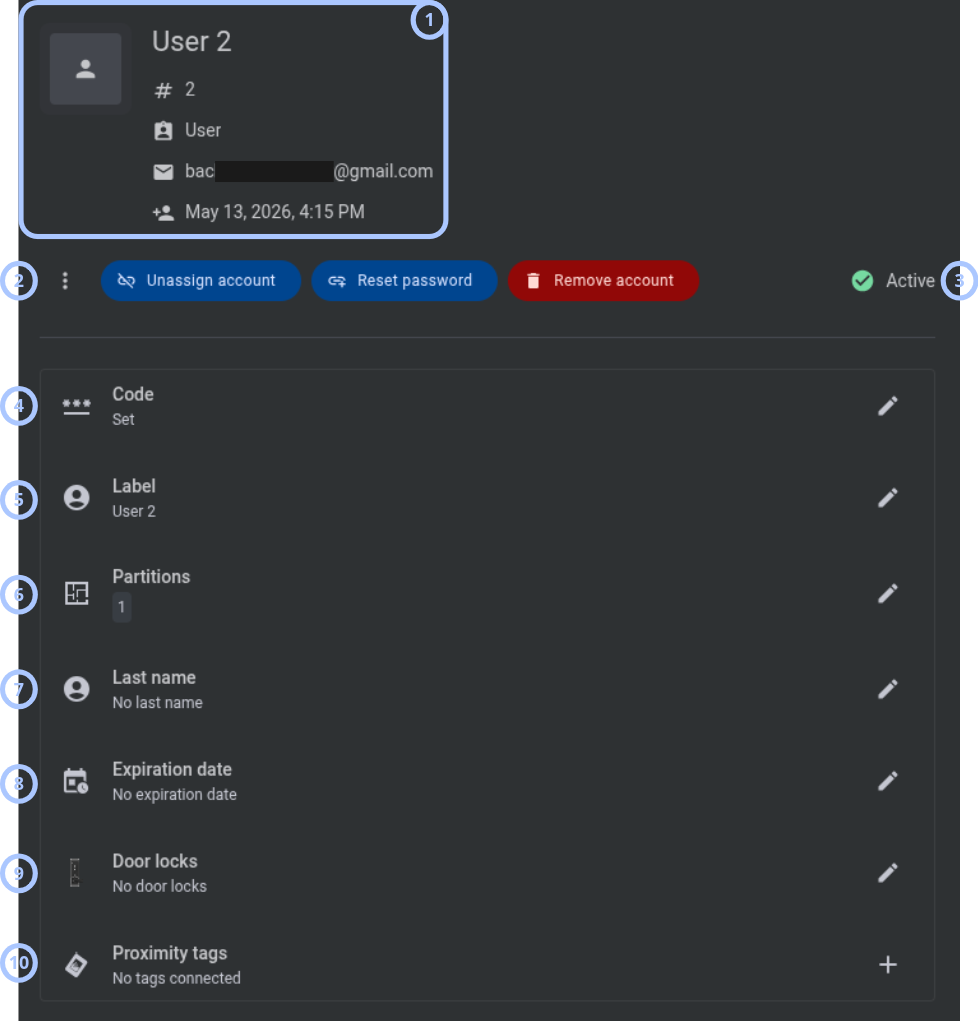
When you select a user in the Users grid, the User details and actions modal opens on the right side.
| Callout | UI element | Description | When to use |
|---|---|---|---|
| 1 | User info | Panel user without code: Shows the panel user ID and role. Panel user with code and no account: Shows panel user name, ID, and role. Panel user with code and assigned account: Shows panel user name, ID, role, assigned account email, and created date. | Use to create a panel user by setting a code. |
| 2 | Account action buttons | Can include Unassign account, Reset password, and Remove account when an account is assigned and the action is allowed. Unassign account removes the assignment but does not delete the customer account. Reset password sends an OTP email. Remove account deletes the customer account entirely. | Use to manage the assigned account. |
| 3 | Status | Shows the current assigned account status: Active, Suspended, or Not confirmed. | Use to understand whether the account can access the user application. |
| 4 | Code | Shows Code (No code) or Code (Set). An edit icon lets you set or edit the code when allowed. | Use to set or change the panel user code. |
| 5 | Label | Shows the panel user label, for example, User X. An edit icon lets you edit the label when the code is set. | Use to update the panel user label. |
| 6 | Last Name | Shows the panel user's last name. An edit icon lets you edit the last name when the code is set. The field is empty by default until a value is provided. | Use to set or update the panel user's last name. |
| 7 | Partitions | Shows the partitions assigned to the panel user (for example, Partition 1, Partition 2) or all partitions if the user has access to all. Displayed only when partitioning is enabled on the panel. An edit icon lets you change the partition assignment when the code is set. Not editable for Duress users. | Use to review or change which partitions the panel user can arm, disarm, and control. |
| 8 | Expiration Date | Shows the date when the panel user code expires and becomes inactive. An edit icon lets you set or change the expiration date when the code is set. After the expiration date, the user is unable to operate the panel (arm, disarm, and other activities). Supported for IQ panels and DSC/Neo panels. | Use to set temporary access for a panel user by defining when their code should stop working. |
| 9 | Door locks | Shows No door locks or the count and list of assigned door locks. | Use to review door lock assignments. |
| 10 | Proximity tags and keypad assignment | Can show legacy proximity tags for keypads with proximity readers and doorlock proximity tags for Yale Doorman L2/L3 door locks, depending on panel type and configuration. | Use to review supported tag and keypad assignments. |
Pagination controls


Pagination controls help you move through panel user pages and change how many users are shown on one page.
| Callout | UI element | Description | When to use |
|---|---|---|---|
| 1 | Previous and next arrows | Shows left and right arrows, such as < and >, to move between user pages. | Use when the users list has more records than the current page can show. |
| 2 | Range indicator | Shows how many users are displayed on the current page, for example, 1-15 of 1000. | Use to understand which user range is currently shown. |
| 3 | Users per page dropdown | Controls how many users are displayed on one page. Available values are 10, 15, 50, 100, and 200. | Use to show fewer or more users in the grid. |
How to use this page
Open the Users tab
Goal:
- Open panel users for a selected panel.
Steps:
- Open the Equipment page.
- Select the panel that you want to review.
- In Equipment hub, select the Users tab.
Expected result:
- The Users tab opens.
- The page header shows Equipment users and the panel user count.
- The grid shows panel users for the selected panel.
Assign an account to a panel user
Goal:
- Assign a customer account to a panel user.
Steps:
- Open the Users tab.
- Select Assign account.
- In the Email field, enter an account email or select an account from suggestions.
- In User, select the panel user.
- Select Save.
Expected result:
- The account is assigned to the selected panel user.
- The Users grid shows Account, Created on, and Status values for the selected panel user.
Set a code for a panel user
Goal:
- Create a panel user on the panel by setting a code.
Steps:
- Open the Users tab.
- Select a panel user that has no code.
- In the User details and actions modal, select the edit icon near Code (No code).
- Enter and save the code.
Expected result:
- The code is set.
- The panel user exists on the panel.
- Label and partition actions become available according to panel capabilities and permissions.
Edit a panel user code
Goal:
- Change a code for an existing panel user.
Steps:
- Open the Users tab.
- Select a panel user that has a code set.
- In the User details and actions modal, select the edit icon near Code (Set).
- Enter and save the new code.
Expected result:
- The panel user code is updated.
Edit a panel user label
Goal:
- Change a panel user label.
Steps:
- Open the Users tab.
- Select a panel user with a code set.
- In the User details and actions modal, select the edit icon near Label.
- Enter and save the new label.
Expected result:
- The panel user label is updated.
Change panel user partitions
Goal:
- Update partition access for a panel user.
Steps:
- Open the Users tab.
- Select a panel user with a code set.
- In the User details and actions modal, open Partitions.
- Update partitions according to panel capabilities.
- Save the changes.
Expected result:
- The panel user partition assignment is updated.
- Master users remain assigned to all partitions.
Disable a panel user
Goal:
- Remove a panel user code from the panel.
Steps:
- Open the Users tab.
- Select a panel user with a code set.
- Open the three dot menu.
- Select Disable panel user.
- Confirm the action if a confirmation message appears.
Expected result:
- The panel user code is removed.
- The user no longer exists on the panel.
- The code state changes to not set.
When disabling a panel user, the label is also affected because the code and label are linked.
Unassign an account
Goal:
- Remove an account assignment from a panel user without deleting the account.
Steps:
- Open the Users tab.
- Select a panel user with an assigned account.
- Select Unassign account from the available actions.
- Confirm the action if a confirmation message appears.
Expected result:
- The account is unassigned from the panel user.
- The customer account is not deleted.
Reset an account password
Goal:
- Send an OTP email for password reset.
Steps:
- Open the Users tab.
- Select a panel user with an assigned account.
- Select Reset password.
Expected result:
- An OTP email is sent for password reset.
- The user can set a new password by using the OTP.
Remove an account
Goal:
- Delete a customer account entirely.
Steps:
- Open the Users tab.
- Select a panel user with an assigned account.
- Select Remove account.
- Confirm the action if a confirmation message appears.
Expected result:
- The customer account is deleted.
- The user loses access to the customer application.
Change users per page
Goal:
- Change how many panel users appear in the grid.
Steps:
- Go to the pagination controls.
- Open the users per page dropdown.
- Select 10, 15, 50, 100, or 200.
Expected result:
- The grid updates to show the selected number of users per page.
Tips
- Review the Code column before trying to edit label or partitions.
- Use Assign account to link an existing customer account to a panel user.
- Do not try to assign a suspended account to a panel user.
- Use Unassign account when you need to remove the panel assignment but keep the customer account.
- Master users are always assigned to all panel partitions and cannot be disabled.
Troubleshooting
Assign account fails
Possible causes
- The selected account is suspended.
- The email was entered but no account was selected from suggestions.
- Your role does not allow assigning accounts.
What to do
- Select an account from the email suggestions.
- Confirm that the account is not suspended.
- Select a valid panel user from the User dropdown.
- Confirm that your role allows assigning accounts.
Three dot menu is not shown
Possible causes
- The panel user code is not set.
- The user does not exist on the panel.
- Your role does not allow user actions.
What to do
- Confirm whether the Code column shows the grey minus icon.
- Set the panel user code if the user must exist on the panel.
- Confirm that your role allows user actions.
Disable panel user action is not available
Possible causes
- The panel user is a Master user.
- The panel user code is not set.
- Your role does not allow disabling panel users.
What to do
- Confirm the panel user role.
- Confirm that the panel user code is set.
- Confirm that your role allows the action.
Label or partitions cannot be changed
Possible causes
- The panel user code is not set.
- The panel does not support the requested partition change.
- The user is a Master user assigned to all partitions.
What to do
- Set the panel user code first.
- Confirm panel capabilities.
- Confirm whether the user is a Master user.
- Try the change again if the action is supported.
Account status is Not confirmed
Possible causes
- The user has not set a password by using OTP.
What to do
- Ask the user to complete password setup by using OTP.
- Use Reset password if a new OTP is required and the action is allowed.
- Refresh the Users tab after setup is complete.
Account status is Suspended
Possible causes
- The account was active but is now suspended.
What to do
- Review the account status.
- Restore the account.
Customer cannot access the customer application
Possible causes
- The account status is Not confirmed or Suspended.
- No account is assigned to the panel user.
- The customer app access setting is disabled for the panel.
- The panel user code is not set.
What to do
- Confirm that an account is assigned.
- Confirm that the account status is Active.
- Confirm that the panel user code is set.
- Check customer app access for the panel.
Door locks or proximity tags are not shown
Possible causes
- The selected panel type does not support the feature.
- The required device or keypad is not configured.
- No door locks or proximity tags are assigned.
What to do
- Confirm the selected panel type and configuration.
- Confirm that door locks or proximity-capable keypads are available.
- Refresh the Users tab.