Reports
Overview
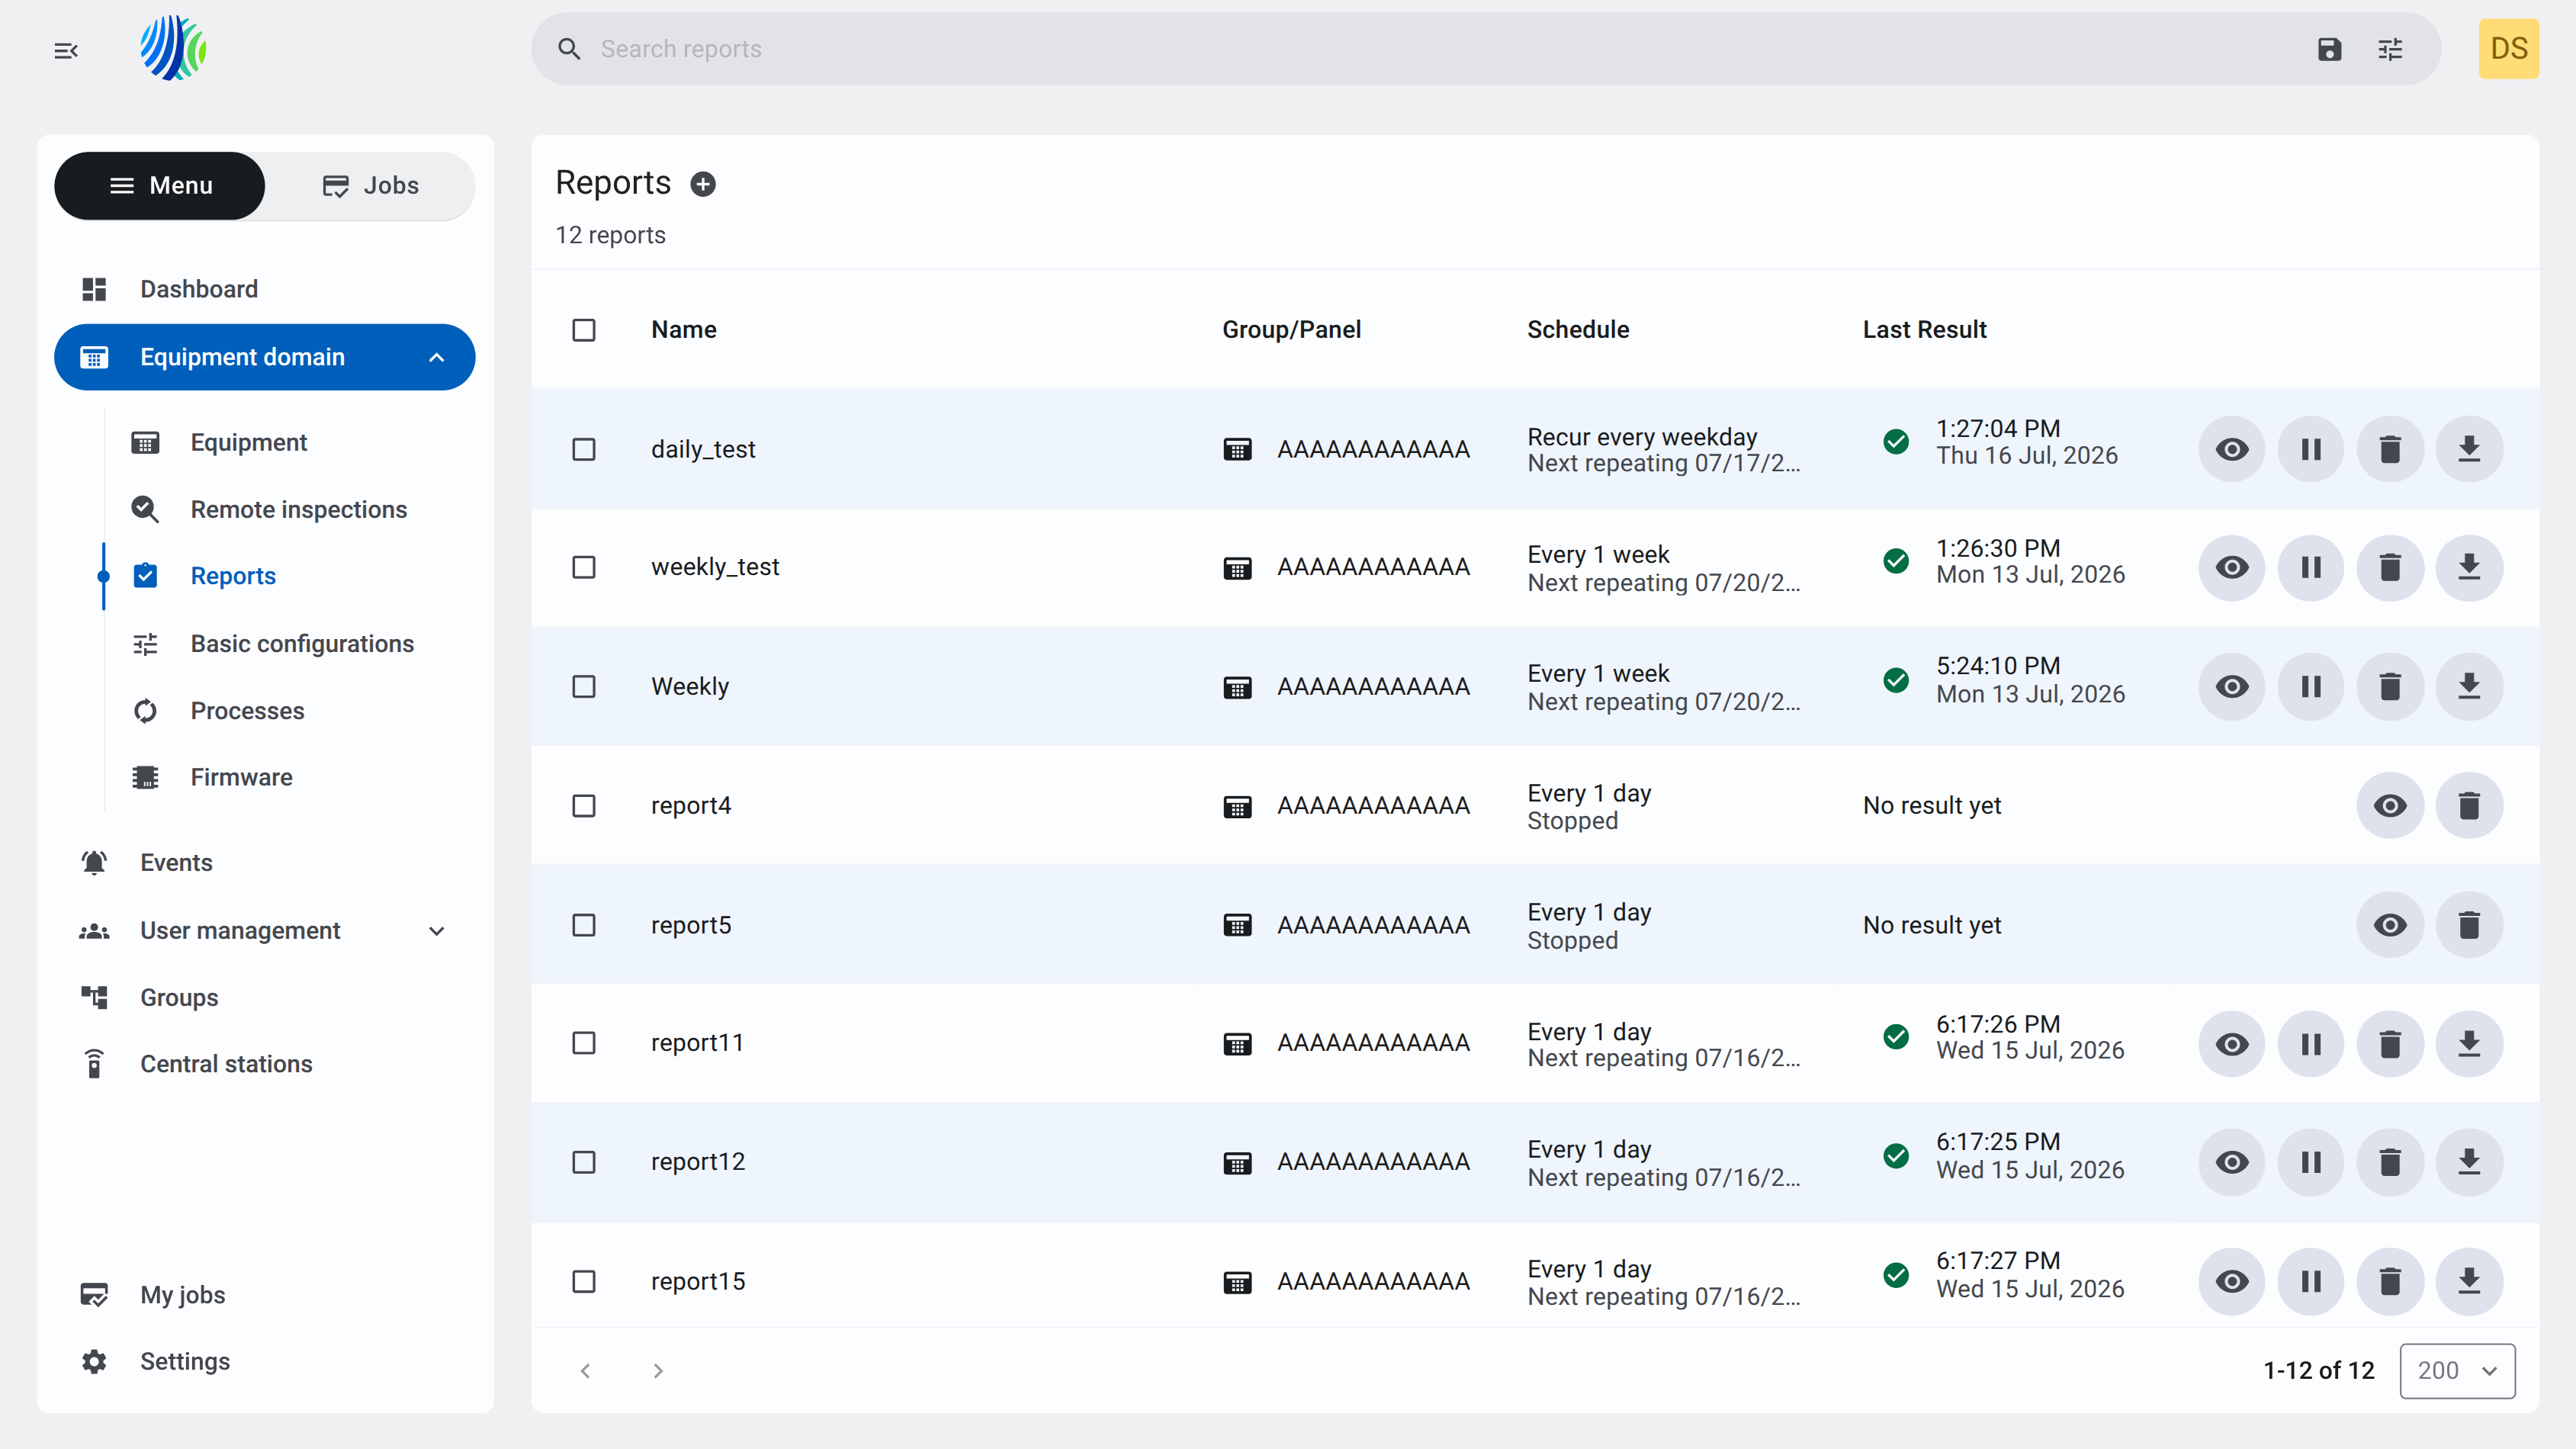
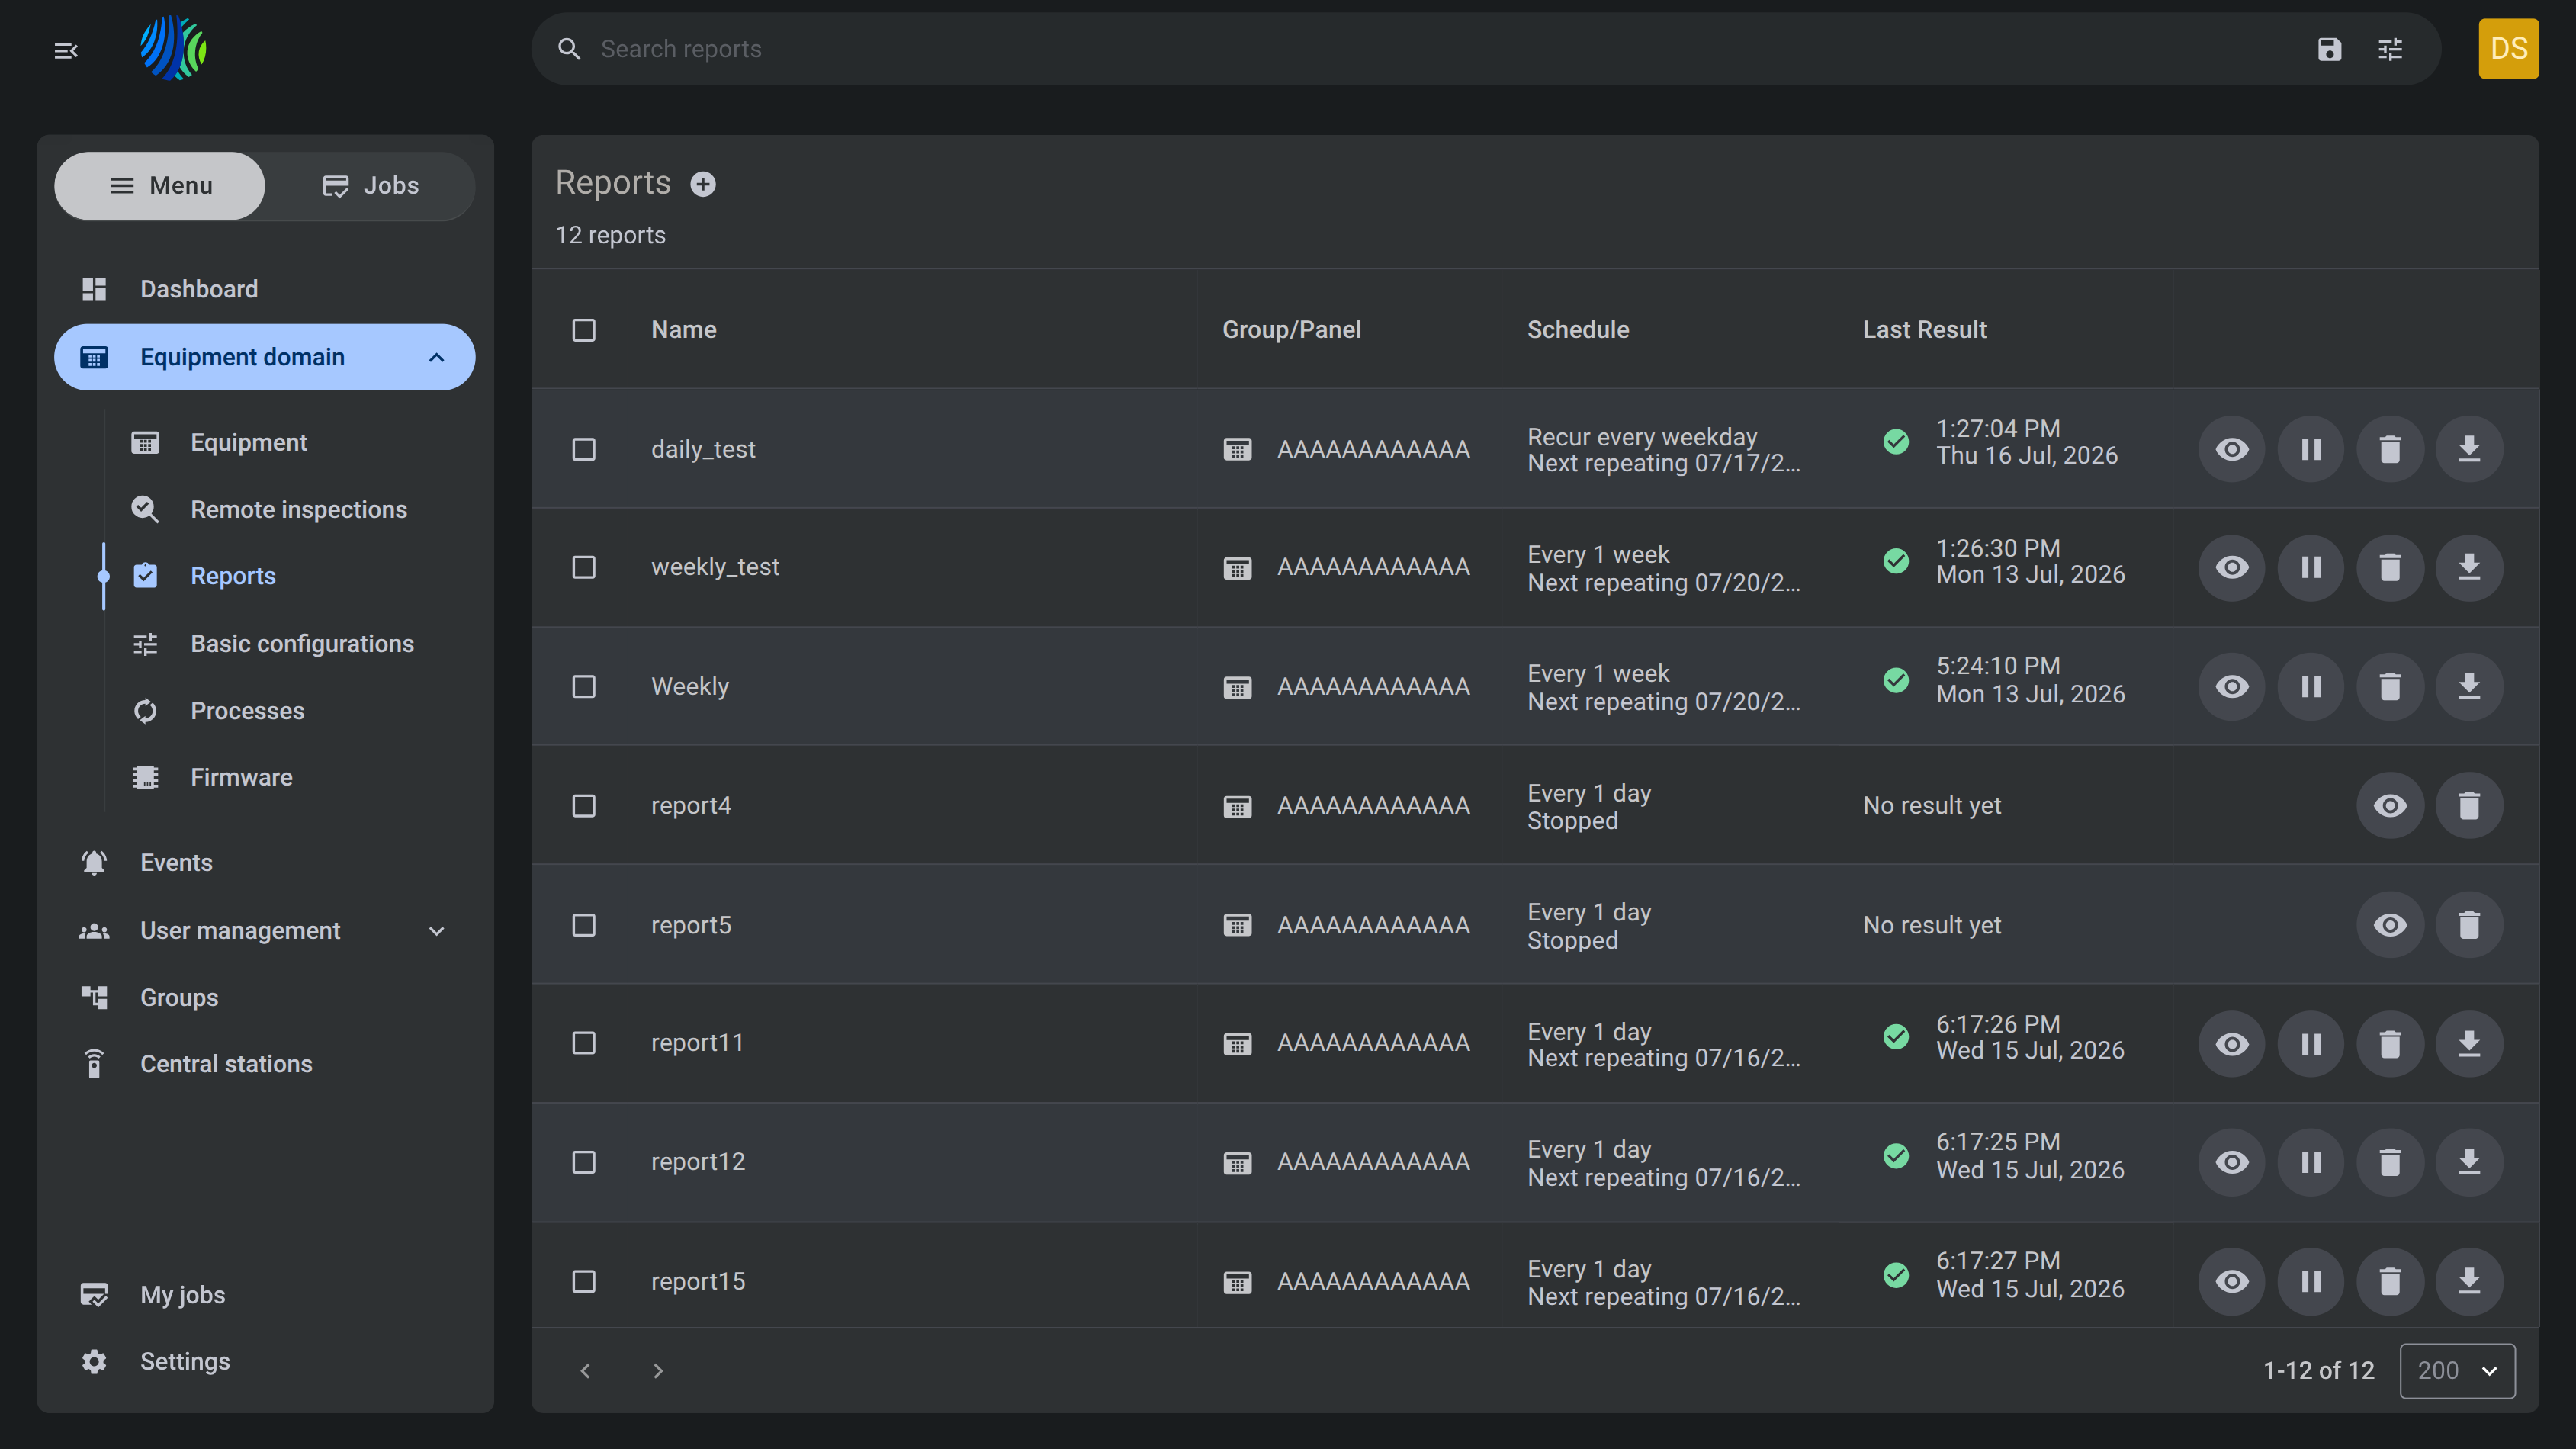
The Reports page is used to create, review, and manage report definitions and report execution results.
Use this page to:
- View configured reports.
- Create reports with the Create report wizard.
- Check report schedule and execution state.
- Remove reports that are no longer needed.
The Reports page helps administrators monitor scheduled reporting, verify whether reports completed successfully, and access generated report files.
Before you begin
Required permissions
- You must have permission to list, review, add, download, remove, stop Reports.
Access to the Reports page is controlled by the role permission group named Reports.
Preconditions
- At least one report must exist before the Reports grid shows records.
Important limitations
- Removing a report permanently deletes the report definition from the Reports page.
Page layout
Page header
The page header identifies the page and shows the number of available entries.


| Callout | UI element | Description | When to use |
|---|---|---|---|
| 1 | Page title | Shows the current page name | Use to confirm that you are on the page. |
| 2 | Page entries count | Shows the total number of entries | Use to understand how many entries are available. |
| 3 | Add icon | Plus icon next to the page title. Opens the Create report wizard. | Use to create a new report. |
Reports grid
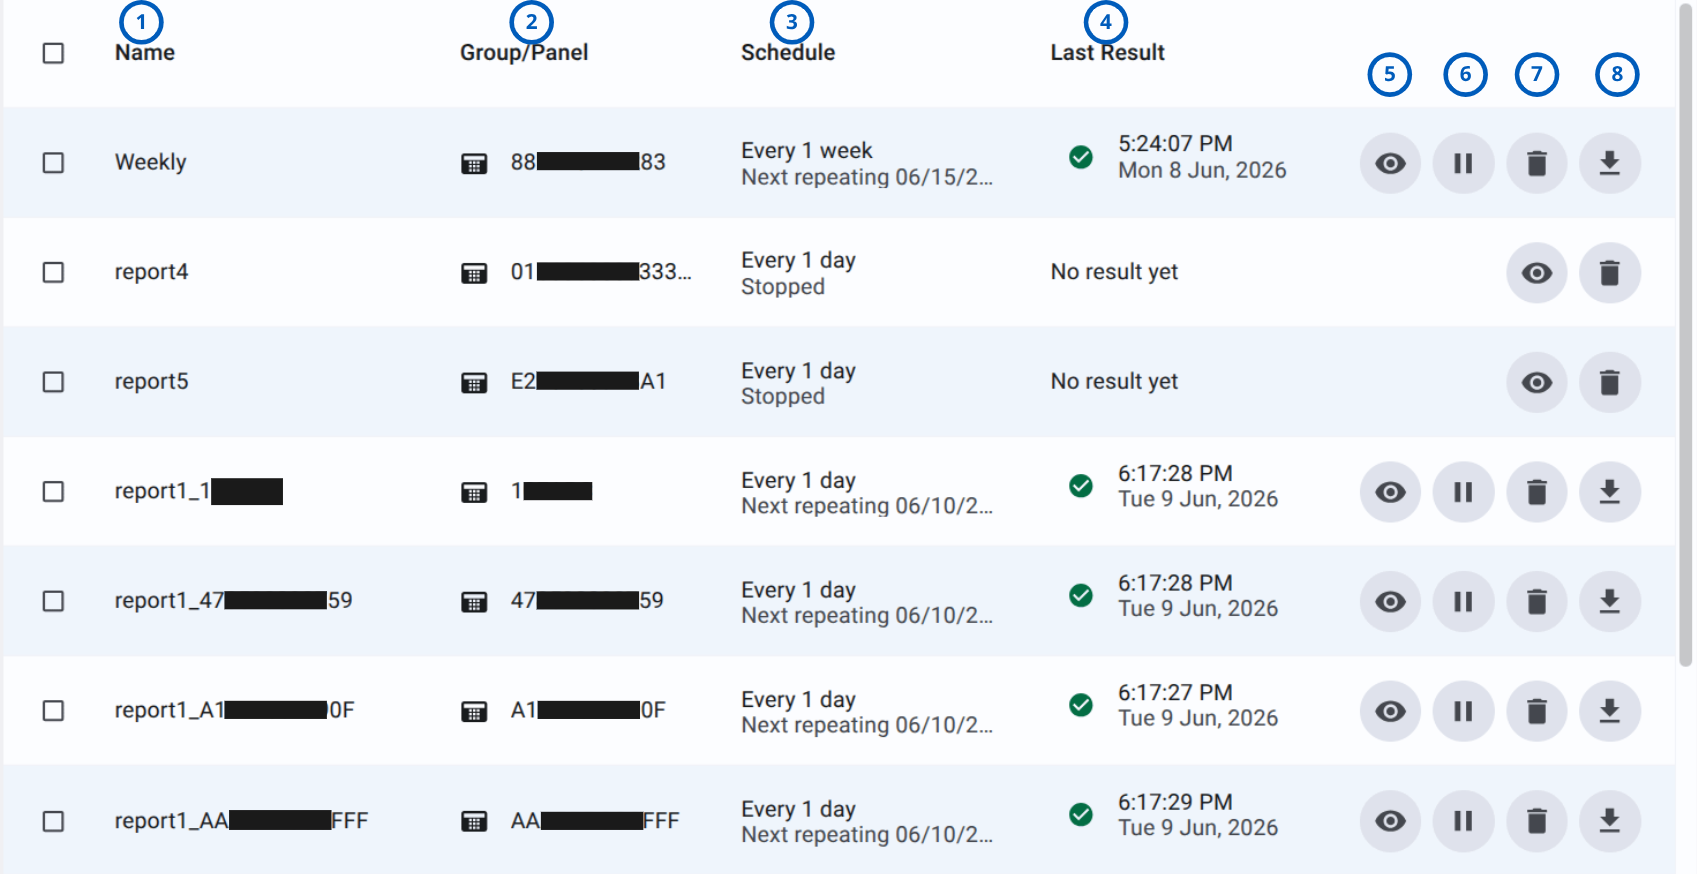
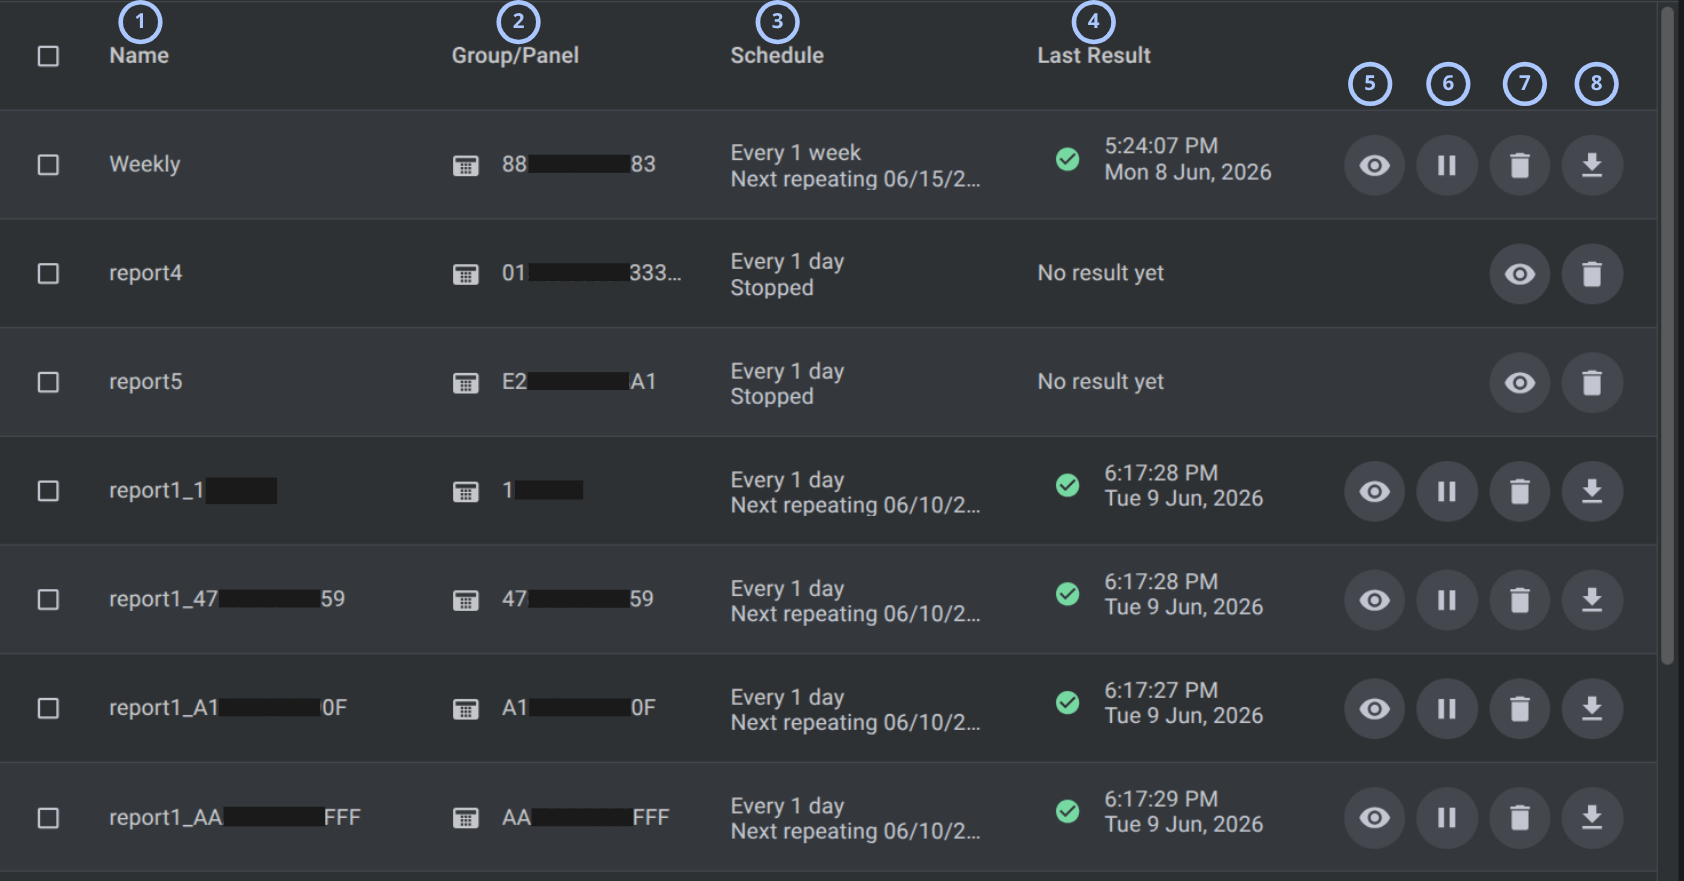
The Reports grid displays report names, associated groups/panels, execution schedules, latest execution results, and available management actions.
| Callout | UI element | Description | When to use |
|---|---|---|---|
| 1 | Name column | Shows the report name. | Use to identify the report definition. |
| 2 | Group/Panel column | Shows the report target with a target icon and ID. | Use to confirm which group or panel the report applies to. |
| 3 | Schedule column | Shows the report schedule frequency and current state. | Use to understand whether the report is one-time, finished, stopped, or repeating. |
| 4 | Last Result column | Shows the latest report result with a status icon and timestamp. | Use to check whether the latest report execution completed successfully and when it completed. |
| 5 | Mark as viewed action | Marks the report result as viewed. | Use after reviewing or acknowledging the latest report result. |
| 6 | Pause action | Pauses an active repeating report schedule. | Use to stop future scheduled executions without removing the report. |
| 7 | Remove action | Removes the selected report from the reports grid. | Use when the report is no longer needed. |
| 8 | Download action | Downloads the selected report result. | Use to save a local copy of the report result. |
Pagination controls
Pagination controls appear at the bottom of the entries grid.


| Callout | UI element | Description | When to use |
|---|---|---|---|
| 1 | Previous and next arrows | Shows left and right arrows, such as < and >, to move between pages. | Use when the entries list has more records than the current page can show. |
| 2 | Range indicator | Shows the current range and total number of entries | Use to understand where you are in the entries list. |
| 3 | Entries per page selector | Controls how many entries appear on one page. | Use to show fewer or more entries in the grid. |
Create report wizard navigation
The Create report wizard opens when you select the add icon. The wizard uses a step list on the left and the selected step form on the right.
- Step 1 - Name
- Step 2 - Report type
- Step 3 - Schedule start
- Step 4 - Report format
- Step 5 - Delivery options
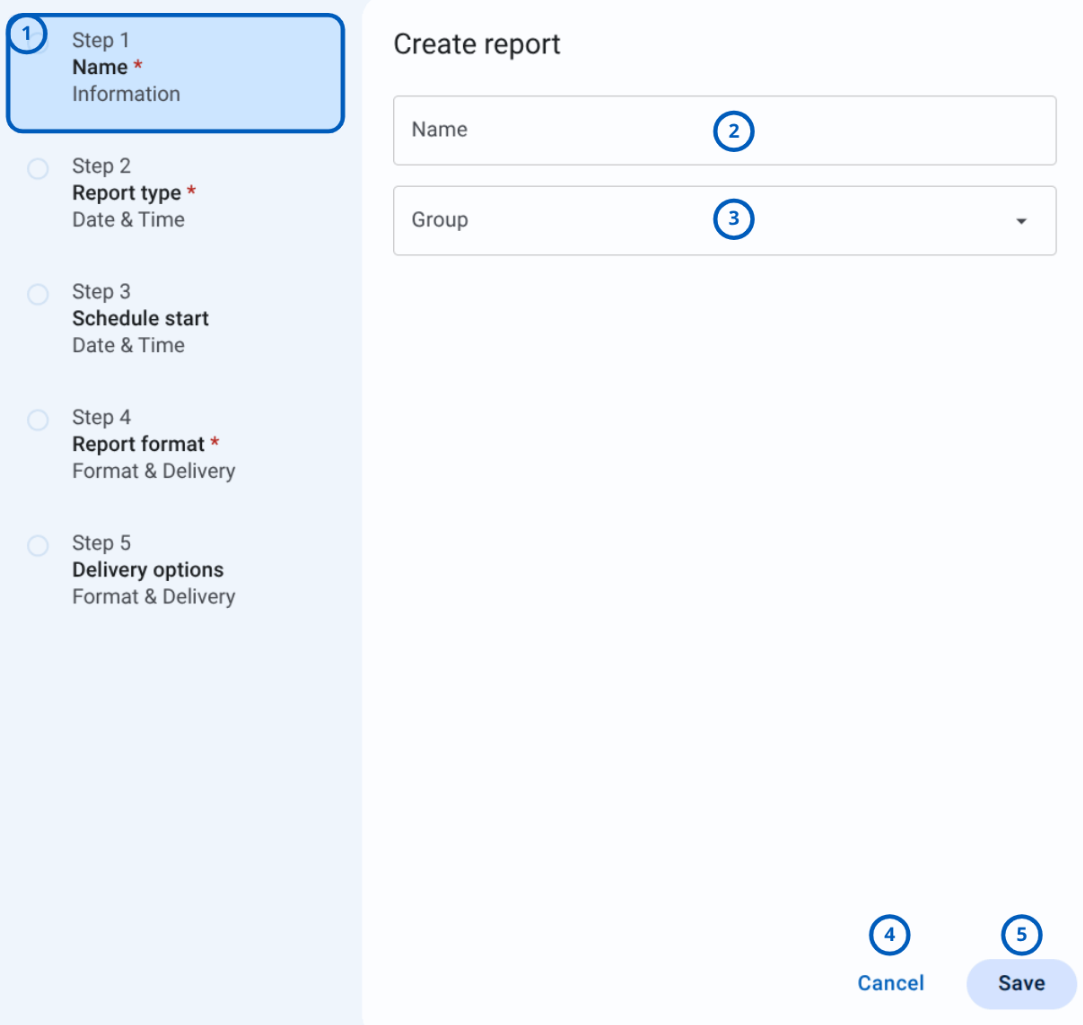
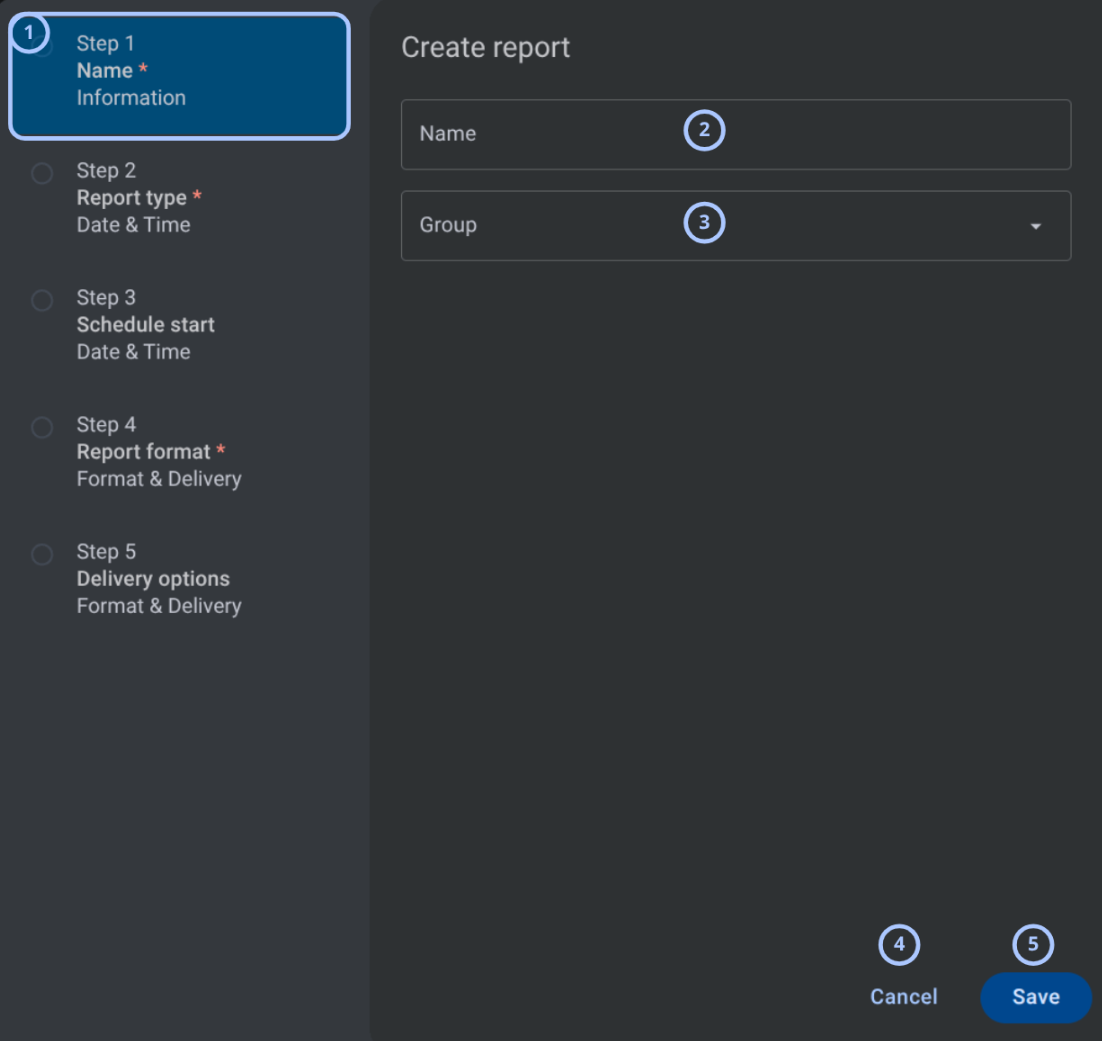
| Callout | UI element | Description | When to use |
|---|---|---|---|
| 1 | Create report steps panel | Shows the report creation steps and highlights the current step, Name Information. | Use to track progress through the report creation workflow. |
| 2 | Name field | Field for entering the report name. | Use to define a name that identifies the report in the reports grid. |
| 3 | Group dropdown | Dropdown for selecting the group associated with the report. | Use to choose which group the report applies to. |
| 4 | Cancel button | Cancels report creation and closes the create report form. | Use to exit the workflow without saving the report. |
| 5 | Save button | Saves the entered report information. | Use after entering the required report details. |
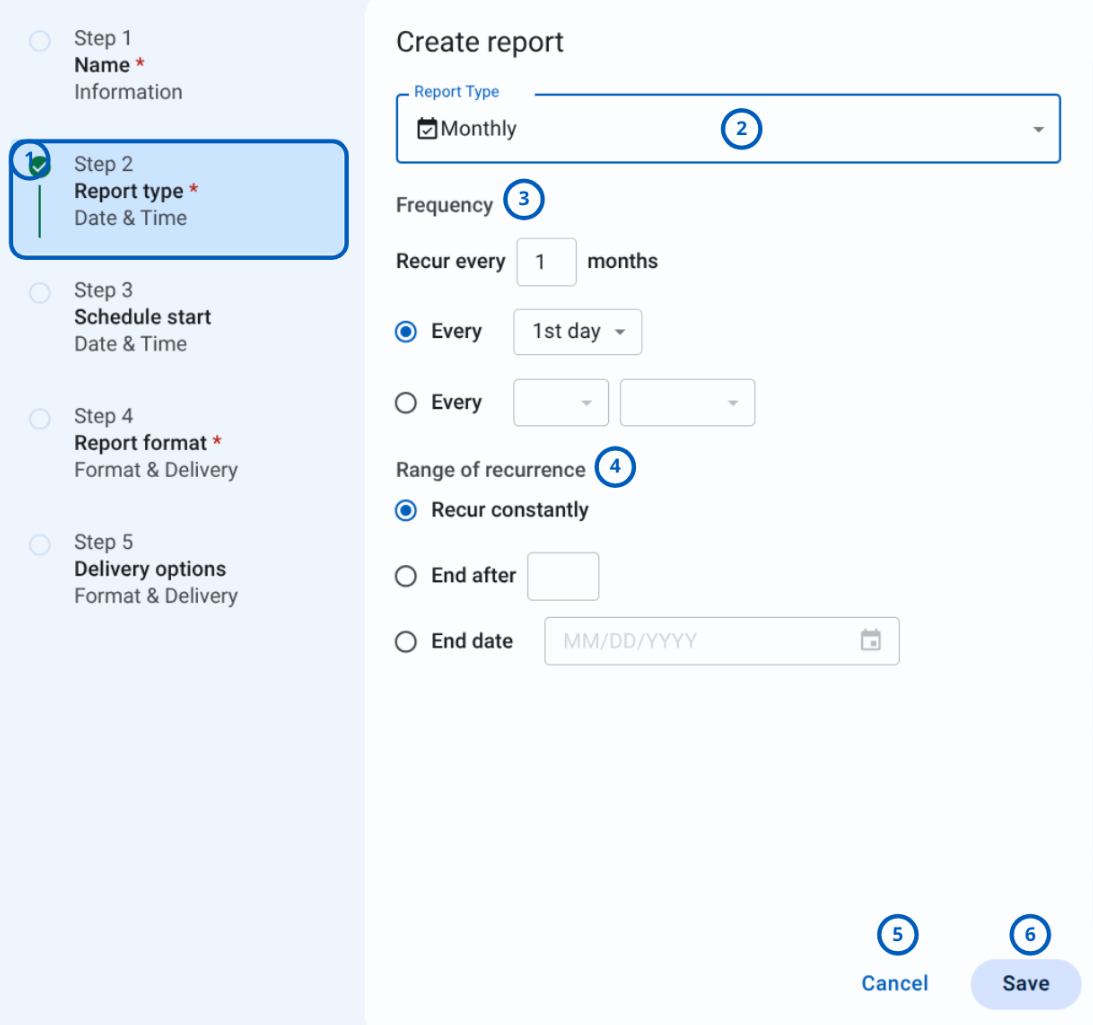
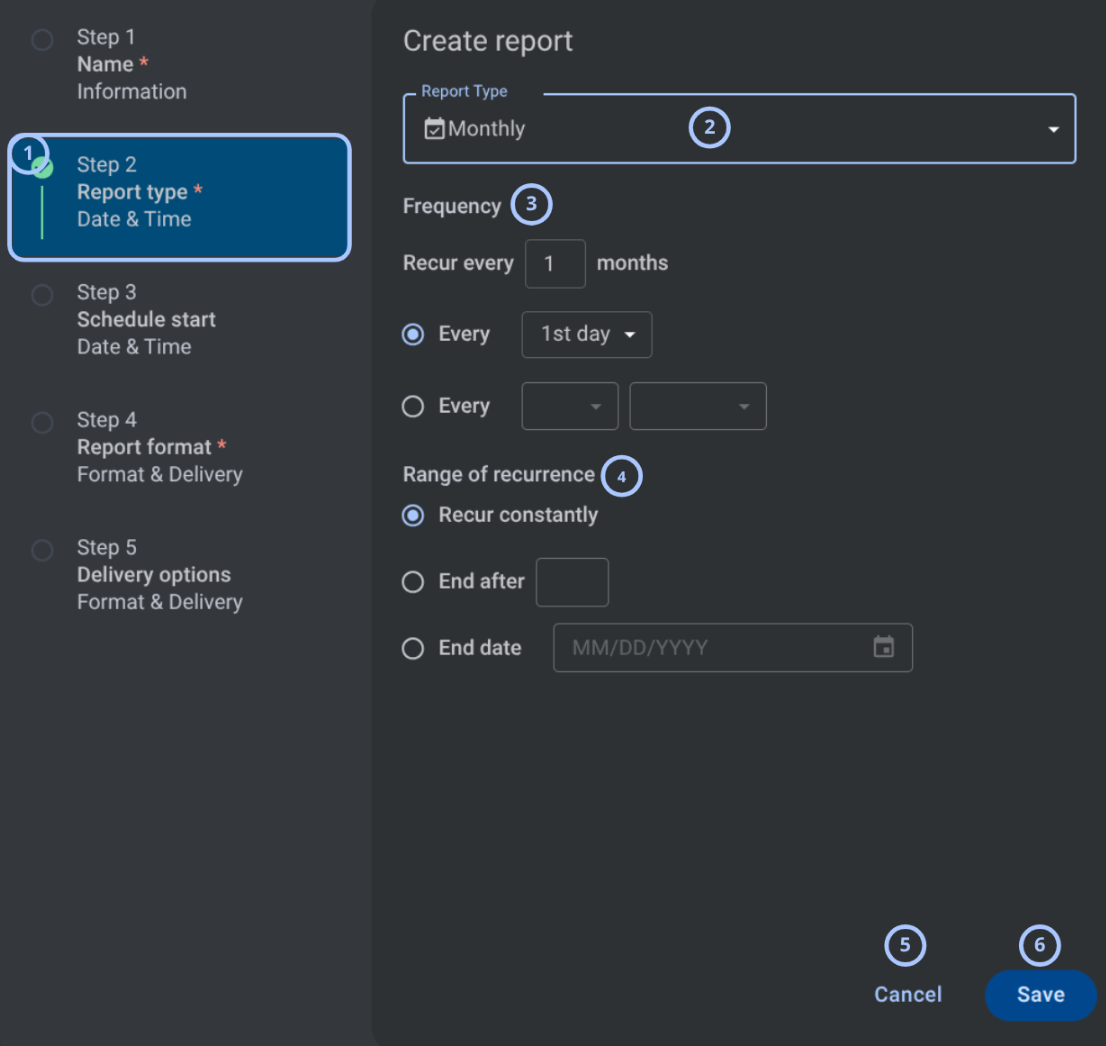
| Callout | UI element | Description | When to use |
|---|---|---|---|
| 1 | Create report steps panel | Shows the report creation steps and highlights the current step, Report type. | Use to track progress through the report creation workflow. |
| 2 | Report Type dropdown | Dropdown for selecting the report schedule type. Available options are One Time, Daily, Weekly, and Monthly. | Use to choose how often the report should run. |
| 3 | Frequency section | Defines how often the selected report type repeats. For Monthly reports, it includes recurrence interval and monthly schedule options. | Use to configure the repeat pattern for the report. |
| 4 | Range of recurrence section | Defines when the recurring report schedule ends. Options include Recur constantly, End after, and End date. | Use to control whether the report repeats indefinitely, stops after a number of occurrences, or ends on a specific date. |
| 5 | Cancel button | Cancels report creation and closes the create report form. | Use to exit the workflow without saving the report. |
| 6 | Save button | Saves the selected report type and schedule settings. | Use after configuring the report type, frequency, and recurrence range. |
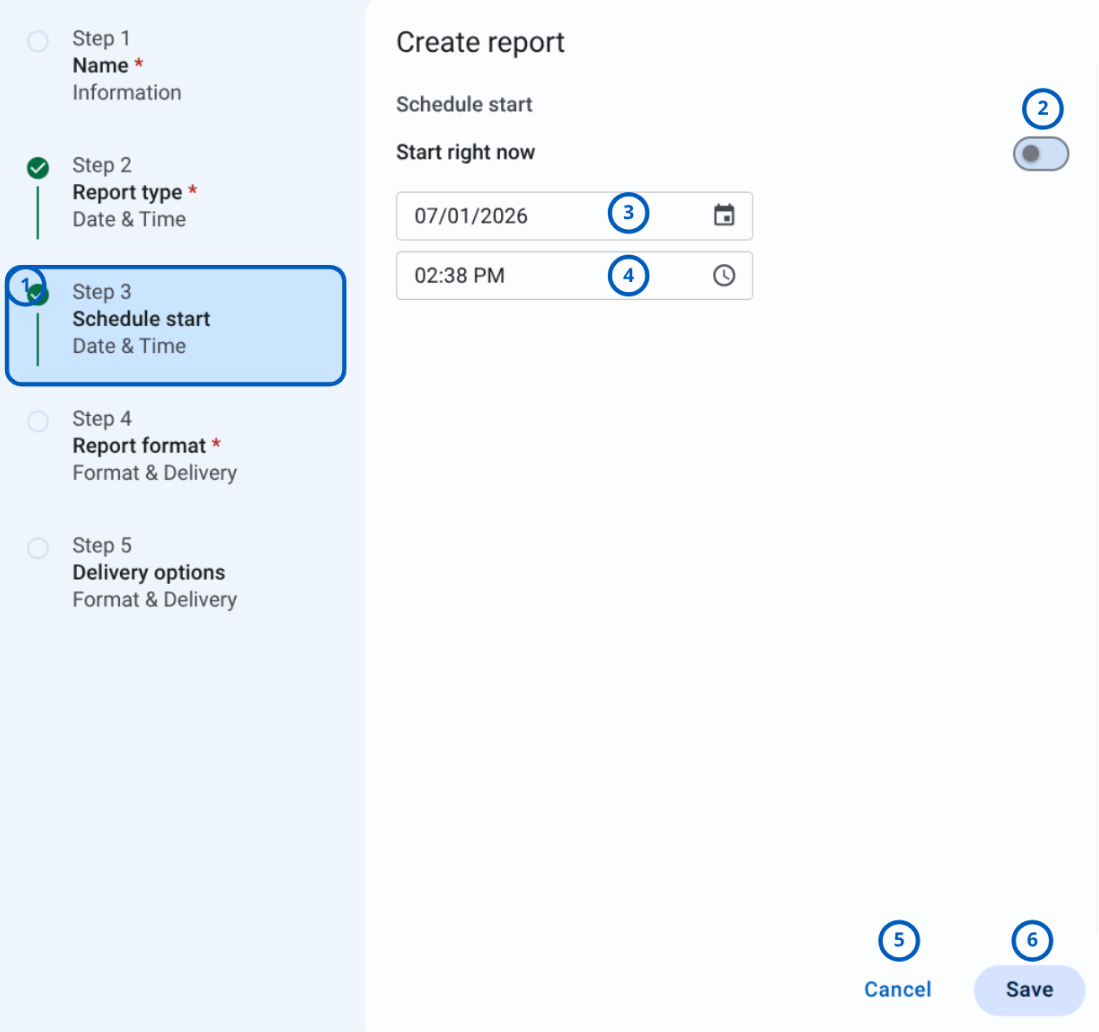
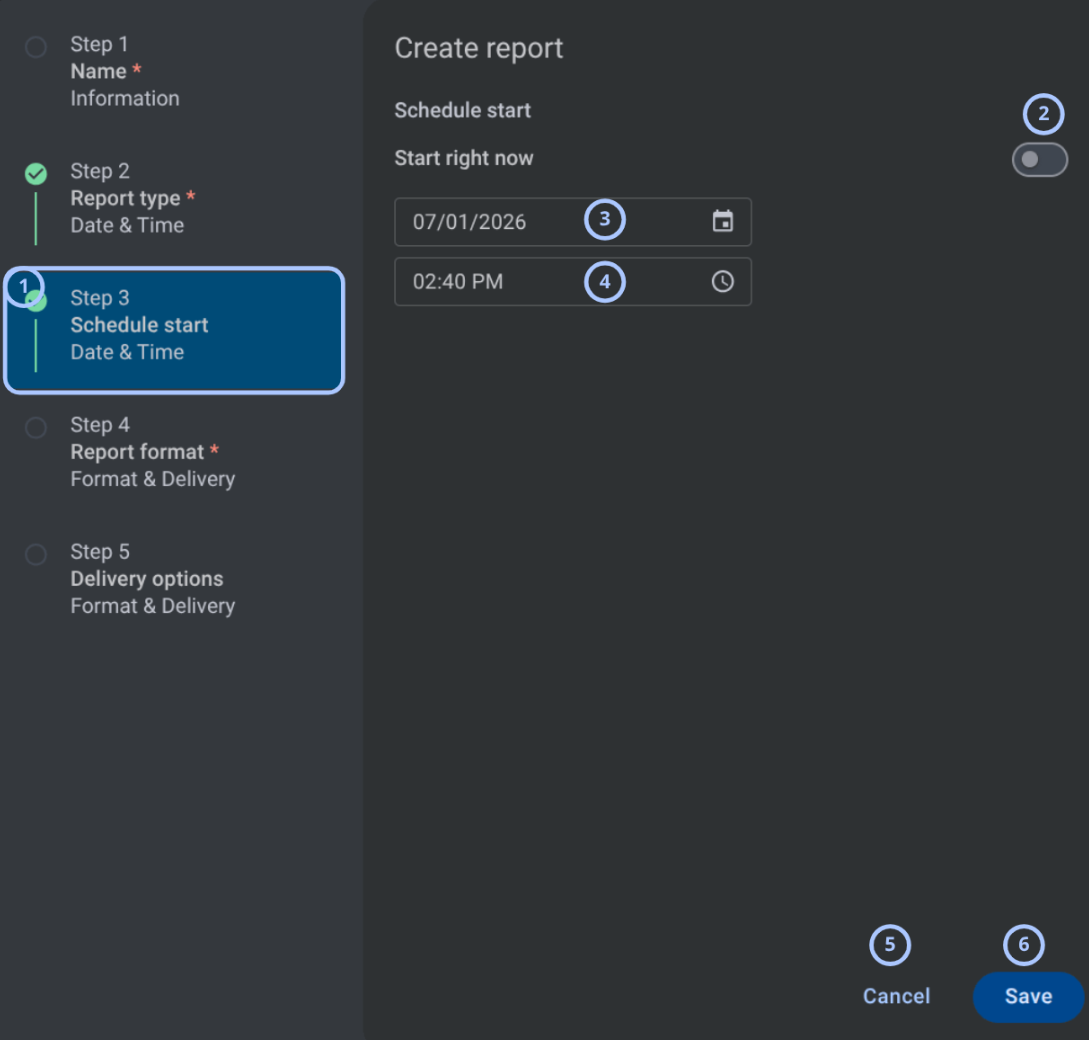
| Callout | UI element | Description | When to use |
|---|---|---|---|
| 1 | Create report steps panel | Shows the report creation steps and highlights the current step, Schedule start. | Use to track progress through the report creation workflow. |
| 2 | Start right now toggle | Enables or disables starting the report schedule immediately. | Use when the report should start immediately instead of using a specific start date and time. |
| 3 | Start date field | Field for selecting the date when the report schedule starts. | Use to define the first date for the scheduled report execution. |
| 4 | Start time field | Field for selecting the time when the report schedule starts. | Use to define the first time for the scheduled report execution. |
| 5 | Cancel button | Cancels report creation and closes the create report form. | Use to exit the workflow without saving the report. |
| 6 | Save button | Saves the selected schedule start settings. | Use after configuring when the report schedule should start. |
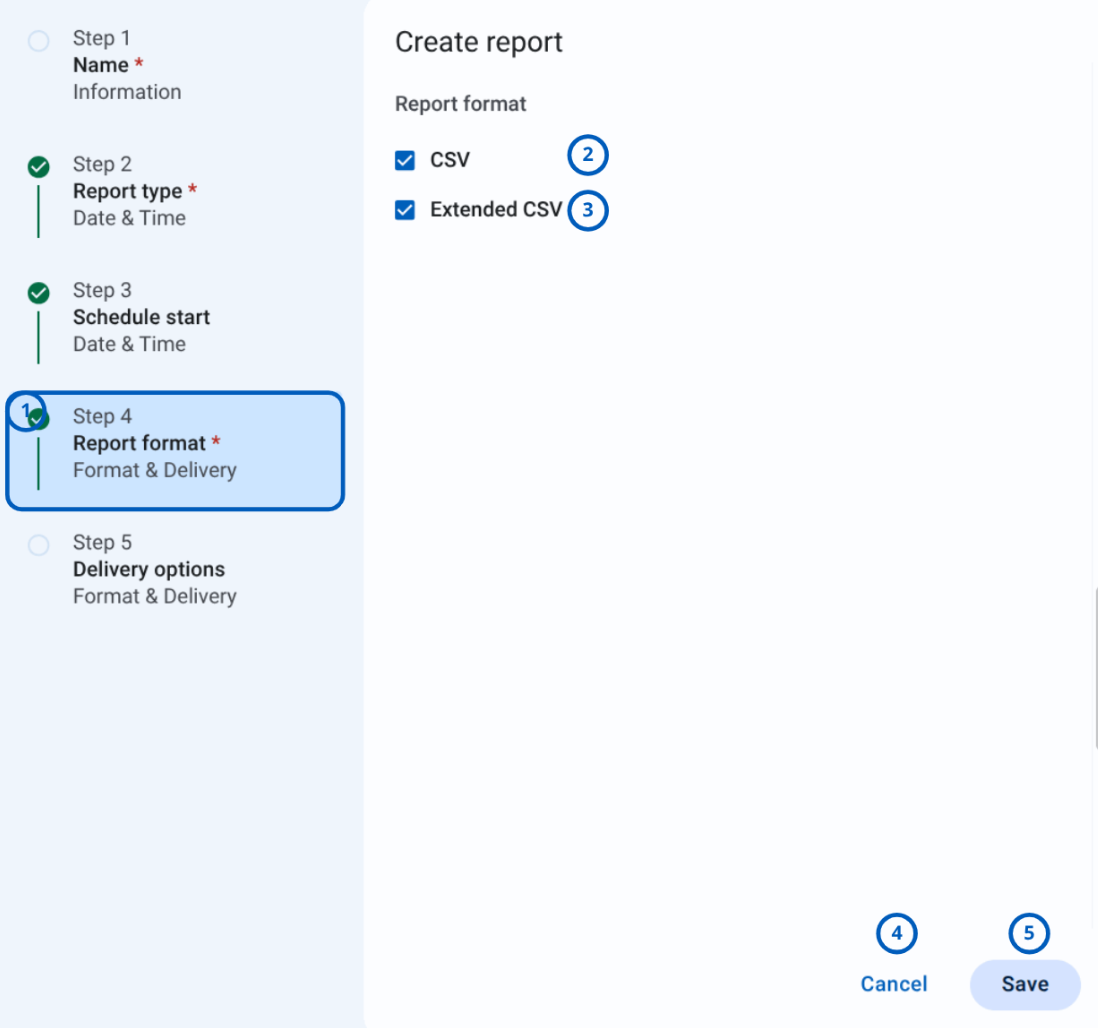
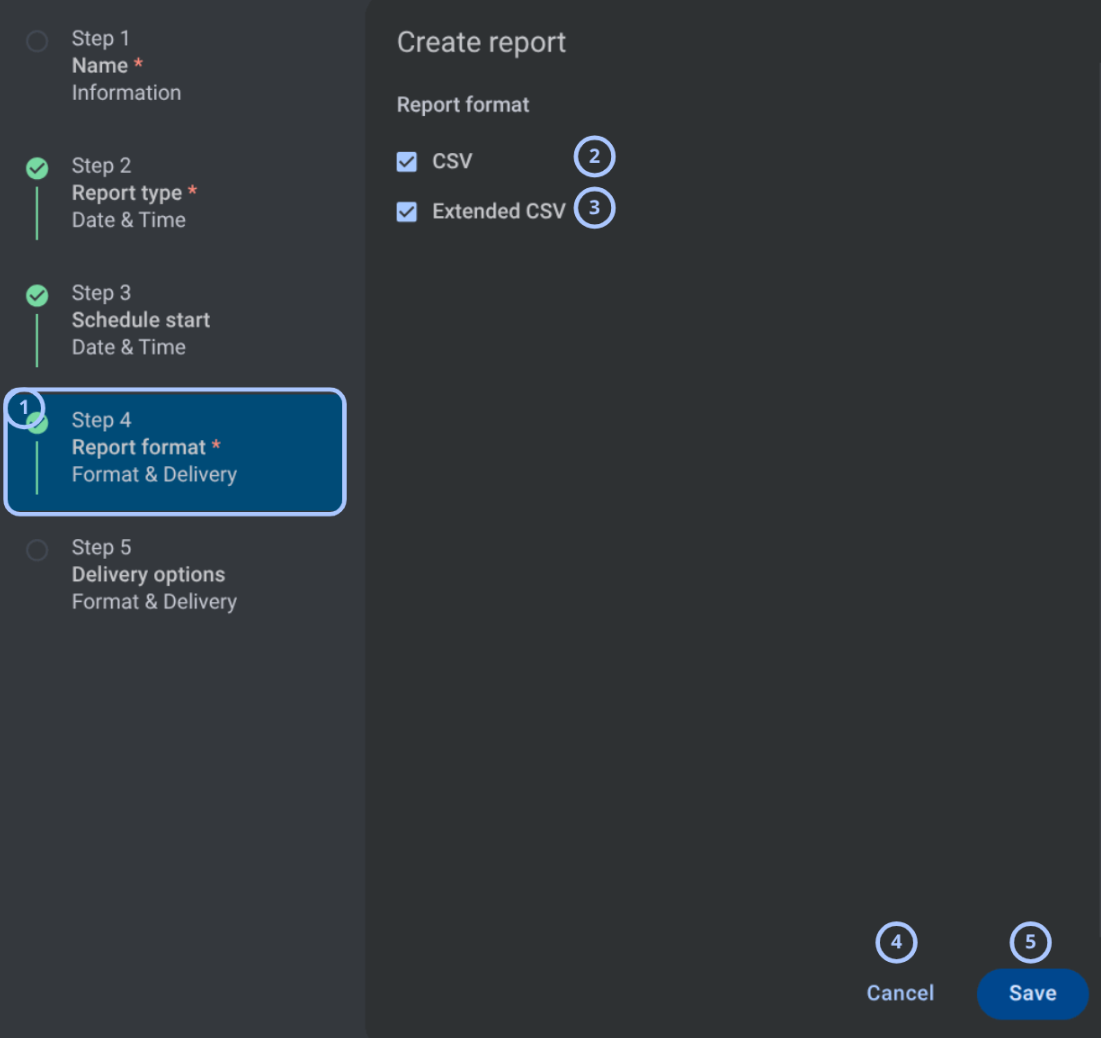
| Callout | UI element | Description | When to use |
|---|---|---|---|
| 1 | Create report steps panel | Shows the report creation steps and highlights the current step, Report format. | Use to track progress through the report creation workflow. |
| 2 | CSV checkbox | Selects CSV as an output format for the report. | Use when the report should be generated in CSV format. |
| 3 | Extended CSV checkbox | Selects Extended CSV as an output format for the report. | Use when the report should include extended data in CSV format. |
| 4 | Cancel button | Cancels report creation and closes the create report form. | Use to exit the workflow without saving the report. |
| 5 | Save button | Saves the selected report format settings. | Use after selecting the required report output format. |
From the main Reports page, reports can be created only per group.
Export in PDF format - is available only for per-panel reports.
To do this, please select Equipment from the menu. Then, select the desired panel and click the three dots in the upper right corner. This will open the More actions menu , where you need to select Report in the Create section.
In Step 4 - Report format, when choosing a format, select PDF. A description of the options is available below.
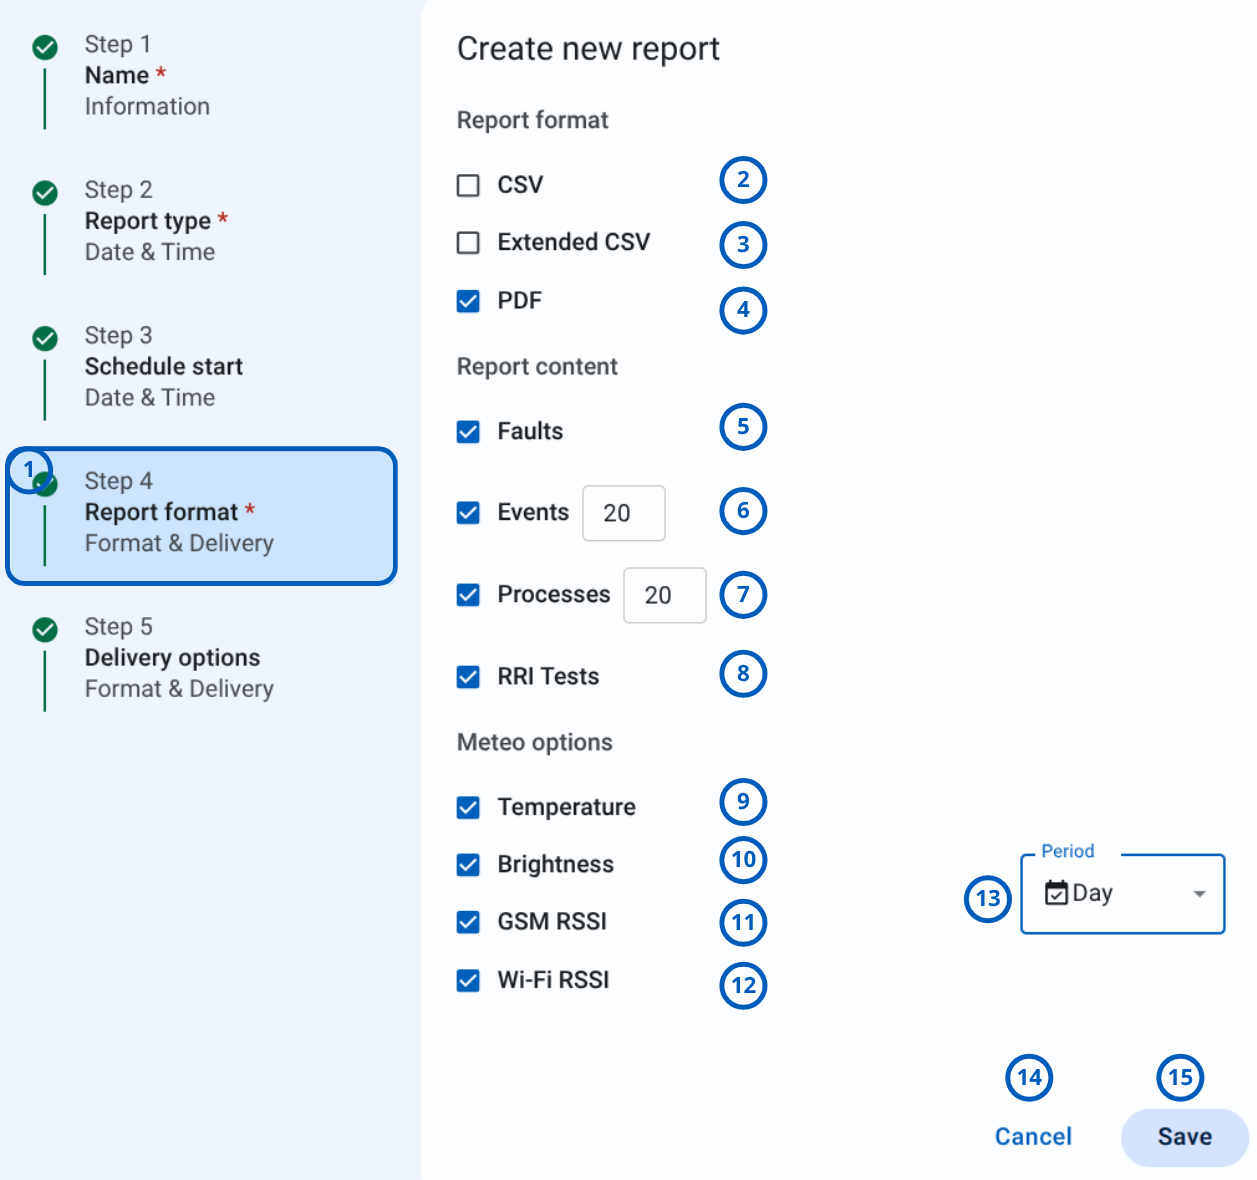
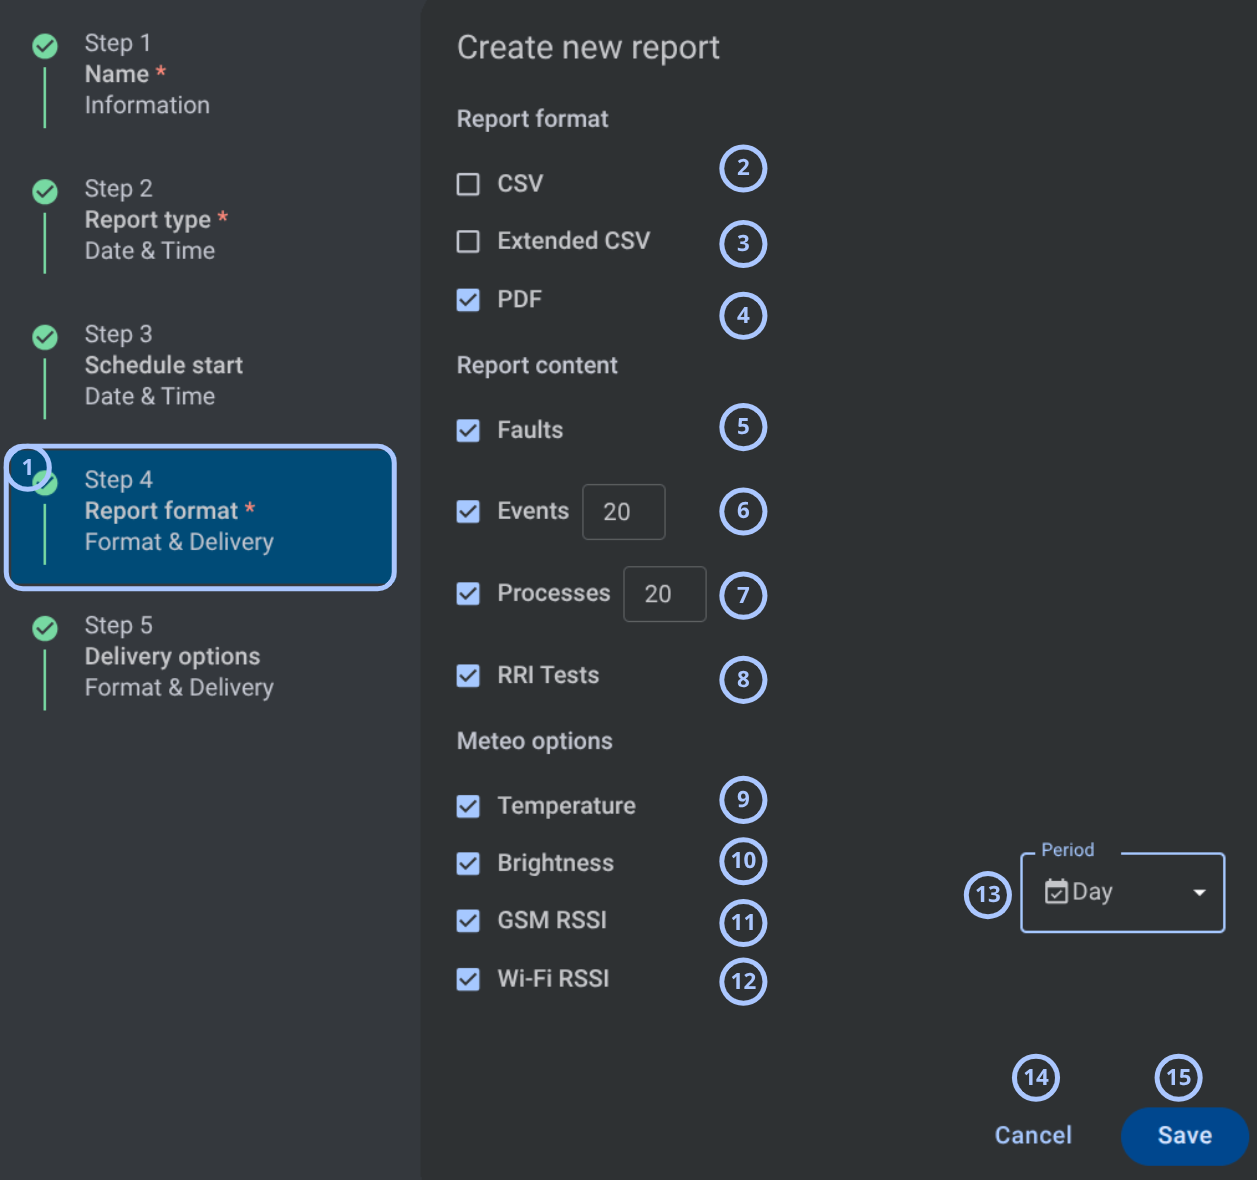
| Callout | UI element | Description | When to use |
|---|---|---|---|
| 1 | Create report steps panel | Shows the report creation steps and highlights the current step, Report format. | Use to track progress through the report creation workflow. |
| 2 | CSV checkbox | Selects CSV as an output format for the report. | Use when the report should be generated in CSV format. |
| 3 | Extended CSV checkbox | Selects Extended CSV as an output format for the report. | Use when the report should include extended data in CSV format. |
| 4 | PDF checkbox | Selects PDF as an output format for the report. | Use when creating a per-panel report that should be generated in PDF format. |
| 5 | Faults checkbox | Includes faults in the PDF report content. | Use when the report should include fault information. |
| 6 | Events checkbox and count field | Includes events in the PDF report content and defines the number of events to include. | Use when the report should include a limited number of recent events. |
| 7 | Processes checkbox and count field | Includes processes in the PDF report content and defines the number of processes to include. | Use when the report should include a limited number of recent processes. |
| 8 | RRI Tests checkbox | Includes RRI test information in the PDF report content. | Use when the report should include RRI test results. |
| 9 | Temperature checkbox | Includes temperature data in the report. | Use when the report should include temperature meteo data. |
| 10 | Brightness checkbox | Includes brightness data in the report. | Use when the report should include brightness meteo data. |
| 11 | GSM RSSI checkbox | Includes GSM RSSI data in the report. | Use when the report should include GSM signal strength data. |
| 12 | Wi-Fi RSSI checkbox | Includes Wi-Fi RSSI data in the report. | Use when the report should include Wi-Fi signal strength data. |
| 13 | Period dropdown | Selects the period for the report data. | Use to define the time period covered by the report. |
| 14 | Cancel button | Cancels report creation and closes the create report form. | Use to exit the workflow without saving the report. |
| 15 | Save button | Saves the selected report format and content settings. | Use after selecting the required output format, report content, meteo options, and period. |
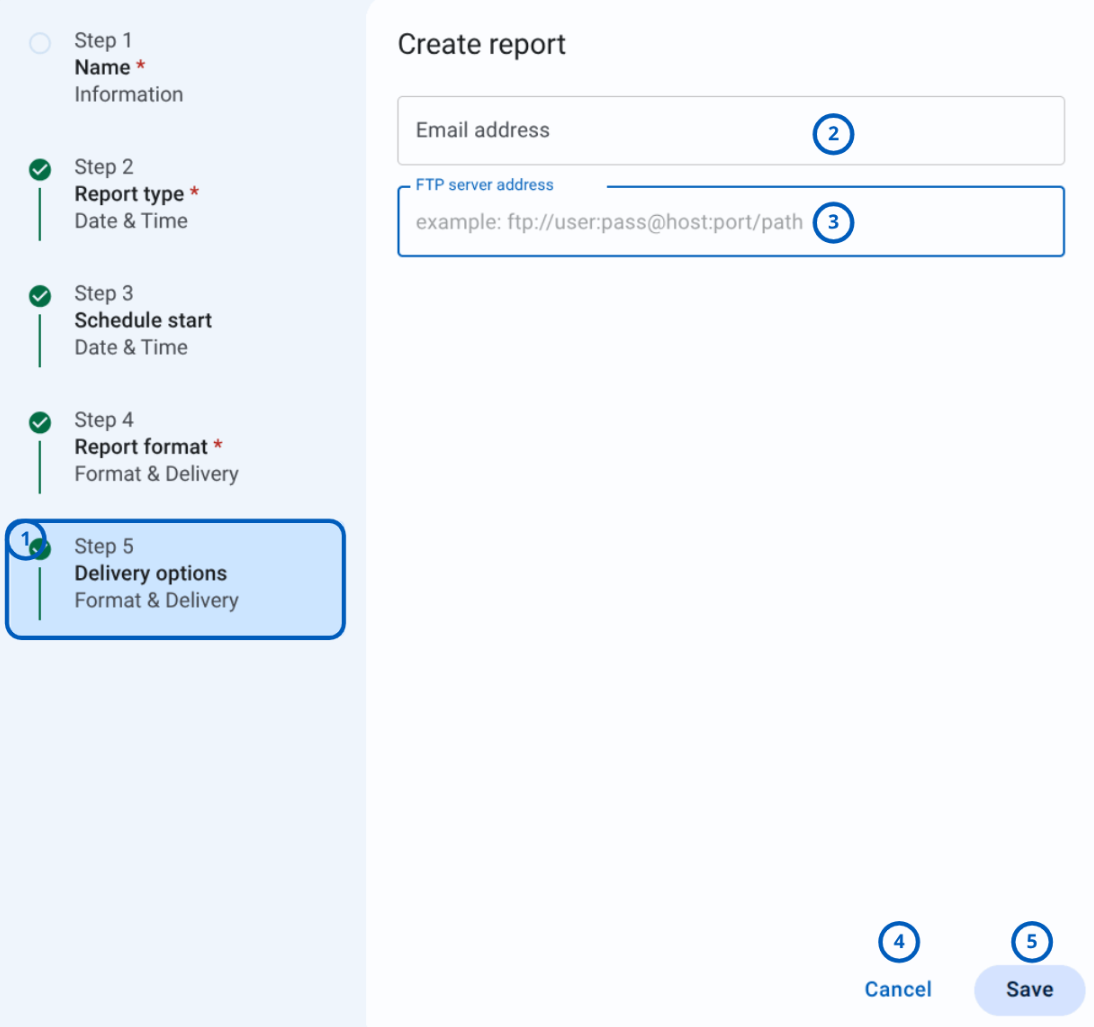
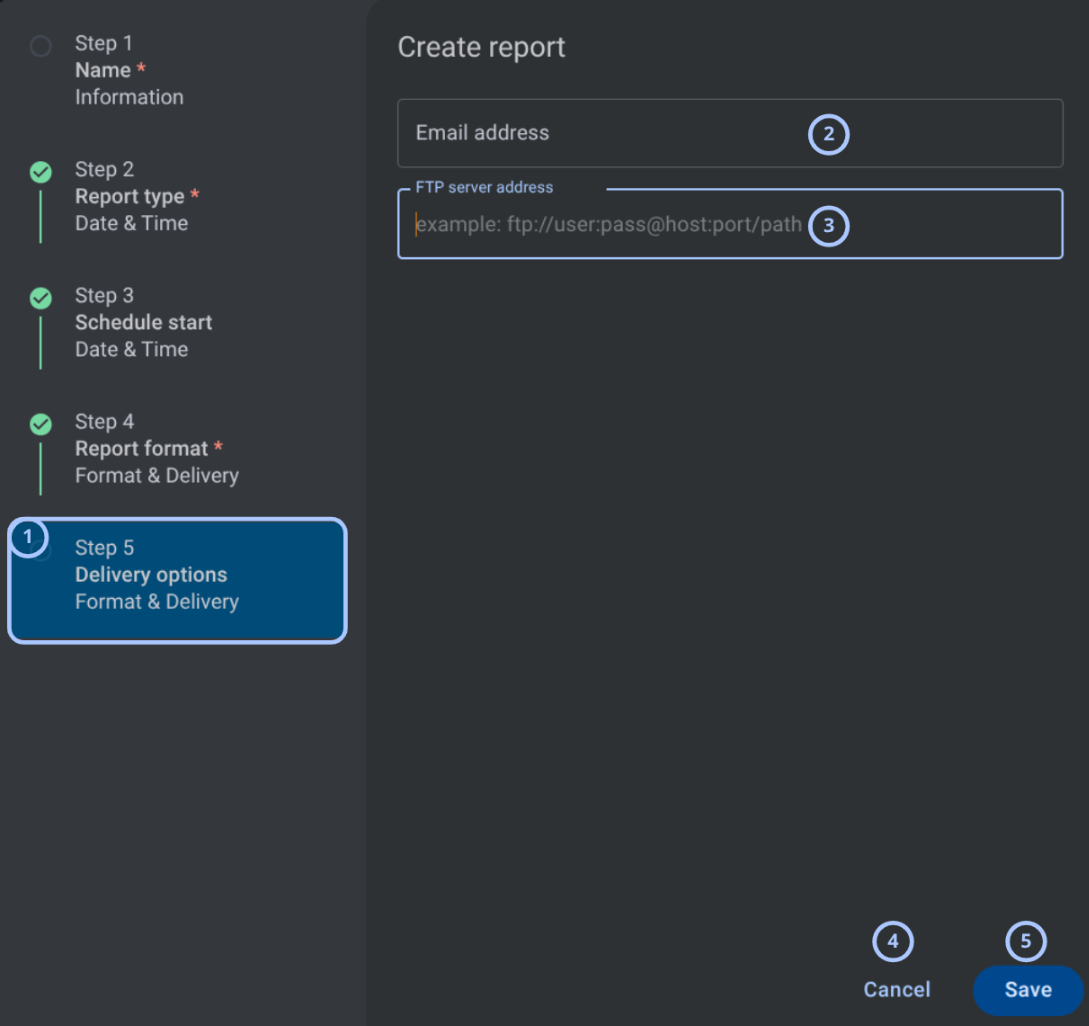
| Callout | UI element | Description | When to use |
|---|---|---|---|
| 1 | Create report steps panel | Shows the report creation steps and highlights the current step, Delivery options. | Use to track progress through the report creation workflow. |
| 2 | Email address field | Field for entering the email address where the report should be delivered. | Use when the report needs to be sent by email. |
| 3 | FTP server address field | Field for entering the FTP server address used for report delivery. | Use when the report needs to be delivered to an FTP server. |
| 4 | Cancel button | Cancels report creation and closes the create report form. | Use to exit the workflow without saving the report. |
| 5 | Save button | Saves the selected delivery options. | Use after entering the required report delivery details. |
How to use this page
Create a report
Goal:
- Create a new report definition.
Steps:
- Open Reports.
- Select the add icon.
- In Step 1 Name, enter the report Name.
- Select a Group.
- In Step 2 Report type, select Report Type.
- In Step 3 Schedule start, keep Start right now enabled or enter a date and time.
- In Step 4 Report format, select CSV, Extended CSV, or both formats according to your requirement.
- In Step 5 Delivery options, enter an Email address or FTP server address when delivery is required.
- Select Save.
Expected result:
- The report definition is created when all required wizard values are valid.
- The report appears in the Reports grid.
Start a report immediately
Goal:
- Configure the report schedule to start immediately.
Steps:
- Open the Create report wizard.
- Go to Step 3 Schedule start.
- Turn on Start right now.
- Continue the wizard and select Save.
Expected result:
- The report schedule starts immediately after the report is created, according to report type and system behavior.
Schedule a report for a specific date and time
Goal:
- Configure a report to start at a selected date and time.
Steps:
- Open the Create report wizard.
- Go to Step 3 Schedule start.
- Turn off Start right now if required.
- Enter or select a date in MM/DD/YYYY format.
- Enter or select a time in hh:mm aa format.
- Continue the wizard and select Save.
Expected result:
- The report uses the selected schedule start date and time when the values are valid.
Configure delivery options
Goal:
- Configure where report output is delivered.
Steps:
- Open the Create report wizard.
- Go to Step 5 Delivery options.
- Enter an Email address if report delivery by email is required.
- Enter an FTP server address if report delivery to FTP is required.
- Select Save.
Expected result:
- Delivery options are saved when the values are valid and delivery is supported.
Review the report
Goal:
- Mark the latest report result as viewed after you review or acknowledge the result.
Steps:
- Open Reports.
- Locate the report in the Reports grid.
- Check the Last Result column to confirm that a report result is available.
- Select the Mark as viewed action.
Expected result:
- The report result is marked as viewed.
- The report remains available in the Reports grid.
Download the finished report
Goal:
- Download a completed report result.
Steps:
- Open Reports.
- Locate the report in the Reports grid.
- Check Last Result to confirm that the latest execution completed.
- Select the Download action.
- Save the downloaded file when prompted by the browser.
Expected result:
- The report result is downloaded to the local device.
Pause the report schedule
Goal:
- Stop future executions of an active repeating report without removing the report definition.
Steps:
- Open Reports.
- Locate the repeating report in the Reports grid.
- Check the Schedule column to confirm that the report is active or repeating.
- Select the Pause action.
- Confirm the action if prompted.
Expected result:
- The report schedule is paused.
- The report definition remains in the Reports grid.
- Future scheduled executions do not run while the report is paused.
Remove a report
Goal:
- Remove a report that is no longer needed.
Steps:
- Open Reports.
- Locate the report.
- Select the remove action.
- Confirm the action if prompted.
Expected result:
- The report is removed from the Reports page.
Removing a report permanently deletes the report definition from the Reports page.
Tips
- Use clear report names so reports are easy to identify in the grid.
- Check Last Result before downloading a report.
- Confirm the target in Group/Panel before saving a report definition.
- Use the schedule column to identify reports that are finished, stopped, or repeating.
- Enter a valid email address or FTP server address if report delivery is required.
- Remove reports only when the report definition is no longer needed.
Troubleshooting
No reports are shown
Possible causes
- No reports exist.
- You do not have permission to Review Reports.
- Pagination or scrolling hides additional reports.
What to do
- Check the report count.
- Use the grid scrollbar or pagination controls.
- Confirm that your role includes permission to Review Reports.
- Create a report if no report definitions exist.
Download action is unavailable
Possible causes
- No report result exists.
- The report execution has not completed.
- You do not have permission to Download reports.
What to do
- Check Last Result.
- Wait for report execution to complete.
- Refresh the Reports page.
- Confirm that your role includes download permission.
Report paused unexpectedly
Possible causes
- A user selected the Pause action.
- The report schedule reached a configured end condition.
- The report is no longer active because of a schedule or execution state change.
What to do
- Check the Schedule column for the current report state.
- Confirm whether another user paused the report.
- Review the report recurrence settings, including end conditions.
- If the report must run again, create a new report or update the schedule according to the available actions.
Report removed
Possible causes
- A user selected the Remove action.
- You do not have permission to see the report.
What to do
- If the report was removed, create a new report with the required settings.
- Confirm that your role includes permission to list and review reports.
Removing a report permanently deletes the report definition from the Reports page.
Report not delivered to email or FTP
Possible causes
- The email address is missing or invalid.
- The FTP server address is missing or invalid.
- The configured FTP path, user name, password, host, or port is incorrect.
What to do
- Check Last Result to confirm that the report execution completed.
- Verify the Email address value in the delivery options.
- Verify the FTP server address value, including protocol, credentials, host, port, and path.
- Download the report manually if delivery still fails and the download action is available.
- Create a new report with corrected delivery details if the existing report cannot be updated.