Settings
Overview
Use the Group settings page to configure how panels assigned to a group behave in PowerManage. Group settings define group data, general panel behavior, automatic configuration for supported IQ panels, supervision by panel family and protocol, notification filtering, end-user notification delivery, and Central Station (CS) communication.
Settings apply at group level. When a panel is enrolled in a group or moved to another group, the panel follows the destination group's applicable settings. Moving a panel between groups restarts the supervision offline timer counter for that panel.
Group settings are panel-family and protocol specific. A setting in one panel section does not apply to other panel families.
Changing supervision periods, offline timers, wake-up behavior, or CS communication can affect panel connectivity, data usage, event delivery, and offline event timing. Review the impact before saving changes.
Before you change supervision, wake-up, notification, or CS communication settings, confirm that the setting applies to the correct group, panel family, and protocol. Changes take effect for all panels in the group, not just a single panel.
Before you begin
Before you edit group settings, review the following requirements.
- Configure required external services before enabling dependent settings:
- SMS broker or GSM modem for SMS wake-up.
- Location services, such as WeatherAPI, GeoNames, or Google API, for time zone and Z-Wave region detection. Configure API tokens in Settings → Resolve → Weather/Location/Timezone Sync Settings.
- SMTP or notification services for end-user email and push delivery.
- CS links before configuring CS communication profiles. Create CS entries in the Central Stations page before linking them to groups.
- Make sure you have the required permissions to view and edit groups.
- It is better to read Groups before proceeding.
- Access to the Groups page and group management actions is controlled by the role permission group named "Groups".
Page Layout
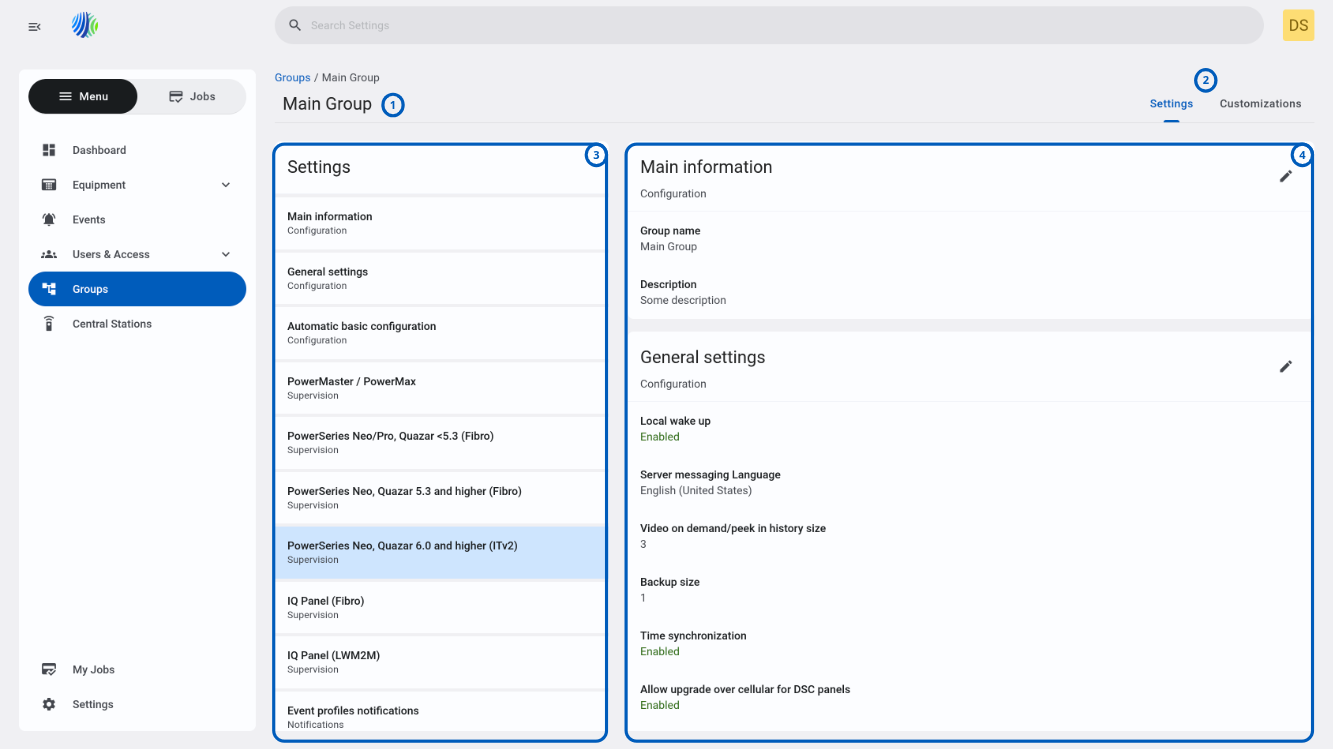
The Settings page is divided into a header area, a left settings navigation list, and a right content area with settings widgets.
| Callout | UI element | Description | When to use |
|---|---|---|---|
| 1 | Group name | Shows the selected group name in the top-left area of the Settings page. | Use to confirm that you are editing settings for the correct group before saving changes. |
| 2 | Settings and Customizations buttons | Show the available configuration areas in the top-right area of the Settings page. | Use to switch between group settings and customization options. |
| 3 | Group settings list | Shows the list of available group settings on the left side of the page. | Use to move between settings sections, such as Configuration, Supervision, Notifications, and Central stations communication. |
| 4 | Settings group widgets | Show the settings for the selected group on the right side of the page. | Use to review and edit settings for the selected settings group. |
Configuration
Use Configuration settings to define group metadata and group-level behavior for panels assigned to the group.
Group Name
- What this does: Defines the unique identifier for the panel group that is displayed across the system.
- When to use: Use when creating or renaming a group.
- Values: 1–24 characters. Letters, digits, spaces, underscores, and hyphens are supported.
- Impact: Identifies the group across the server. The value must be unique per server.
Keep group names short and meaningful. Use the description field to explain the group purpose, location, or customer context.
Description
- What this does: Stores a free-text note that describes the group purpose or configuration.
- When to use: Use to document the group purpose for operators and administrators.
- Values: 0–1000 characters. Free text.
- Impact: Informational only. Displayed on the Groups page and used in CS Communication search filters.
Local Wakeup
- What this does: Controls whether the ConnectAlarm app can send a wake-up SMS directly from the user's mobile phone to the panel.
- When to use: Enable when end users should be able to wake up their cellular panels directly from the ConnectAlarm app without relying on the server's SMS broker or GSM modem. Useful when the server does not have a message broker configured, or to reduce SMS broker costs for user-initiated connections.
- Values: Enabled or Disabled. Default: Enabled.
- Impact: When enabled, the ConnectAlarm app displays a Tap to Connect button when the panel is offline. The user taps it and their phone composes and sends a wake-up SMS to the panel's SIM number locally, bypassing the server's message broker entirely. The server does not send a wake-up SMS when a user logs in to the panel through ConnectAlarm. Server-initiated processes from the PowerManage GUI, scheduled tasks, and automation rules are not affected by this setting — the server continues to use its configured message broker or GSM modem for those operations. When disabled, the Tap to Connect local SMS option is not available in the app, and the server handles all wake-up SMS sending through its configured broker or modem, including when a user logs in through the app.
Local Wakeup only affects the ConnectAlarm app's ability to send wake-up SMS from the user's phone. It does not change how the server sends wake-up messages for server-initiated processes such as Refresh, Bypass, Set State, Discovery, VOD, RRI, or automation rules triggered by the rule engine.
Server Messaging Language
- What this does: Sets the group-level language used as a fallback for server-generated email, SMS, and push notifications.
- When to use: Use when end users in the group need notifications in a specific language, and the users either do not have the ConnectAlarm app installed or the panel keypad language is not set.
- Values: Dropdown. Examples include English, Chinese, Hebrew, Spanish, French, German, Turkish, and others. Default: English.
- Impact: The group language is not the first choice for notification language — it is a fallback in a priority chain.
PowerManage selects the notification language as follows:
- App language — if the user is registered in ConnectAlarm, the language selected in the app is used.
- Keypad language — if the user has no app, the panel keypad locale is used.
- Group language — if the keypad locale is not available, this setting is used.
- Server default language — if the group language template is also not present on the server, the default language is used.
The same priority applies to email template selection: app language → keypad language → group language → default template.
The selected language pack must be present on the server. Language packs are delivered through the repository and applied during repository sync. If the language pack for the selected language is not synced to the server, notifications fall back to the next available language in the chain, ultimately to English.
For DSC panels, the email template layout is always English regardless of group language — only the event description text within the template can be translated to a different language. For Visonic panels, both the template and the event description follow the priority chain.
For push notifications, behavior differs by platform: on Android, only the event description is translated from the server side (the push template text is translated by the Android app itself). On iOS, both the push template and event description are translated from the server side.
Changing the group language does not retroactively change the language for users who already have a language selected in the ConnectAlarm app. The app language always takes highest priority. This setting primarily affects users who do not use the app, such as those receiving panel-configured private reporting emails or SMS.
If a language pack was recently added to the repository, perform a repository sync before selecting that language in the group settings. Language sync can fail silently if the .po translation files contain formatting errors such as missing plural forms or invalid conversion specifiers. Check the server log after sync to verify the language was applied successfully.
Video on Demand History Size
- What this does: Sets the maximum number of VOD clips stored per zone per panel in the VOD History.
- When to use: Use when you need to retain more or fewer VOD clips per camera zone. Increase for sites with frequent alarm activity where historical video review is important. Decrease on servers with limited disk space or a large number of panels with cameras.
- Values: Numeric. Default: 3.
- Impact: Each zone that supports VOD maintains its own independent history. When the history reaches the configured limit, the oldest clip is automatically deleted and replaced with the new one (FIFO rotation). Higher values increase disk storage consumption per panel — each clip can contain 1 or 10 frames depending on the panel's
If a VOD request fails (for example, the panel does not acknowledge the request, or not all frames are received), the incomplete clip still occupies a slot in the VOD History. A missed frame in one VOD clip does not affect other clips in the history — incomplete clips are formed after a 1-hour timeout and remain viewable with whatever frames were received.
Panel Time Synchronization
- What this does: Enables automatic time synchronization between the PowerManage server and panels enrolled in the group.
- When to use: Use when panel clocks drift or must stay aligned with the server's NTP time. Required for panels that do not have their own NTP access or need centralized time control.
- Values: Enabled or Disabled. Default: Disabled.
- Impact: When enabled, PowerManage runs the
discovery_sync_timestage during discovery and sends the server's UTC time and the resolved time zone to the panel. The behavior differs by panel family and protocol:\
Time zone resolution priority:
PowerManage resolves the panel's time zone in two steps: first it determines the panel's location, then it uses that location to detect the time zone.
Step 1 — Location source priority:
- Owner Info address — if an address is set in Info → Owner Info, the server geocodes it to coordinates. Owner Info always takes priority over IP.
- Panel IP address — if Owner Info is not set or cannot be resolved, the server detects location from the panel's IP address. Only Weather API supports IP-based geolocation; GeoNames and Google API do not.
Step 2 — Geolocation and time zone service priority:
When resolving by Owner Info address, the server tries geocoding services in this order:
- Google API key (if configured)
- GeoNames username (if configured)
- Weather API token (if configured)
When resolving by panel IP, only Weather API is used (GeoNames and Google API do not support IP-based geolocation).
After geolocation is complete, the server resolves the time zone:
- If geolocation was completed via Weather API, the time zone is detected simultaneously (same API call).
- If geolocation was completed via GeoNames or Google API, the server resolves the time zone separately, trying providers in this order:
- Google API (if configured and timezone API is available for the token)
- GeoNames (if configured)
- Weather API (if configured)
Fallback when no location services are configured:
- The server checks for a previously stored time zone in the database. If a time zone was resolved during a previous discovery, it is reused.
- If no stored time zone exists, the server sends only UTC time without a time zone. The panel may display time in UTC+0.
- For DSC panels specifically, if no external time zone is available, the server falls back to the time zone configured on the communicator (
[851][020]), then to the Daylight Saving Time system option ([005][902][17]), and finally to the server's own time zone.
ConnectAlarm app behavior:
- When time sync is enabled, the Date & Time menu is hidden in the ConnectAlarm app, preventing manual time changes by users.
- When time sync is disabled, the Date & Time menu appears in the app. Users can set the panel time manually. The server uses the phone's time zone: if the phone's country exists in the panel's supported time zone list, it sends that time zone directly. If the country is absent from the list, it substitutes a time zone with the same UTC offset but a different country name.
Redundancy: Time sync is a per-group setting on each server. Only the active (Primary) server performs time synchronization. If the Primary and Secondary servers have different group settings for time sync, the Secondary's setting takes effect only after a switchover.
Enabling time sync on panels that also report to a third-party receiver (for example, Surgard) can cause conflicting time sources. If a DSC panel has Fibro and ITv2 sessions to PowerManage and a separate Fibro session to Surgard, PowerManage can override the Surgard-synced time and change the panel's Real Clock option ([024] option 5) from Y to N. Confirm the desired behavior before enabling time sync in dual-receiver deployments.
Daylight Saving Time (DST) transitions can cause time discrepancies. If the panel's time zone section ([851][020]) is set to a zone with DST but the server does not correctly resolve the offset, the panel may display time with a ±1 hour error. This is a known limitation — verify time accuracy after DST transitions, especially for panels in time zones that observe DST differently from the server's time zone.
Temperature/Light Statistic
- What this does: Enables collection and display of temperature and illuminance (light) data from smart detectors enrolled on panels in the group.
- When to use: Enable when you need to monitor environmental sensor data from PowerG, PowerG+, or other smart devices. Required for the Meteo tab to appear on the Devices page in the PowerManage GUI.
- Values: Enabled or Disabled. Default: Disabled.
- Impact: When enabled, panels send temperature and illuminance readings from supported smart detectors. PowerManage displays this data as time-series charts on the Meteo tab under each device on the Devices page. The Meteo tab appears within approximately 10 minutes after the first data arrives.
Supported data types by panel family:
| Panel family | Temperature | Illuminance (Light) | Protocol used |
|---|---|---|---|
| DSC / Neo / Neo 5 / PSP | Yes | No | ITv2 |
| Visonic / PowerMaster | Yes | Yes | P2 (Pnet) |
| IQ panels | Yes | Yes | LwM2M |
Data pipeline and refresh interval: The panel sends meteo data continuously. The GUI refreshes meteo charts every 5 minutes. Meteo data older than 3 months is automatically deleted. When a panel or device is removed, its meteo data is also deleted.
Temperature alarms and troubles are not affected: This setting controls only the meteo data collection and display (the Meteo charts). Temperature-related alarms and troubles — such as high temperature, low temperature, hot, cold, freezer, and freezing alerts — continue to work regardless of this setting. These alarms are handled by a separate mechanism and are always forwarded to the Events page and CS receivers even when Temperature/Light Statistic is disabled.
ConnectAlarm automation rules: When this setting is enabled, end users can create home automation rules in the ConnectAlarm app with temperature-based triggers (for example, "when temperature exceeds 30°C, turn on output device"). Temperature values must be available in Redis before a rule can evaluate successfully. If a user creates a temperature-based rule before the first temperature data arrives from the panel, the rule evaluation fails and a push notification about the failure is sent to the user.
If a smart detector is deleted and a non-smart detector is enrolled on the same zone, the Meteo tab may still display stale temperature data from the previously deleted smart detector. This data clears only when new data from a smart device overwrites it, or when the panel is removed and re-enrolled.
Moving a panel to a group with a different Temperature/Light Statistic setting triggers a discovery automatically. If the Meteo tab does not appear or disappear as expected after moving a panel, trigger a manual discovery.
Illuminance (light) data is collected from a subset of smart detectors. For Visonic panels, light data is available from Flat PIR (126), Ceiling PIR Short (127), Ceiling PIR Long (128), Smart Outdoor PIR (129), and Smart Glassbreak (161). The rule engine does not support brightness-based automation rules — only temperature-based triggers are available for home automation rules in the ConnectAlarm app.
PowerMaster Upgrade Method
- What this does: Sets the preferred communication channel for remote firmware upgrades on Visonic PowerMaster and PowerMax panels and their PowerLink modules.
- When to use: Use to select whether firmware packages are downloaded over broadband (Ethernet) or GPRS (cellular). Choose based on the panel's available connections and the cellular data budget.
- Values: Broadband or GPRS. Default: Broadband.
- Impact: This setting applies only to Visonic (PowerMaster/PowerMax) panel and PowerLink firmware upgrades. It does not affect DSC/Neo/PSP panels (controlled by the separate Allow Upgrade over Cellular for DSC Panels setting) or IQ panels (which use Patch Tag updates from IQMS regardless of this setting).
Wake-up behavior: If the panel is offline when an upgrade is initiated, the server sends a wake-up SMS to bring the panel online before starting the upgrade. For GPRS-only panels, a wake-up SMS is always required before the upgrade can proceed.
GPRS data consumption: Upgrading over GPRS transfers the full firmware package over the cellular connection, which can consume significant data depending on the firmware size. Broadband is strongly recommended for DualPath panels that have both connections available.
Moving panels between groups: If a panel is moved to a group with a different upgrade method while an upgrade is in progress, the in-progress upgrade continues using the original method. The new method applies to subsequent upgrades only.
LTE modem upgrades (AOTA/FOTA): LTE modem firmware upgrades use a separate process and communication channel. They are not controlled by this setting and always use the cellular modem's own connection to the upgrade server.
If this setting is set to Broadband and a Visonic panel is connected only via GPRS (no PowerLink broadband module installed), the firmware upgrade will fail because the panel cannot download the package over a channel it does not have. Before starting a firmware upgrade, verify that the panel's available connection matches the configured upgrade method, or change this setting to GPRS for groups that contain GPRS-only Visonic panels.
Allow Upgrade over Cellular for DSC Panels
- What this does: Controls whether remote firmware upgrades on DSC Neo, Neo 5, and PSP panels are permitted over the cellular (GPRS/LTE) channel.
- When to use: Enable when the group contains GPRS-only or cellular-only DSC panels that require remote firmware upgrades and do not have a broadband connection. Keep disabled when all DSC panels in the group have broadband connectivity.
- Values: Enabled or Disabled. Default: Disabled.
- Impact: This setting applies only to DSC panel families (Neo, Neo 5, PSP). It does not affect Visonic panels (controlled by the separate PowerMaster Upgrade Method setting) or IQ panels (which use Patch Tag updates from the cloud regardless of this setting).
The actual upgrade channel used depends on the combination of this setting, the panel's available connections, and the Cellular Primary panel setting ([851][005][4]).
Upgradeable components: This setting controls the channel for all remotely upgradeable DSC components, including the panel, communicator, wired keypads, wired modules, and for Neo 5 panels also the PowerG+ Daughter Card.
Panel-side prerequisite: Remote firmware upgrade must be enabled on the communicator ([851][005][6] = Y). If this panel-side option is disabled, the upgrade fails regardless of the group setting.
Moving panels between groups: If a GPRS-only panel is moved from a group with this setting enabled to a group with it disabled, any subsequent firmware upgrade attempt will fail. If a panel is moved while an upgrade is in progress, the in-progress upgrade continues using the original group's setting. The new group's setting applies to subsequent upgrades only.
GPRS data consumption: Firmware packages for combined upgrades (panel + communicator + modules + keypads) can be substantial. Upgrading over cellular, especially on 2G connections, is slow and can be unstable due to socket switching between protocols. Broadband is strongly recommended when available. On 3G or LTE connections, cellular upgrades are more reliable but still consume significant data.
If this setting is disabled and a GPRS-only or cellular-only DSC panel needs a firmware upgrade, the upgrade will fail. Before starting a firmware upgrade on a GPRS-only panel, verify that this setting is enabled in the panel's group. If the panel was recently moved to a new group, confirm the new group's setting before initiating the upgrade.
For Neo 5 panels, combined firmware upgrades (panel + communicator + daughter card + keypads + modules in a single session) over cellular are known to be less stable than broadband upgrades. If a combined upgrade fails over cellular, retry individual component upgrades one at a time rather than as a batch.
Z-Wave Region Automatic Selection
- What this does: Enables PowerManage to automatically detect and set the correct Z-Wave frequency region for IQ panels based on the panel's geographic location.
- When to use: Enable for IQ panel deployments where manual Z-Wave region configuration is not practical, such as large-scale or multi-region rollouts. Keep disabled when panels have Z-Wave devices already enrolled with a manually configured region that differs from the panel's physical location (for example, test labs or demo environments).
- Values: Enabled or Disabled. Default: Disabled.
- Impact: This setting applies only to IQ panel family (IQ4, IQ4 NS, IQ4 Hub, IQ Pro). It has no effect on DSC, Neo, Neo 5, PSP, or Visonic panels.
When enabled, PowerManage detects the panel's geographic location and maps it to one of the supported Z-Wave regions. The detected region is sent to the panel, which updates its Z-Wave radio frequency accordingly.
Supported Z-Wave regions (auto-detection):
| Region | Frequency |
|---|---|
| Europe (EU) | 868 MHz |
| United States (US) | 908 MHz |
| Australia / New Zealand (ANZ) | 921 MHz |
| Hong Kong | 919 MHz |
| India | 865 MHz |
| Israel | 916 MHz |
| Russia | 869 MHz |
| China | 868 MHz |
| Japan | 922 MHz |
| Korea | 920 MHz |
United States Long Range is not supported by auto-detection. Z-Wave Long Range regions must be configured manually.
Location detection uses the same mechanism as Panel Time Synchronization and Weather Forecast. The location source priority and geolocation service priority described in the Panel Time Synchronization section apply here as well.
When Z-Wave region is updated:
- After panel enrollment, during the first discovery.
- When Owner Info address is added or changed (triggers a new location detection and region update).
- When Owner Info is removed (falls back to IP-based detection).
- When Owner Info is changed while the panel is offline — the region updates upon reconnection.
- When the panel IP changes (for example, switching from cellular to Wi-Fi with a different IP in a different region).
- When WeatherAPI or GeoNames tokens are applied after panel enrollment.
- When GeoNames username is configured after Owner Info address was already set.
- When Owner Info is set from the AlarmInstall app — changes propagate to PowerManage and trigger region detection.
Override behavior when enabled: If Z-Wave region is manually changed from the panel side or via configuration upload, PowerManage overrides it back to the detected region during the next discovery. Manual region changes do not persist when this setting is enabled.
Behavior when disabled: Z-Wave region detection by PowerManage does not occur. Manual region changes from the panel side or via configuration upload persist without being overridden. If the panel was previously in a group with this setting enabled and had a detected region, that region remains until manually changed.
Enabling this setting on a group with IQ panels that already have Z-Wave devices enrolled can cause Z-Wave device malfunction. If the auto-detected region differs from the region the Z-Wave devices were enrolled under, the Z-Wave radio frequency changes and all previously enrolled Z-Wave devices become unreachable. Devices will show "Malfunction" trouble on the Devices tab and cannot be operated until the region is changed back.
Before enabling, verify that the auto-detected region matches the region of the Z-Wave devices already enrolled on the panels. If there is a mismatch, either exclude affected panels from the group or disable this setting and configure Z-Wave region manually.
If only Google API key is configured (without GeoNames or Weather API), Z-Wave region auto-detection may not work for panels where location is determined by Owner Info address. The Google API key alone has been reported to fail silently for some address formats. For reliable Owner Info-based region detection, configure at least Weather API + GeoNames + Google API together. With all three configured, address resolution works for all formats including coordinates, city names, and full addresses.
Panels connected via cellular carriers whose IP resolves to a different country can receive an incorrect Z-Wave region. For example, an IQ panel in Israel connected through a carrier with an India-routed IP may have its Z-Wave region set to India, causing 865 MHz Z-Wave devices to malfunction. To prevent this, set the panel's Owner Info address to the correct location — Owner Info always takes priority over IP-based detection. If Owner Info is not set and the IP-based region is incorrect, the only workaround is to disable this setting and configure the region manually.
Some cities with ambiguous or common names (for example, Seoul, Tokyo, Melbourne, Perth, Lima, Jakarta) may not resolve correctly when entered as a single word in Owner Info. The GeoNames service may return only the country without city-level precision, resulting in an incorrect or unexpected region. For best results, enter full addresses including street, city, and country, or use geographic coordinates (latitude, longitude) in the Owner Info address field.
Use SMS for Neo 5 Wake Up
- What this does: Controls the server-side wake-up method for Neo 5 panels — either legacy SMS or MQTT via the JC2 cloud broker.
- When to use: Keep disabled (default) to use MQTT wake-up, which is more reliable and does not require an SMS broker or SIM phone number. Enable only if MQTT prerequisites cannot be met (for example, no billing license, incorrect Dealer ID, or no JC2 connectivity) and you need to fall back to SMS-based wake-up.
- Values: Enabled or Disabled. Default: Disabled.
- Impact: This setting applies only to Neo 5 panels. It has no effect on legacy panels (Visonic, DSC Neo earlier than 5.0, PSP) — legacy panels always use SMS wake-up regardless of this setting.
This setting is only visible in the group settings when billing is enabled in the server license. If billing is disabled, the toggle disappears from the GUI, and all Neo 5 panels in the group fall back to SMS wake-up automatically.
All three conditions must be met for MQTT: billing enabled + this setting disabled + correct Dealer ID on the panel.
How MQTT wake-up works: The Neo 5 panel maintains a persistent connection to the MQTT broker hosted on JC2 cloud services. When a wake-up is needed, PowerManage sends an API request to the JC2 service, which publishes a wake-up message to the panel via MQTT. The panel then establishes an ITv2 session back to PowerManage. MQTT wake-up does not require a SIM phone number, does not consume SMS credits, and is generally faster and more reliable than SMS.
How SMS wake-up works: PowerManage sends a wake-up SMS through the configured SMS broker (or GSM modem) to the panel's SIM phone number. The panel receives the SMS, parses the wake-up label, and initiates an ITv2 session back to PowerManage. SMS wake-up requires a configured SMS broker, a valid SIM phone number set on the panel, and an SMS-capable SIM card.
What triggers wake-up: Both MQTT and SMS wake-up are triggered by the same server-initiated processes: Refresh State, Set State (Arm/Disarm), Bypass, Discovery (when "Wake up Panel on User initiated Discovery" is enabled), VOD request, Peek-In, Walktest, Add/Remove Device, Download/Upload Configuration, Virtual Keypad, RRI, firmware upgrade, Download Panel Log, and automation rules from the ConnectAlarm app.
Changing this setting does not trigger discovery. The wake-up method is evaluated on-the-fly each time a wake-up is needed. No discovery or panel restart is required after toggling this setting.
Moving panels between groups: When a panel is moved to a group with a different value for this setting, the new wake-up method takes effect immediately at the next wake-up initiation. No discovery is triggered.
Redundancy: The wake-up method setting is per group and is replicated to the Secondary server during redundancy sync. After a switchover, the Secondary server uses the same wake-up method. However, MQTT wake-up requires the Secondary server to also have JC2 connectivity configured; if the Secondary cannot reach JC2, MQTT wake-up fails even if the setting is correct.
If the panel's SIM does not have a phone number (for example, MetTel SIMs), SMS wake-up will not work because there is no destination number for the wake-up message. In this case, MQTT is the only viable server-side wake-up method. Ensure that billing is enabled and the Dealer ID is correct so that MQTT is used. If MQTT prerequisites cannot be met, you can manually set a SIM number, but this works only if the SIM actually supports receiving SMS at that number.
Enable RSSI Report for Neo 5
- What this does: Controls whether Neo 5 panels automatically send GSM and Wi-Fi signal strength updates to PowerManage when the signal level changes.
- When to use: Enable when you need continuous, real-time monitoring of cellular and Wi-Fi signal quality for Neo 5 panels. Useful for proactive network diagnostics, identifying panels with degrading signal, and tracking signal trends over time. Keep disabled if automatic signal reporting is not needed or to reduce network traffic.
- Values: Enabled or Disabled. Default: Disabled.
- Impact: This setting applies only to Neo 5 panels. It has no effect on legacy Neo, PSP, Visonic, DualPath, or IQ panels — those panel families report signal strength through their own mechanisms.
This setting enables or disables the automatic signal strength notification — an event-driven report sent by the Neo 5 panel whenever the GSM or Wi-Fi signal level changes. When enabled, the panel proactively pushes signal updates to PowerManage without requiring a manual refresh or discovery.
Disabling this setting does not remove the GSM RSSI or Wi-Fi RSSI charts from the GUI — it only stops automatic signal change notifications. RSSI data is still collected during discovery and via manual refresh.
Network type is also reported and displayed alongside the signal level: 2G (GPRS), 2G (EDGE), 3G (WCDMA), 3G (HSDPA), 4G (LTE), 4G (LTE Advanced), 2G (CDMA), 3G (EVDO).
Data rotation: RSSI data older than 3 months is automatically deleted. When a panel is removed from the server, its RSSI data is also deleted. When a panel is re-enrolled, RSSI history starts from scratch.
Discovery triggered when setting is changed: Toggling this setting triggers a discovery for Neo 5 panels in the group to update the reporting configuration on the panel. During this discovery, the panel may temporarily stop sending keep-alive messages — if the offline timer is shorter than the discovery duration, a brief false offline event may occur.
Moving panels between groups: When a panel is moved to a group with a different value for this setting, a discovery is triggered to update the reporting configuration. RSSI data collected in the previous group is preserved — it is not deleted on group change.
Wi-Fi RSSI level is not updated by the "Refresh RSSI" (PowerG device RSSI) or "Refresh GSM" processes — these are separate processes. Wi-Fi RSSI is updated only by discovery, by the "Refresh Wi-Fi" button, or by automatic notification when this setting is enabled. Similarly, "Refresh State" does not update Wi-Fi or GSM RSSI values.
This setting controls automatic signal change notifications only. Even with this setting disabled, operators can always check the current signal strength by clicking "Refresh GSM" or "Refresh Wi-Fi" on the Devices page, or by triggering a manual discovery. The RSSI data from these manual actions is displayed on the same charts.
Supervision
PowerMaster / PowerMax
Cellular Supervision
- What this does: Enables periodic keep-alive monitoring over the GPRS or cellular channel.
- When to use: Use when GPRS panels need online/offline status tracking through cellular.
- Values: Enabled or Disabled. Default: Disabled.
- Impact: If disabled, no GPRS keep-alive is expected. The panel shows KA Disabled status and no offline events are generated for this channel.
Cellular Supervision Period
- What this does: Sets the interval in seconds between expected GPRS keep-alive messages.
- When to use: Use to balance offline detection speed and cellular data usage.
- Values: 120–604800 seconds. Default: 600.
- Impact: Lower values detect offline status faster but increase cellular traffic. The high-performance benchmark value is 600 seconds. For cellular-heavy deployments (60,000+ panels), values below 600 seconds increase server load and cellular costs significantly.
Cellular Offline Timer
- What this does: Sets the time in seconds after the last cellular keep-alive before the panel is declared offline.
- When to use: Use a value proportional to the supervision period, typically 2–5 times the keep-alive period.
- Values: 130–604810 seconds. Default: 3000.
- Impact: When the timer expires, an offline event is generated. The value must be greater than the supervision period. Setting this too close to the supervision period causes false offline events during temporary network hiccups.
Broadband Encryption
- What this does: Enables Pnet encryption on the broadband channel.
- When to use: Use when secure communication is required on broadband. Recommended for all production environments.
- Values: Enabled or Disabled. Default: Disabled.
- Impact: Encrypts broadband keep-alive and data exchange. Enabling encryption adds minimal CPU overhead but significantly improves security. Once enabled, panels that do not support Pnet encryption cannot communicate over broadband until they are upgraded.
Broadband Supervision Period
- What this does: Sets the interval in seconds between expected broadband keep-alive messages.
- When to use: Use for broadband panels where shorter intervals are supported and network capacity allows it.
- Values: 5–86400 seconds. Default: 30.
- Impact: Lower values provide near-real-time status. Minimum value for high-performance setups is 5 seconds (benchmarked for up to 20,000 broadband Visonic panels). At 5-second intervals, each panel generates approximately 17,280 KA messages per day.
Broadband Offline Timer
- What this does: Sets the time in seconds after the last broadband keep-alive before the panel is declared offline.
- When to use: Use a value proportional to the broadband supervision period, typically 3–5 times the keep-alive period.
- Values: 15–86410 seconds. Default: 150.
- Impact: When the timer expires, a broadband offline event is generated. The value must be greater than the broadband supervision period.
PowerSeries NEO/Pro, Quazar earlier than 5.3 (Fibro)
For Quazar versions earlier than 5.3, cellular and broadband supervision share a single supervision period value. Cellular and broadband offline timers are independent. Starting with Quazar 5.3, each channel has its own independent supervision period.
Cellular Supervision
- What this does: Enables Fibro keep-alive monitoring over the cellular channel for DSC panels.
- When to use: Use when cellular DSC panels need online/offline status tracking.
- Values: Enabled or Disabled. Default: Disabled.
- Impact: If disabled, no cellular offline events are generated and the panel shows KA Disabled for the GPRS channel.
Broadband Supervision
- What this does: Enables Fibro keep-alive monitoring over the broadband channel for DSC panels.
- When to use: Use when broadband DSC panels need online/offline status tracking.
- Values: Enabled or Disabled. Default: Disabled.
- Impact: If disabled, no broadband offline events are generated and the panel shows KA Disabled for the broadband channel.
Supervision Period
- What this does: Sets the shared keep-alive interval for both cellular and broadband channels.
- When to use: Use to balance detection speed and resource usage.
- Values: 10–65535 seconds. Default: 135.
- Impact: Applies to both channels simultaneously. Changes to this value trigger a discovery step to update the panel. Benchmark value for DSC panels is 135 seconds. The shared period means you cannot set faster broadband detection without also increasing cellular KA traffic.
Cellular Offline Timer
- What this does: Sets the time after the last cellular keep-alive before the panel is declared offline.
- When to use: Use a value proportional to the supervision period.
- Values: 20–65545 seconds. Default: 405.
- Impact: Triggers a GPRS offline event when expired. The value must be greater than the supervision period.
Broadband Offline Timer
- What this does: Sets the time after the last broadband keep-alive before the panel is declared offline.
- When to use: Use a value proportional to the supervision period.
- Values: 20–65545 seconds. Default: 405.
- Impact: Triggers a broadband offline event when expired. The value must be greater than the supervision period.
PowerSeries NEO, Quazar 5.3 and later (Fibro)
Starting with Quazar 5.3, cellular and broadband supervision periods and offline timers are fully independent. You can configure different intervals for each channel.
Cellular Supervision
- What this does: Enables Fibro keep-alive monitoring over cellular for Neo panels with Quazar 5.3 or later.
- When to use: Use when cellular Neo or Quazar 5.3+ panels need online/offline tracking.
- Values: Enabled or Disabled. Default: Disabled.
- Impact: Controls cellular supervision independently and does not affect broadband supervision.
Cellular Supervision Period
- What this does: Sets the keep-alive interval for the cellular Fibro channel.
- When to use: Use to adjust cellular responsiveness.
- Values: 10–65535 seconds. Default: 135.
- Impact: Independent from the broadband period and affects cellular offline detection speed.
Cellular Offline Timer
- What this does: Sets the time after the last cellular Fibro keep-alive before an offline event is generated.
- When to use: Use a value proportional to the cellular supervision period.
- Values: 20–65545 seconds. Default: 405.
- Impact: Triggers a cellular offline event when expired.
Broadband Supervision
- What this does: Enables Fibro keep-alive monitoring over broadband for Neo panels with Quazar 5.3 or later.
- When to use: Use when broadband Neo or Quazar 5.3+ panels need online/offline tracking.
- Values: Enabled or Disabled. Default: Disabled.
- Impact: Controls broadband supervision independently and does not affect cellular supervision.
Broadband Supervision Period
- What this does: Sets the keep-alive interval for the broadband Fibro channel.
- When to use: Use to adjust broadband responsiveness.
- Values: 10–65535 seconds. Default: 135.
- Impact: Independent from the cellular period and affects broadband offline detection speed.
Broadband Offline Timer
- What this does: Sets the time after the last broadband Fibro keep-alive before an offline event is generated.
- When to use: Use a value proportional to the broadband supervision period.
- Values: 20–65545 seconds. Default: 405.
- Impact: Triggers a broadband offline event when expired.
PowerSeries Neo, Quazar 6.0 and higher (ITv2)
ITv2 Cellular Supervision
- What this does: Enables ITv2 keep-alive monitoring over cellular for Neo 5 panels.
- When to use: Use when Neo 5 panels connected through cellular need supervision.
- Values: Enabled or Disabled. Default: Disabled.
- Impact: Enables cellular online/offline status tracking for ITv2 protocol.
For Neo 5 panels on cellular, the recommended default supervision period is 43200 seconds (12 hours) with an offline timer of 90000 seconds (25 hours) to account for normal cellular session timeouts and reconnection delays. The standard Fibro defaults of 135/405 seconds are too aggressive for ITv2 cellular connections and can cause frequent false offline events.
ITv2 Cellular Supervision Period
- What this does: Sets the keep-alive interval for the ITv2 cellular channel.
- When to use: Use to balance cellular data budget and detection needs.
- Values: 10–65535 seconds. Default: 135.
- Impact: Determines how often the panel sends ITv2 keep-alive over cellular and affects data usage. For cellular-only Neo 5 panels, use a higher value (12+ hours) to reduce data consumption and avoid false offline events.
ITv2 Cellular Offline Timer
- What this does: Sets the time after the last ITv2 cellular keep-alive before the panel is declared offline.
- When to use: Use a value proportional to the ITv2 cellular supervision period.
- Values: 20–65545 seconds. Default: 405.
- Impact: Triggers a "BBA module has gone offline (ITv2)" event when expired. If the offline timer is too short, offline events can be generated during active discovery processes when the panel temporarily stops sending KA messages.
If you see "BBA module has gone offline (ITv2)" events during the discovery process for newly enrolled panels, increase the ITv2 offline timer to exceed the typical discovery duration (usually 2–5 minutes). This prevents false offline events during the initial enrollment.
ITv2 Broadband Supervision
- What this does: Enables ITv2 keep-alive monitoring over broadband, Ethernet, or Wi-Fi for Neo 5 panels.
- When to use: Use when Neo 5 panels connected through broadband need supervision.
- Values: Enabled or Disabled. Default: Disabled.
- Impact: Enables broadband online/offline status tracking for ITv2 protocol.
ITv2 Broadband Supervision Period
- What this does: Sets the keep-alive interval for the ITv2 broadband channel.
- When to use: Use to balance broadband network capacity and detection needs.
- Values: 10–65535 seconds. Default: 135.
- Impact: Determines how often the panel sends ITv2 keep-alive over broadband.
ITv2 Broadband Offline Timer
- What this does: Sets the time after the last ITv2 broadband keep-alive before the panel is declared offline.
- When to use: Use a value proportional to the ITv2 broadband supervision period.
- Values: 20–65545 seconds. Default: 405.
- Impact: Triggers a broadband offline event for ITv2 when expired.
IQ Panel (Fibro)
Cellular Supervision
- What this does: Enables Fibro heartbeat monitoring over cellular for IQ panels.
- When to use: Use when IQ panels use Fibro on cellular and need supervision.
- Values: Enabled or Disabled. Default: Disabled.
- Impact: Controls Fibro-based cellular online/offline detection for IQ panels.
Cellular Supervision Period
- What this does: Sets the Fibro keep-alive interval over cellular.
- When to use: Use to adjust cellular detection speed.
- Values: 10–65535 seconds. Default: 135.
- Impact: Determines Fibro heartbeat frequency over cellular for IQ panels.
Cellular Offline Timer
- What this does: Sets the time after the last Fibro cellular keep-alive before the IQ panel is declared offline.
- When to use: Use a value proportional to the Fibro cellular supervision period.
- Values: 20–65545 seconds. Default: 405.
- Impact: Generates an offline event for the IQ panel Fibro cellular channel when expired.
Broadband Supervision
- What this does: Enables Fibro heartbeat monitoring over broadband for IQ panels.
- When to use: Use when IQ panels use Fibro on broadband and need supervision.
- Values: Enabled or Disabled. Default: Disabled.
- Impact: Controls Fibro-based broadband online/offline detection for IQ panels.
Broadband Supervision Period
- What this does: Sets the Fibro keep-alive interval over broadband.
- When to use: Use to adjust broadband detection speed.
- Values: 10–65535 seconds. Default: 135.
- Impact: Determines Fibro heartbeat frequency over broadband for IQ panels.
Broadband Offline Timer
- What this does: Sets the time after the last Fibro broadband keep-alive before the IQ panel is declared offline.
- When to use: Use a value proportional to the Fibro broadband supervision period.
- Values: 20–65545 seconds. Default: 405.
- Impact: Generates an offline event for the IQ panel Fibro broadband channel when expired.
IQ Panel (LwM2M)
LwM2M supervision is supported for IQ panels version 4.6 and later. For IQ panels version 4.5 and earlier, the legacy online/offline mechanism applies and LwM2M supervision settings have no effect.
Cellular Supervision
- What this does: Enables LwM2M-based keep-alive monitoring over cellular for IQ panels.
- When to use: Use when IQ panels report through LwM2M and need cellular online/offline detection.
- Values: Enabled or Disabled. Default: Disabled.
- Impact: Provides LwM2M supervision independent from Fibro. Both protocols can coexist on the same panel.
Cellular Supervision Period
- What this does: Sets the LwM2M keep-alive interval over cellular.
- When to use: Use to adjust cellular detection needs. Note the panel hardcoded minimum.
- Values: 10–65535 seconds. Default: 86400.
- Impact: The IQ panel firmware enforces a hardcoded minimum cellular keep-alive of 86400 seconds (24 hours) regardless of the value configured here. Setting a smaller value in the group settings has no effect on the actual KA interval for cellular. Plan offline timer values accordingly.
Cellular Offline Timer
- What this does: Sets the time after the last LwM2M cellular keep-alive before the IQ panel is declared offline.
- When to use: Use a value proportional to the LwM2M cellular supervision period. Account for the panel's hardcoded 86400-second minimum.
- Values: 20–65545 seconds. Default: 86421.
- Impact: Triggers an LwM2M cellular offline event when expired.
Broadband Supervision
- What this does: Enables LwM2M-based keep-alive monitoring over Ethernet or Wi-Fi for IQ panels.
- When to use: Use when IQ panels report through LwM2M and need broadband online/offline detection.
- Values: Enabled or Disabled. Default: Disabled.
- Impact: Provides LwM2M-based broadband supervision. When both Fibro and LwM2M supervision are enabled, the LED shows online if at least one protocol reports an online status on any channel.
Broadband Supervision Period
- What this does: Sets the LwM2M keep-alive interval over broadband.
- When to use: Use to adjust broadband detection needs.
- Values: 10–65535 seconds. Default: 135.
- Impact: Determines LwM2M heartbeat frequency over Ethernet or Wi-Fi for IQ panels. LwM2M Registration Updates also occur every 30 seconds by default, independent of this setting.
Broadband Offline Timer
- What this does: Sets the time after the last LwM2M broadband keep-alive before the IQ panel is declared offline.
- When to use: Use a value proportional to the LwM2M broadband supervision period.
- Values: 20–65545 seconds. Default: 405.
- Impact: Triggers an LwM2M broadband offline event when expired.
For IQ panels that use both Fibro and LwM2M, supervision can be configured per protocol. Changes to one protocol's settings do not affect the other. The panel's overall connection LED reflects a merged status: if at least one protocol reports online on any channel, the LED shows online. Confirm which protocol is expected for the deployment before changing values.
Notifications
Use Notifications settings to control which event categories are visible in the user app and which push or email notification categories end users can subscribe to.
Notification settings are divided into two independent sections:
- Events notification profile — control which events appear on the Events tab in the ConnectAlarm app.
- Push/Email notification profile — control which push/email notification toggles are available to end users in the app's notification settings.
These two sections are fully independent of each other.
Events Notification Profile
Events Notification Profile control which events are displayed on the Events tab in the user app. Disabling an event profile hides the event from the Events tab but does not affect push or email delivery. Events are still processed and stored on the server; they are only hidden from the user-facing Events tab.
Alerts
- What this does: Controls visibility of alert events in the ConnectAlarm app Events tab.
- When to use: Enable to show trouble or alert events in the user app.
- Values: Enabled or Disabled. Default: Enabled.
- Impact: If disabled, alert events are hidden from the Events tab for this group.
Alarms
- What this does: Controls visibility of alarm events in the ConnectAlarm app Events tab.
- When to use: Enable to show intrusion, fire, or panic alarms in the user app.
- Values: Enabled or Disabled. Default: Enabled.
- Impact: If disabled, alarm events are hidden from the Events tab.
Restores
- What this does: Controls visibility of restore events in the ConnectAlarm app Events tab.
- When to use: Enable to show alarm or trouble restore events in the user app.
- Values: Enabled or Disabled. Default: Enabled.
- Impact: If disabled, restore events are hidden from the Events tab.
Security Open/Close
- What this does: Controls visibility of arm and disarm events in the ConnectAlarm app Events tab.
- When to use: Enable to show arming and disarming events in the user app.
- Values: Enabled or Disabled. Default: Enabled.
- Impact: If disabled, arm and disarm events are hidden from the Events tab.
Camera Being Viewed
- What this does: Controls visibility of camera viewing events in the ConnectAlarm app Events tab.
- When to use: Enable if camera access events should be visible to end users.
- Values: Enabled or Disabled. Default: Enabled.
- Impact: If disabled, camera being viewed events are hidden from the Events tab.
Output Devices On/Off
- What this does: Controls visibility of home automation device state events in the Events tab.
- When to use: Enable if Z-Wave or PowerG+ device state changes should be visible.
- Values: Enabled or Disabled. Default: Enabled.
- Impact: If disabled, home device state changes are hidden from the Events tab.
Online
- What this does: Controls visibility of panel online events in the ConnectAlarm app Events tab.
- When to use: Enable to show when a panel comes online.
- Values: Enabled or Disabled. Default: Enabled.
- Impact: If disabled, online events are hidden from the Events tab.
Offline
- What this does: Controls visibility of panel offline events in the ConnectAlarm app Events tab.
- When to use: Enable to show when a panel goes offline.
- Values: Enabled or Disabled. Default: Enabled.
- Impact: If disabled, offline events are hidden from the Events tab.
Notice Events
- What this does: Controls visibility of system notice events in the ConnectAlarm app Events tab.
- When to use: Enable to show RRI and system notices in the user app.
- Values: Enabled or Disabled. Default: Enabled.
- Impact: If disabled, notice events are hidden from the Events tab.
Duress
- What this does: Controls visibility of duress events in the Events tab.
- When to use: Enable to show silent panic alarm events in the user app.
- Values: Enabled or Disabled. Default: Enabled.
- Impact: If disabled, duress events are hidden from the Events tab.
System
- What this does: Controls visibility of system events, such as installer login, rule failures, and access revocation, in the Events tab.
- When to use: Enable to show installer logins, push subscription expiry, rule failures, and access revocation in the user app.
- Values: Enabled or Disabled. Default: Enabled. Added in PowerManage 5.0.
- Impact: If disabled, system events such as installer login notifications, rule engine failures, and access revocation events are hidden. This profile is not present on servers running versions earlier than 5.0.
Push/Email notification profile
Push/Email notification profile profiles control whether push and email notification categories are available in the user app. When a profile is disabled, the corresponding toggle is hidden from the app's notification settings screen, and users cannot subscribe to that notification type.
Alerts
- What this does: Controls whether push and email notifications for alerts are available to end users.
- When to use: Enable to allow users to subscribe to alert notifications in the app.
- Values: Enabled or Disabled. Default: Enabled.
- Impact: If disabled, the alert push/email toggle is hidden in the app and alerts are not sent by push/email.
Alarms
- What this does: Controls push and email notification availability for alarm events.
- When to use: Enable to allow users to subscribe to alarm notifications in the app.
- Values: Enabled or Disabled. Default: Enabled.
- Impact: If disabled, the alarm push/email toggle is hidden in the app and alarms are not sent by push/email.
Restores
- What this does: Controls push and email notification availability for restore events.
- When to use: Enable to allow users to subscribe to restore notifications in the app.
- Values: Enabled or Disabled. Default: Enabled.
- Impact: If disabled, the restore push/email toggle is hidden in the app and restores are not sent by push/email.
Security Open/Close
- What this does: Controls push and email notification availability for arm and disarm events.
- When to use: Enable to allow users to subscribe to arm/disarm notifications in the app.
- Values: Enabled or Disabled. Default: Enabled.
- Impact: If disabled, the arm/disarm push/email toggle is hidden in the app.
Camera Being Viewed
- What this does: Controls push and email notification availability for camera viewing events.
- When to use: Enable to allow users to be notified when a camera is being viewed.
- Values: Enabled or Disabled. Default: Enabled.
- Impact: If disabled, the camera viewing push/email toggle is hidden in the app.
Output Devices On/Off
- What this does: Controls push and email notification availability for home device state changes.
- When to use: Enable to allow users to be notified of automation device on/off changes.
- Values: Enabled or Disabled. Default: Enabled.
- Impact: If disabled, the home device push/email toggle is hidden in the app.
Online
- What this does: Controls push and email notification availability for panel online events.
- When to use: Enable to allow users to be notified when a panel comes online.
- Values: Enabled or Disabled. Default: Enabled.
- Impact: If disabled, the online event push/email toggle is hidden in the app.
Offline
- What this does: Controls push and email notification availability for panel offline events.
- When to use: Enable to allow users to be notified when a panel goes offline.
- Values: Enabled or Disabled. Default: Enabled.
- Impact: If disabled, the offline event push/email toggle is hidden in the app.
Notice Events
- What this does: Controls push and email notification availability for notice events.
- When to use: Enable to allow users to be notified of system notices and RRI results.
- Values: Enabled or Disabled. Default: Enabled.
- Impact: If disabled, the notice event push/email toggle is hidden in the app.
Duress
- What this does: Controls push and email notification availability for duress events.
- When to use: Enable to allow users to be notified of silent panic alarm events.
- Values: Enabled or Disabled. Default: Enabled.
- Impact: If disabled, the duress push/email toggle is hidden in the app.
System
- What this does: Controls push and email notification availability for system events, such as installer login, rule failure, and access revocation.
- When to use: Enable to allow users to be notified of installer logins, rule failures, and access revocation events.
- Values: Enabled or Disabled. Default: Enabled. Added in PowerManage 5.0.
- Impact: If disabled, the system notification toggle is hidden in the app and no system push/email notifications are sent. Push and email for this profile are independent: you can disable system pushes while keeping system emails or vice versa. Certain security-critical pushes, such as EN Grade 2 installer login confirmation requests to the Master User, are not affected by this toggle and are always delivered.
Events Notification Profile and Push/Email Notification Profiles are fully independent:
- Disabling an Event Profile hides the event from the Events tab in the app but does not stop push or email delivery for that event type. Users who subscribed to that event type continue to receive push/email notifications.
- Disabling an Push/Email Notification Profiles hides the push/email toggle in the app and prevents new subscriptions, but does not remove the event from the Events tab.
Example: If Restores are disabled in Event Profiles but enabled in Notification Profiles, a restore event is hidden from the Events tab but push and email notifications are still delivered to subscribed users.
Disabling a notification profile in the group settings prevents new users from subscribing to that event type, but does not cancel existing subscriptions. Users who previously subscribed to a notification type continue to receive push or email notifications even after the profile is turned off.
To fully stop notifications for a profile, you must both disable the notification profile in the group settings and have affected users manually unsubscribe from the notification type in their app settings, or manage subscriptions through the API.
PowerManage supports the following push notification throughput:
- Android: Up to 17 pushes per second
- iOS: Up to 17 pushes per second
Push delivery requires that push notifications are globally enabled in the server settings and that SMTP/notification services are properly configured. If push notifications are disabled at the server level, the app shows an error message on the notification settings tab regardless of the group profile settings.
Central stations communication
Use Central stations communication settings to control which event categories are forwarded to each linked Central Station (CS).
Event forwarding to a CS requires two configuration steps:
- Create the CS in the Central Stations page with the correct protocol, connection type, and retry settings.
- Link the CS to the group and enable the desired event profiles in the group's CS Communication tab.
Events that match an enabled profile are forwarded to the linked CS. Events that do not match any enabled profile receive a "Filtered" delivery status.
All
- What this does: Selects or deselects all event profiles for this CS link.
- When to use: Use to quickly enable or disable all event forwarding to a specific CS.
- Values: Enabled or Disabled. Default: Disabled.
- Impact: Overrides the individual profile toggles below. When enabled, all event types are forwarded.
Alert / Alarm / Restore
- What this does: Enables forwarding of intrusion alarms, alerts, and restore events to this CS.
- When to use: Enable for any CS that monitors alarm events. This is the core security monitoring profile.
- Values: Enabled or Disabled. Default: Disabled.
- Impact: If disabled, alarm, alert, and restore events from panels in this group are not sent to this CS. These events still be delivered to other CS links in the same or different groups.
Security Open/Close
- What this does: Enables forwarding of arming and disarming events to this CS.
- When to use: Enable when the CS needs to log panel arm/disarm activity.
- Values: Enabled or Disabled. Default: Disabled.
- Impact: If disabled, arm/disarm events are not forwarded to this CS and delivery status shows "Filtered".
Online / Offline
- What this does: Enables forwarding of panel connection status changes to this CS.
- When to use: Enable when the CS needs to track panel connectivity status.
- Values: Enabled or Disabled. Default: Disabled.
- Impact: If disabled, online/offline status changes are not forwarded to this CS.
Notice / RRI
- What this does: Enables forwarding of system notices and Remote Routine Inspection results.
- When to use: Enable when the CS needs Remote Inspection data and system notifications.
- Values: Enabled or Disabled. Default: Disabled.
- Impact: If disabled, notices and RRI results are not forwarded to this CS.
Temperature / Illuminance
- What this does: Enables forwarding of environmental sensor data events to this CS.
- When to use: Enable when the CS monitors temperature and light sensor data. Requires Temperature/Light Statistic to be enabled in the Configuration section.
- Values: Enabled or Disabled. Default: Disabled.
- Impact: If disabled, temperature and light sensor data events are not forwarded to this CS. This profile has no effect if Temperature/Light Statistic is disabled in the Configuration settings, since no such events are generated.
Duress
- What this does: Enables forwarding of duress or silent panic alarm events to this CS.
- When to use: Enable when the CS needs to receive silent panic alarms.
- Values: Enabled or Disabled. Default: Disabled.
- Impact: If disabled, duress events are not forwarded to this CS.
Each Central Station can be linked to multiple groups. Each group link has its own event profile toggles. Changes to CS communication links on one group do not affect other groups.
PowerManage supports the following CS protocols: MLR2 (Contact-ID, SIA L2, SIA L3, MAS SIA L3), FEP XML (CID, SIA, SYS), VIS NAP (Visonic, CID, SIA, V2/Visonic, V3/Visonic), Fibro CS (CID, SIA), and DC-09.
If the panel sends events in one format (for example, SIA) and the CS expects a different format (for example, CID), PowerManage automatically converts between formats before delivery. No additional configuration is required for format conversion.
When linking a CS to a group, verify the CS protocol, connection settings, and retry configuration on the Central Stations page first. An incorrectly configured CS (wrong host, port, or protocol) causes all forwarded events to enter the Retry → Failed cycle without reaching the CS.