Accounts
Overview
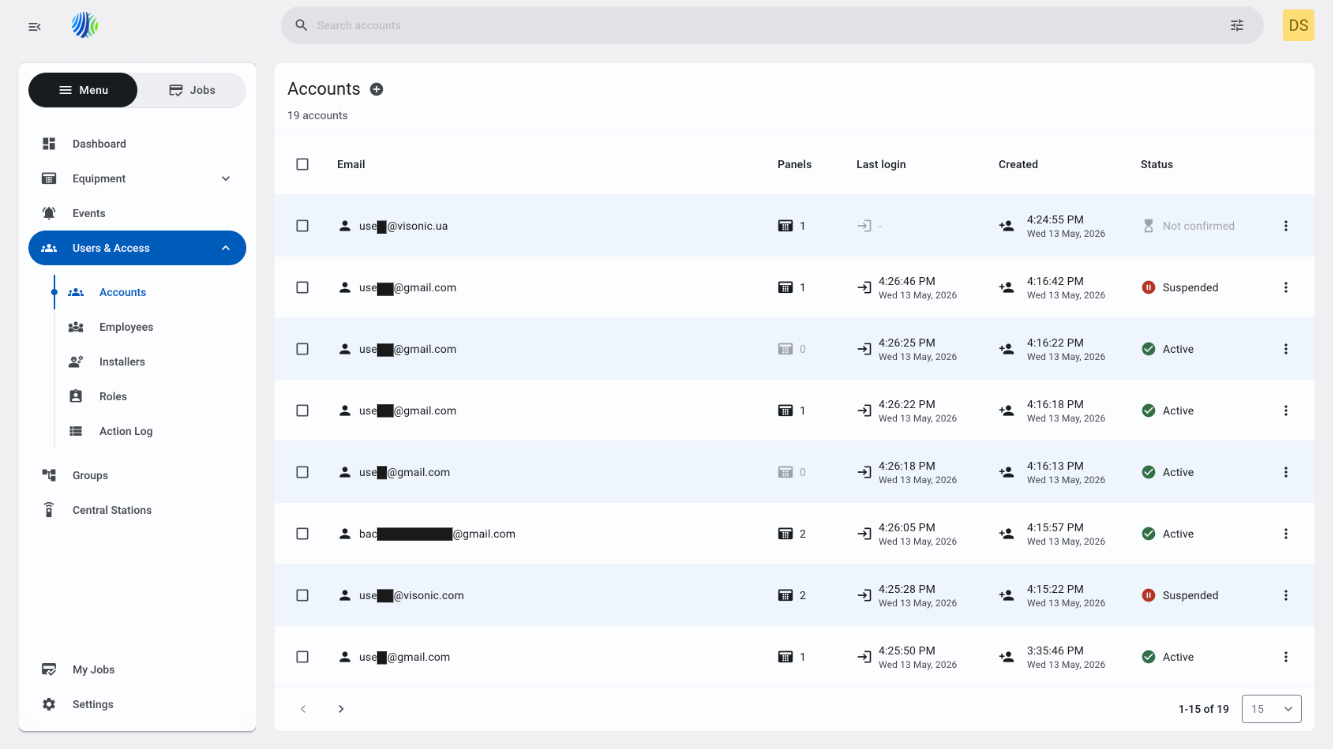
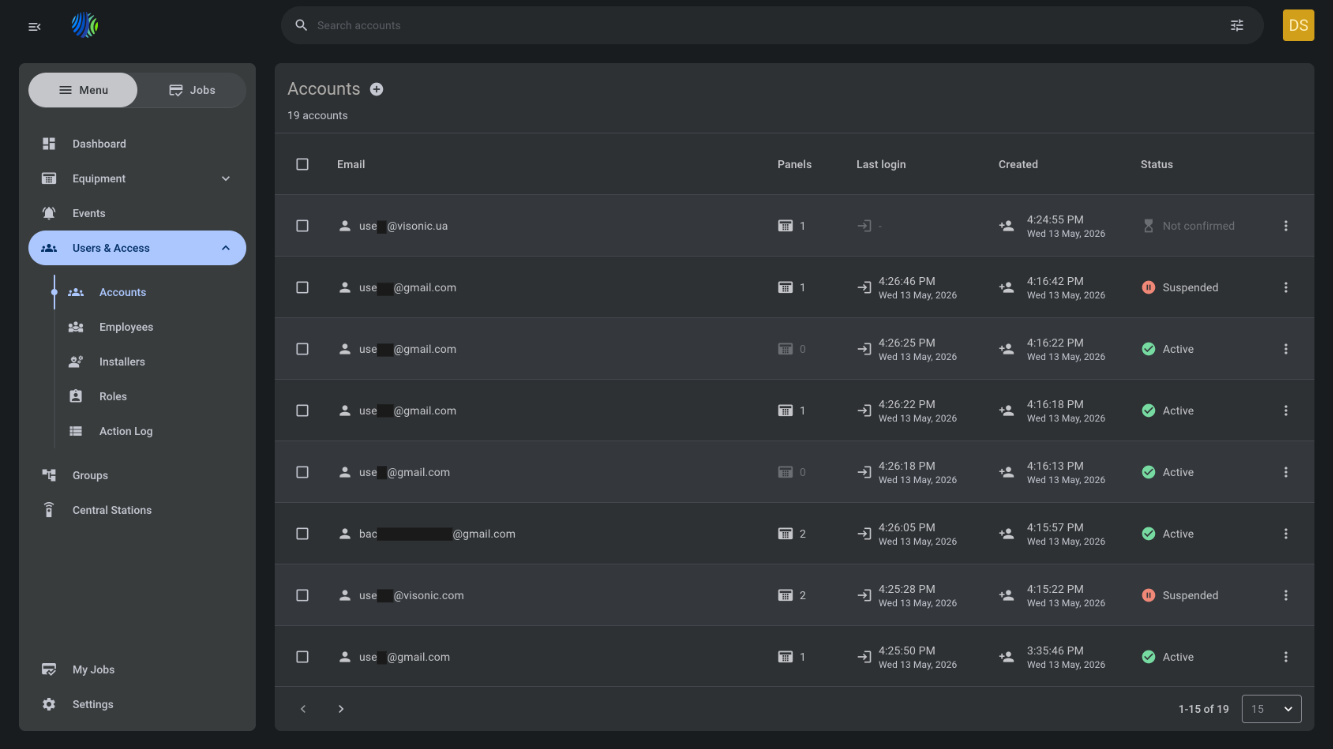
The Accounts page is used to manage accounts that can access the user application.
Use this page to:
- Register a new account.
- Review account email, status, assigned panels, and login activity.
- Suspend or enable account access.
- Reset an account password.
- Assign panels to an account.
- Unassign panels from an account.
- Remove accounts that are no longer needed.
This page helps administrators control user application access and manage panel assignments from one location.
Before you begin
Required permissions
- You must have permission to view accounts.
- You must have permission to add accounts.
- You must have permission to suspend accounts.
- You must have permission to enable accounts.
- You must have permission to remove accounts.
- You must have permission to reset account passwords.
- You must have permission to view panels assigned to accounts.
- You must have permission to assign panels to accounts.
- You must have permission to unassign panels from accounts.
Access to the Accounts page and accounts management is controlled by the role permission group named Accounts.
Preconditions
- SMTP must be configured to send one-time codes for registration or password reset.
- The account must have a valid email address to receive registration and password reset codes.
- Panels must exist before they can be assigned to an account.
- Panel users must exist on a selected panel before an account can be assigned to a panel user.
Dependencies
- Email delivery depends on the configured SMTP service.
- Panel assignment depends on available panels in the system.
- The User dropdown in the assignment modal depends on the selected panel and its available panel users.
Important limitations
- Removing an account is permanent and cannot be undone.
- A suspended account cannot access the user application.
- A newly registered account has Not confirmed status until the first login to the user application is completed.
- One-time registration and password reset codes cannot be sent if SMTP is not configured or is unavailable.
Page layout
Page header


The page header identifies the page, shows the account count, and provides the entry point for registering a new account. Bulk action buttons appear in the header after you select accounts in the grid.
| Callout | UI element | Description | When to use |
|---|---|---|---|
| 1 | Page title | Shows the current page name: Accounts. | Use to confirm that you are on the account management page. |
| 2 | Accounts count | Shows the number of accounts currently listed, for example, 20 accounts. | Use to confirm the total after registration, removal, or page refresh. |
| 3 | + add icon | Opens the Register account modal. | Use to register a new account. |
| 4 | Bulk action buttons | Shows actions for selected accounts. Available buttons can include Suspend, Enable, and Remove. | Use after selecting one or more accounts in the grid. |
Bulk action buttons appear only after you select at least one account. If you select accounts with different statuses, actions for the selected statuses can appear together.
Accounts grid
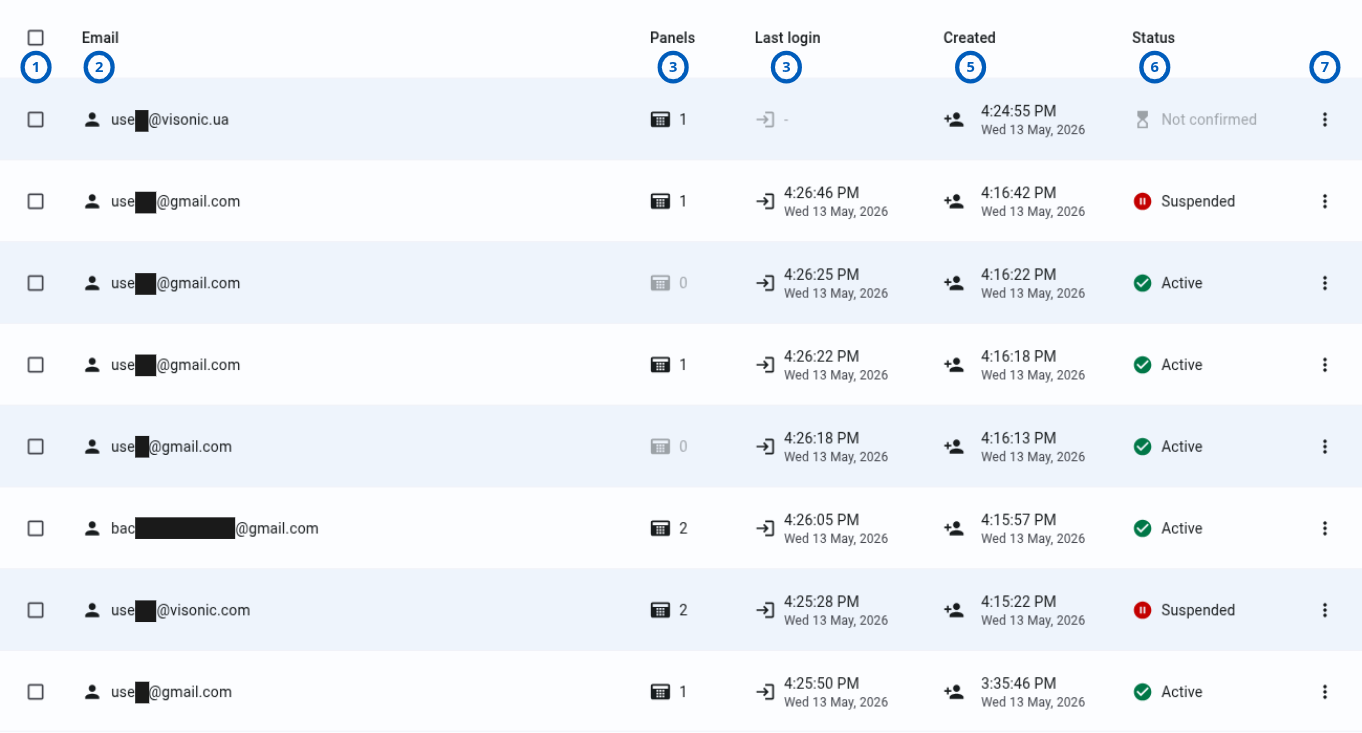
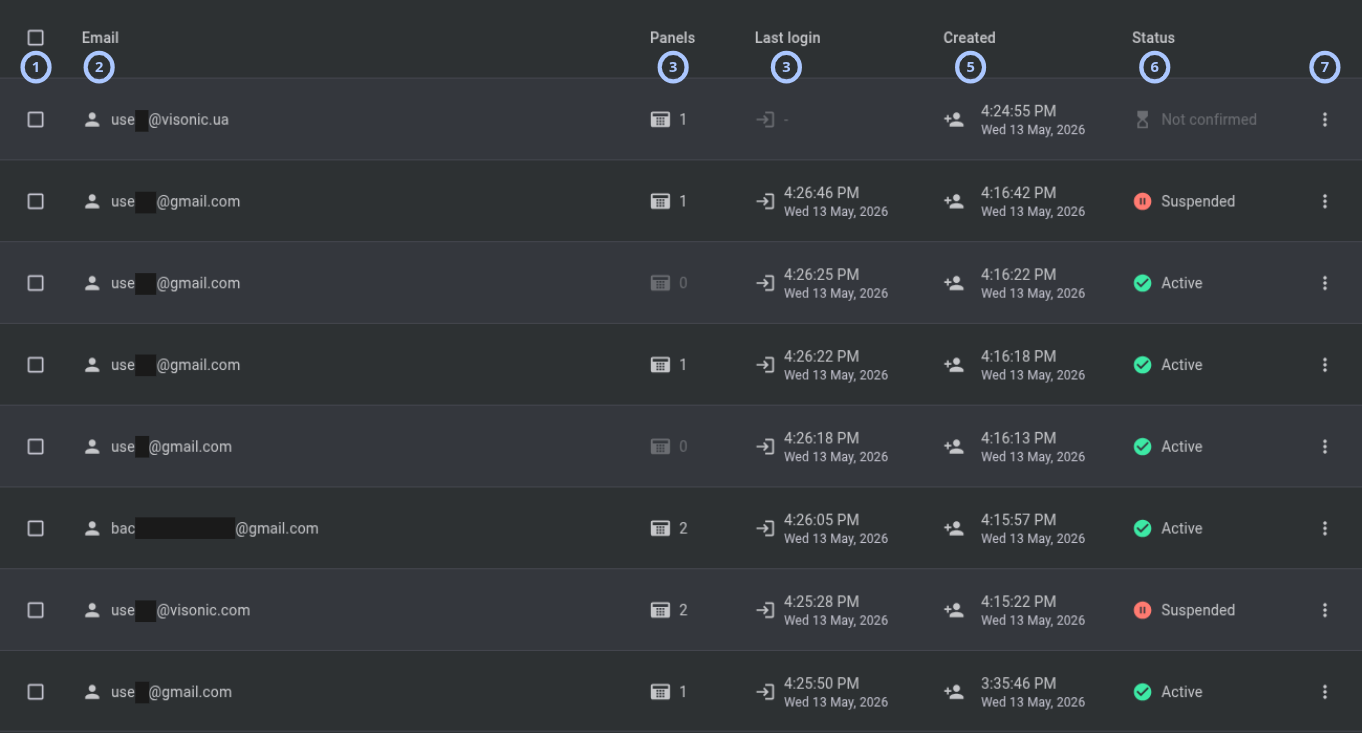
The accounts grid lists accounts and shows access, assignment, and activity details.
| Callout | UI element | Description | When to use |
|---|---|---|---|
| 1 | Checkbox | Selects one or more accounts. | Use to show bulk actions in the page header. |
| 2 | Email column | Shows the account email address. | Use to identify the account and verify where one-time codes are sent. |
| 3 | Panels column | Shows the number of panels assigned to the account. | Use to review assignment volume before opening account details. |
| 4 | Last login column | Shows the date and time of the account's last login to the user application. | Use to review recent account activity. |
| 5 | Created column | Shows when the account was created. | Use for account review and audit checks. |
| 6 | Status column | Shows the current account status: Active, Suspended, or Not confirmed. | Use to understand whether the account can access the user application. |
| 7 | Row actions menu | Shows a three vertical dots menu for a specific account. | Use to suspend, enable, reset password, or remove one account. |
Register account modal
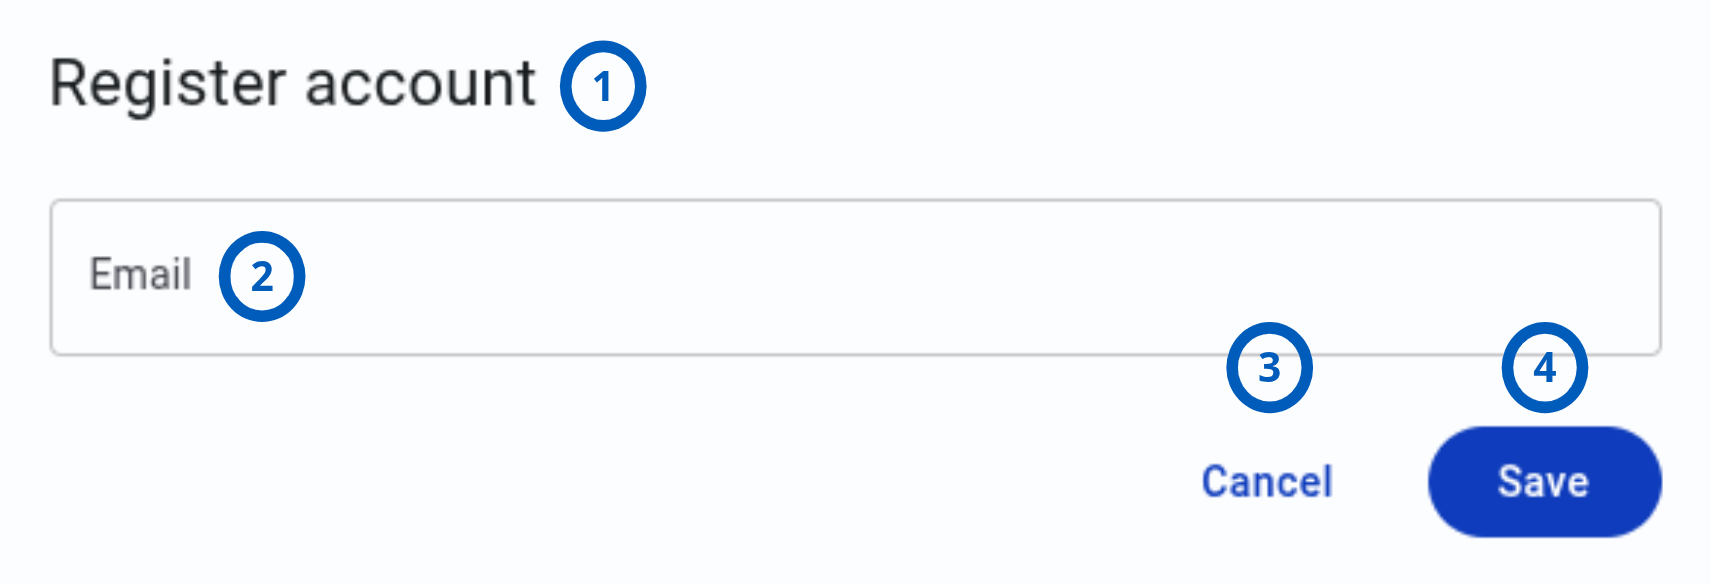
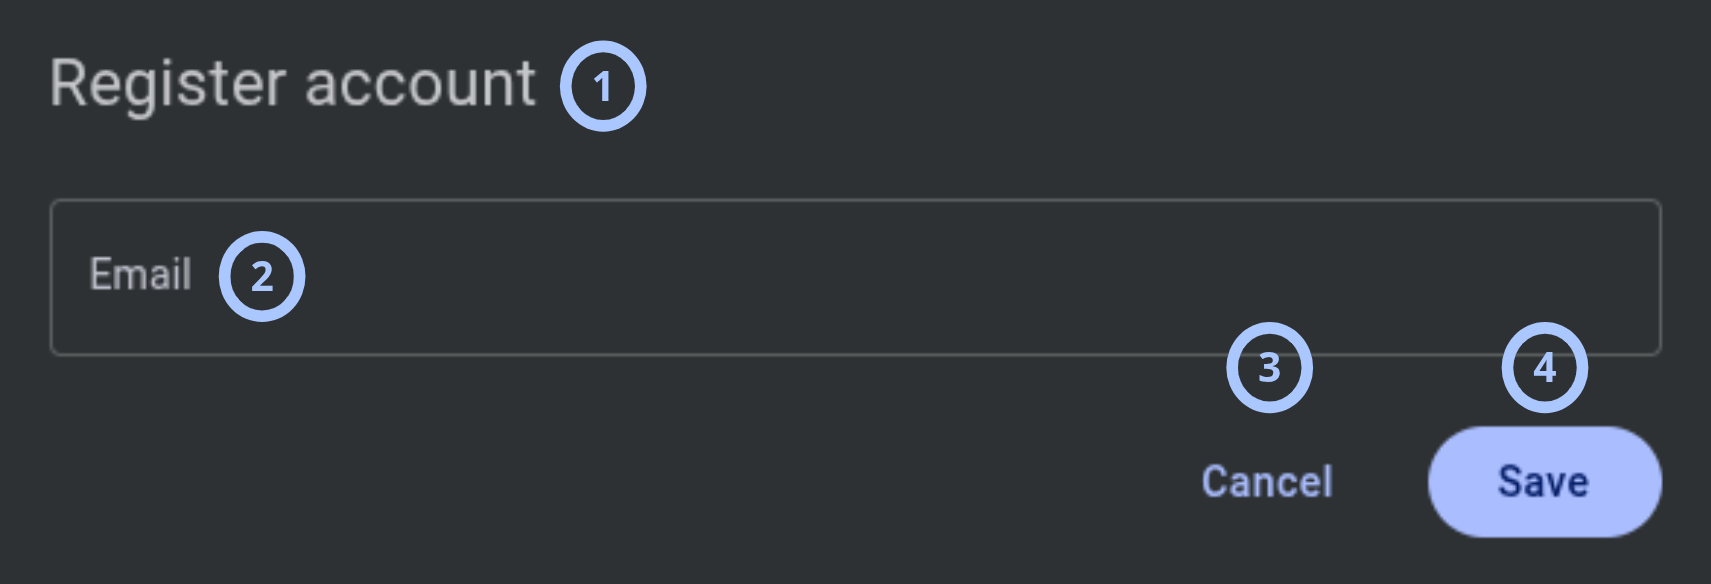
The Register account modal opens when you select the + add icon in the page header.
| Callout | UI element | Description | When to use |
|---|---|---|---|
| 1 | Modal title | Shows the modal name: Register account. | Use to confirm that you are creating an account. |
| 2 | Email field | Stores the account email address. The system sends a one-time registration code to this address. | Use to enter the email address the account owner will use for registration. |
| 3 | Cancel button | Closes the modal without saving. | Use when you do not want to register the account. |
| 4 | Save button | Registers the account when the email value is valid. | Use to create the account and send a one-time registration code by email. |
Row actions menu

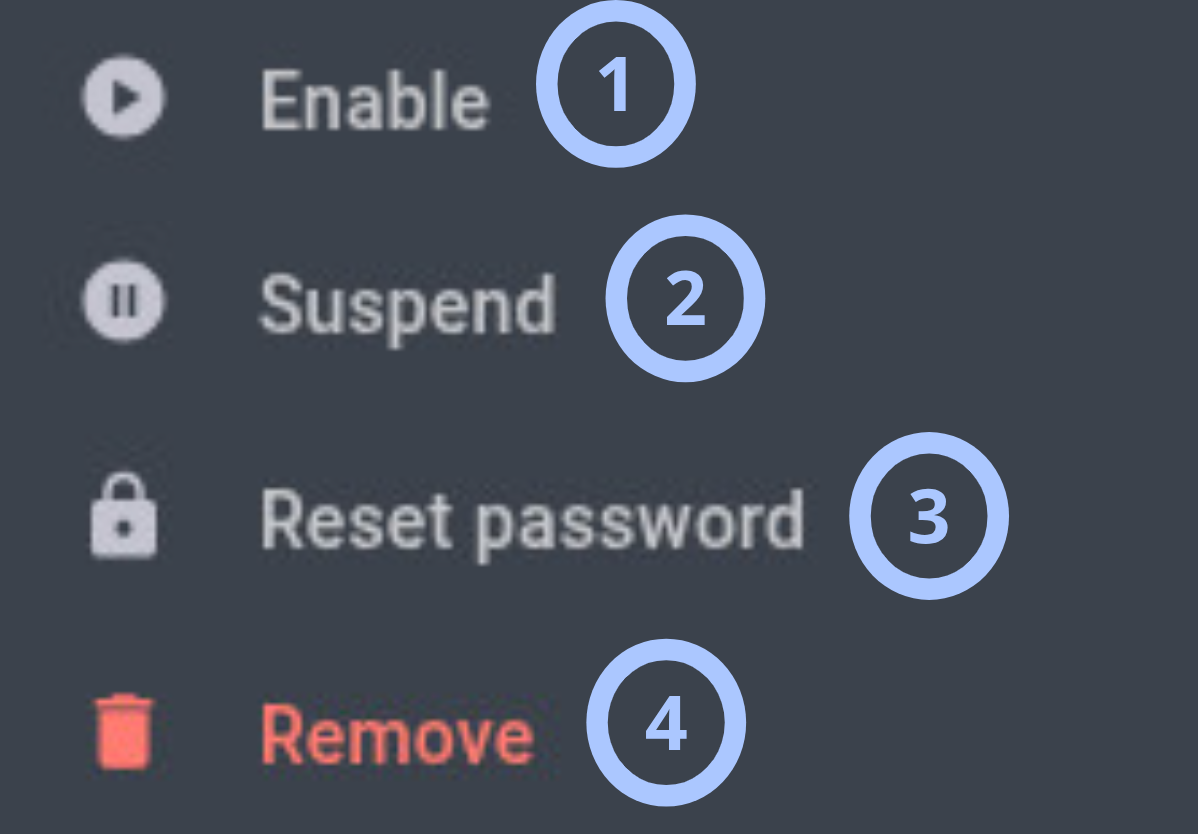
Each account row has a three vertical dots menu. The available actions depend on the account status.
| Callout | UI element | Description | When to use |
|---|---|---|---|
| 1 | Enable | Changes a Suspended account to Active. The account has access to the user application. | Use when access must be restored. |
| 2 | Suspend | Changes an Active account to Suspended. The account no longer has access to the user application. | Use when access must be disabled without removing the account. |
| 3 | Reset password | Opens the Reset password confirmation modal. | Use when the account owner needs a one-time password reset code. |
| 4 | Remove | Opens the Remove account confirmation modal. | Use when the account must be permanently removed. |
Reset password modal

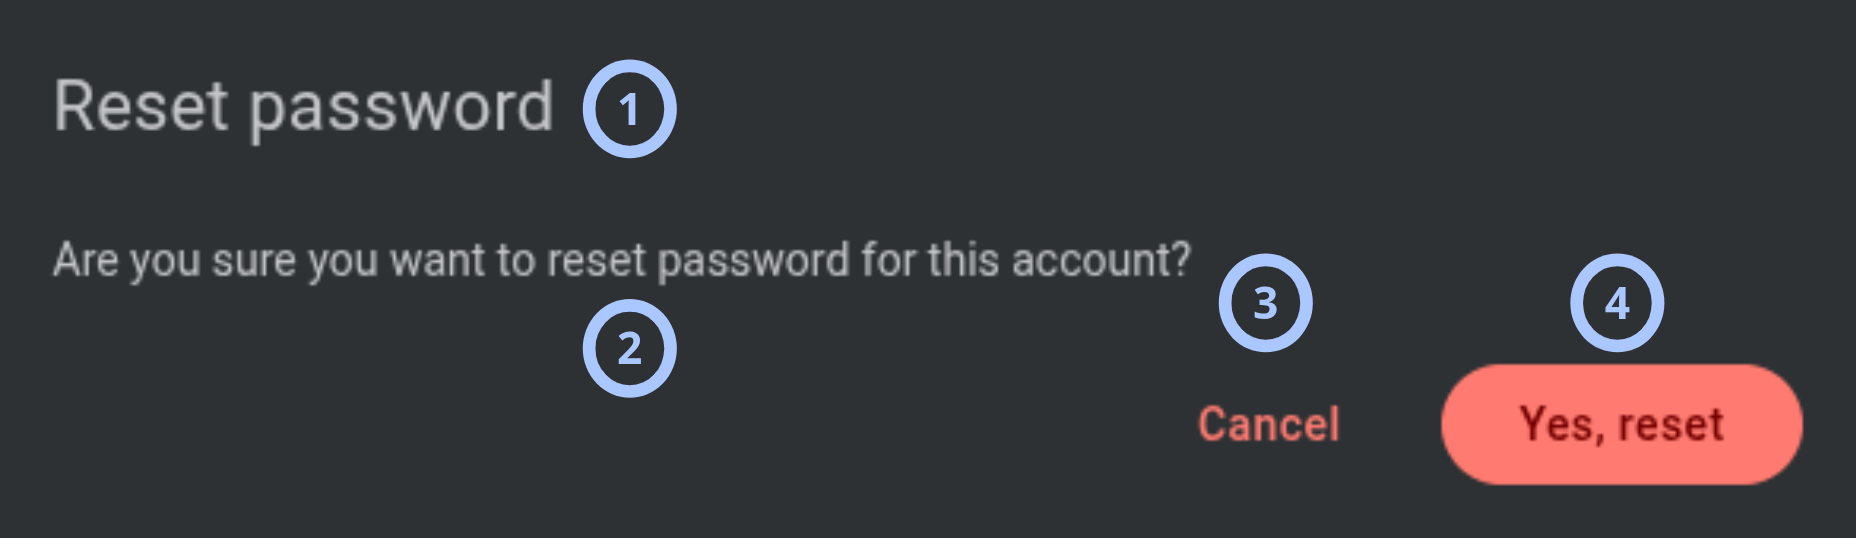
The Reset password modal opens when you select Reset password from the row actions menu or the account details actions menu.
| Callout | UI element | Description | When to use |
|---|---|---|---|
| 1 | Modal title | Shows the modal name: Reset password. | Use to confirm that you are starting a password reset. |
| 2 | Warning message | Shows the message: Are you sure you want to reset password for this account? | Review before sending a reset code. |
| 3 | Cancel button | Closes the modal without resetting the password. | Use when you do not want to continue. |
| 4 | Yes, reset button | Sends a one-time password reset code to the account email address. | Use to confirm the password reset. |
Remove account modal
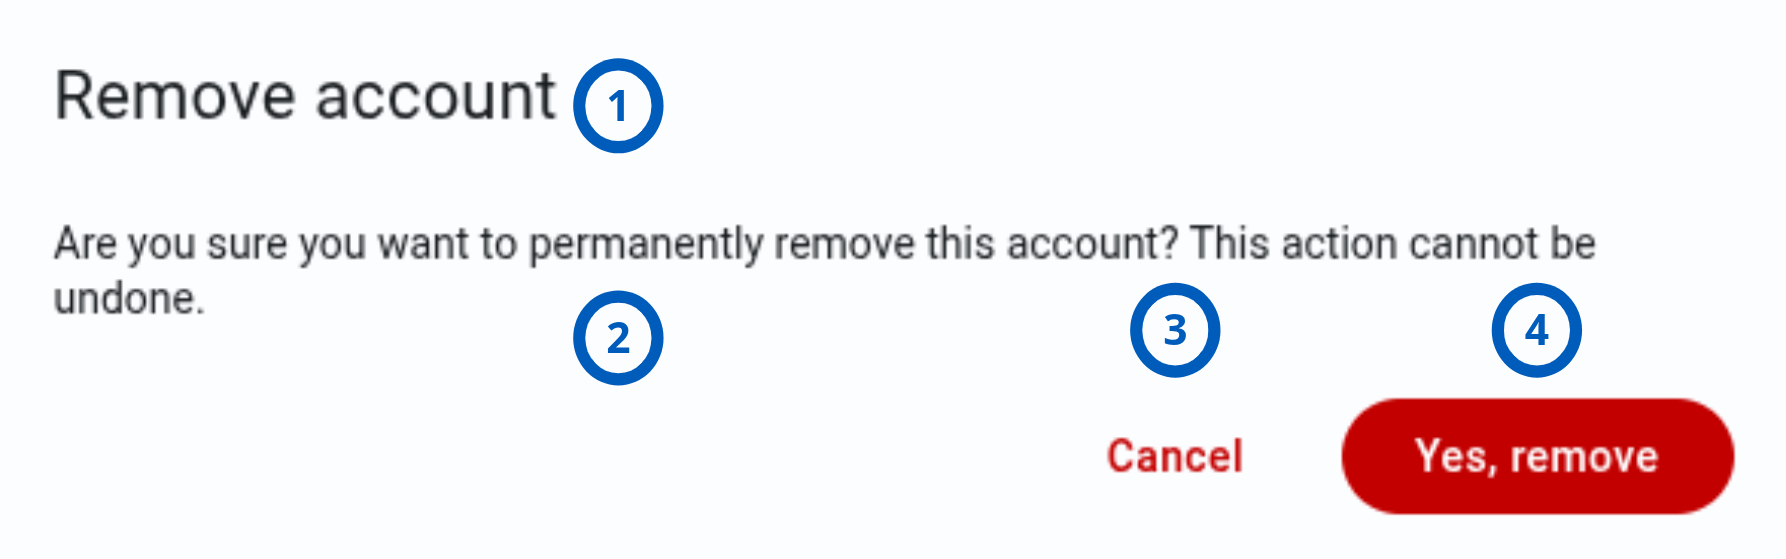
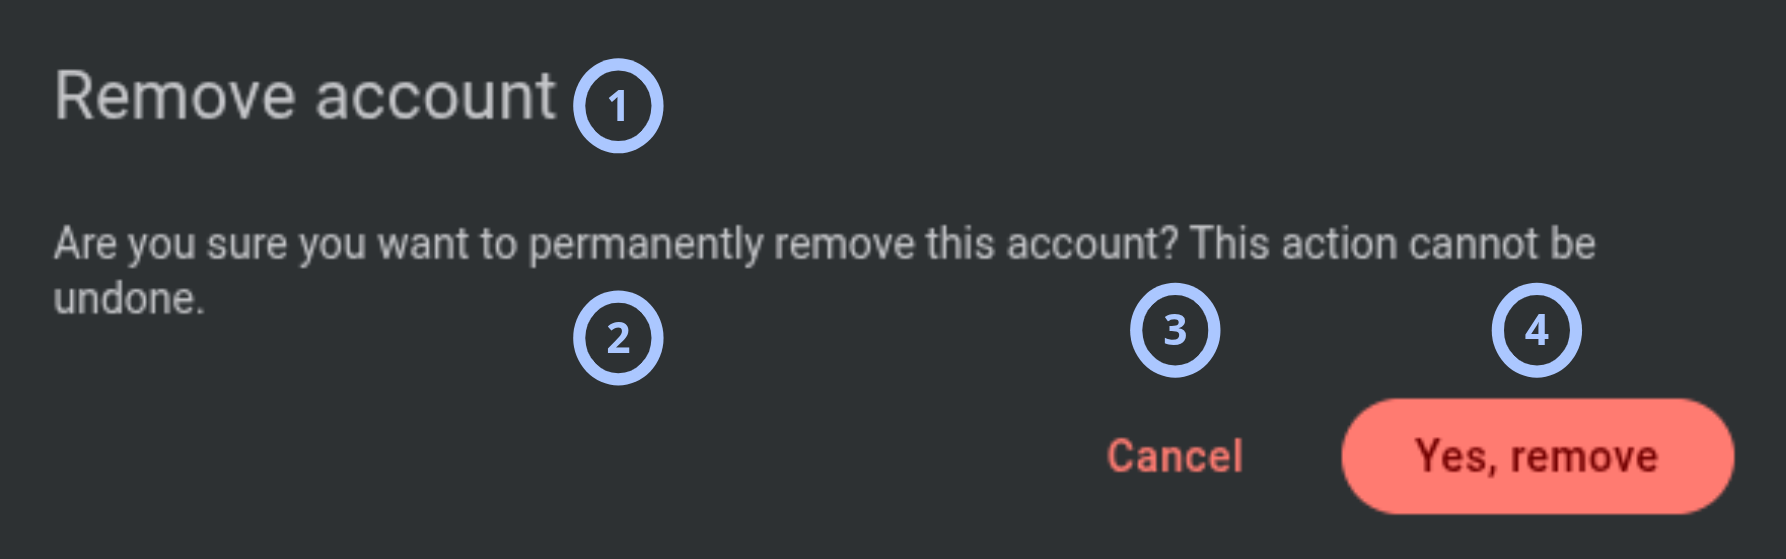
The Remove account modal opens when you select Remove from the row actions menu, account details actions menu, or available bulk actions.
| Callout | UI element | Description | When to use |
|---|---|---|---|
| 1 | Modal title | Shows the modal name: Remove account. | Use to confirm that you are removing an account. |
| 2 | Warning message | Shows the message: Are you sure you want to permanently remove this account? This action cannot be undone. | Review before removal. |
| 3 | Cancel button | Closes the modal without removing the account. | Use when you do not want to remove the account. |
| 4 | Yes, remove button | Permanently removes the account from the accounts grid. | Use only when the account is no longer needed. |
Account details modal
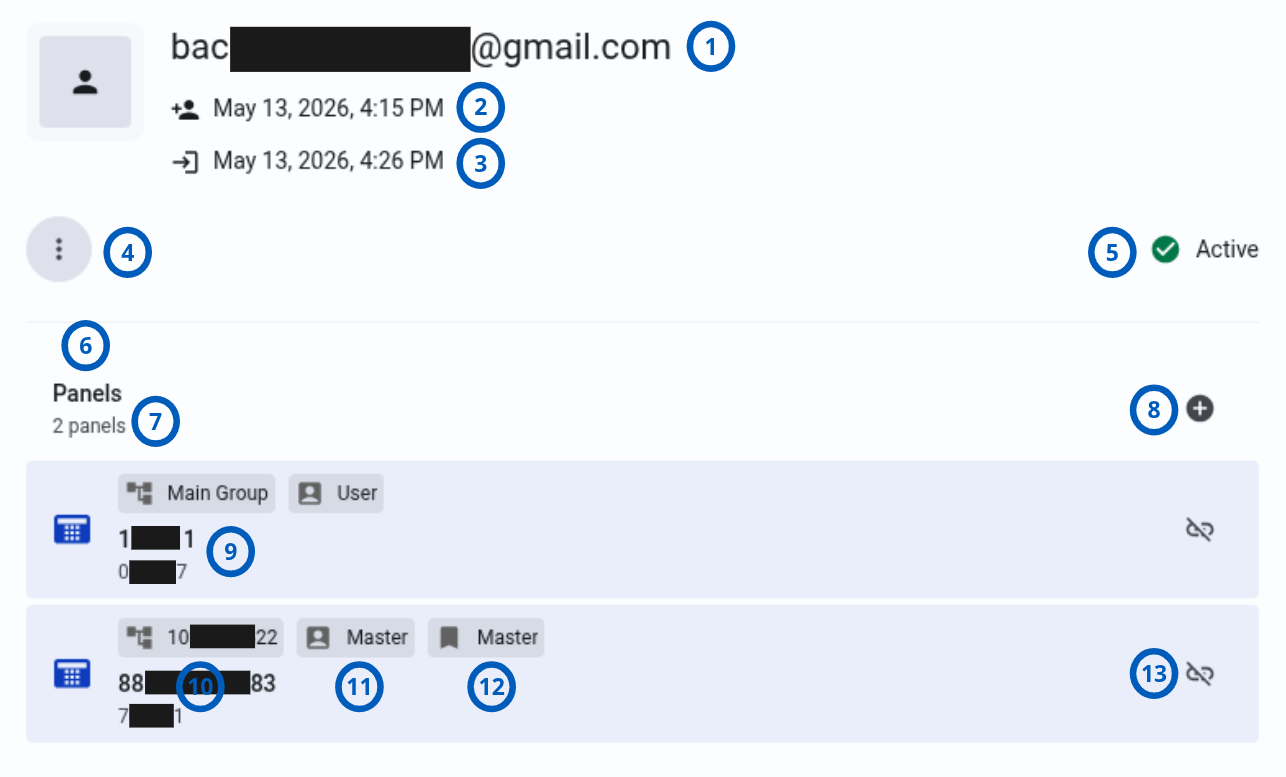

The account details modal opens from the right side of the page when you select an account in the grid.
| Callout | UI element | Description | When to use |
|---|---|---|---|
| 1 | Shows the account email address. | Use to confirm which account record is open and where codes are sent. | |
| 2 | Created | Shows when the account was created. | Use for account review or audit checks. |
| 3 | Last login | Shows the account's most recent login date and time. | Use to review account activity. |
| 4 | Three vertical dots menu | Shows the relevant actions available for the account status. | Use to suspend, enable, reset password, or remove the account. |
| 5 | Status | Shows the current access status: Active, Suspended, or Not confirmed. | Use to determine whether the account has access. |
| 6 | Panels section | Lists panels assigned to the account. | Use to review, assign, or unassign panels. |
| 7 | Panel count | Shows the number of assigned panels, for example, 1 panel. | Use to confirm assignment count after changes. |
| 8 | + assign panel icon | Opens the Assign account to panel modal. | Use to assign another panel to the account. |
| 9 | Panel item | Shows panel IMEI, account code, panel group, account panel user type, and panel user name. | Use to identify an assigned panel and its user assignment. |
| 10 | Panel group link | Opens the related group page. | Use to review or manage the panel group. |
| 11 | Panel user name | Shows the name of the panel user assigned to the account. | Use to verify the selected panel user. |
| 12 | Master/User indicator | Shows whether the account is assigned to the panel as a master user or regular user. | Use to understand the account's panel user type. |
| 13 | Unassign panel icon | Opens the Unassign panel confirmation modal. | Use to remove the panel assignment from the account. |
Assign account to panel modal
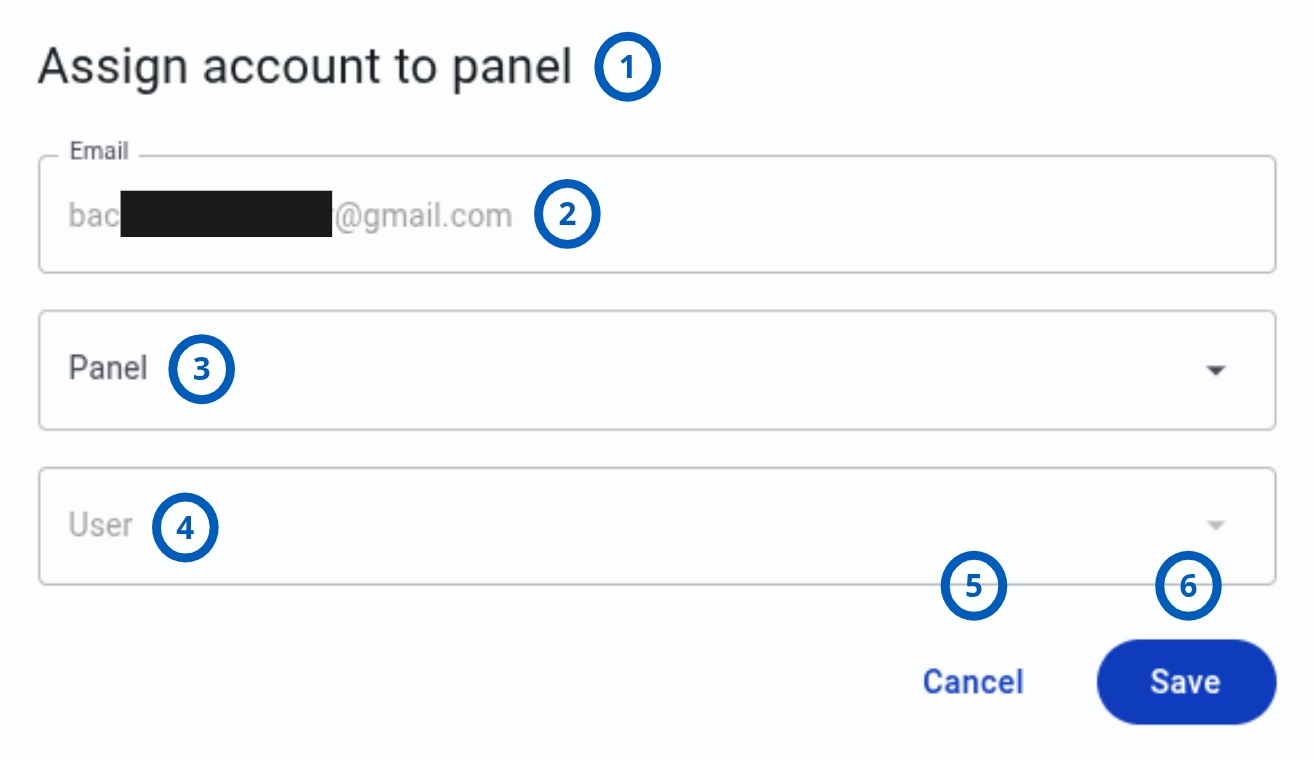
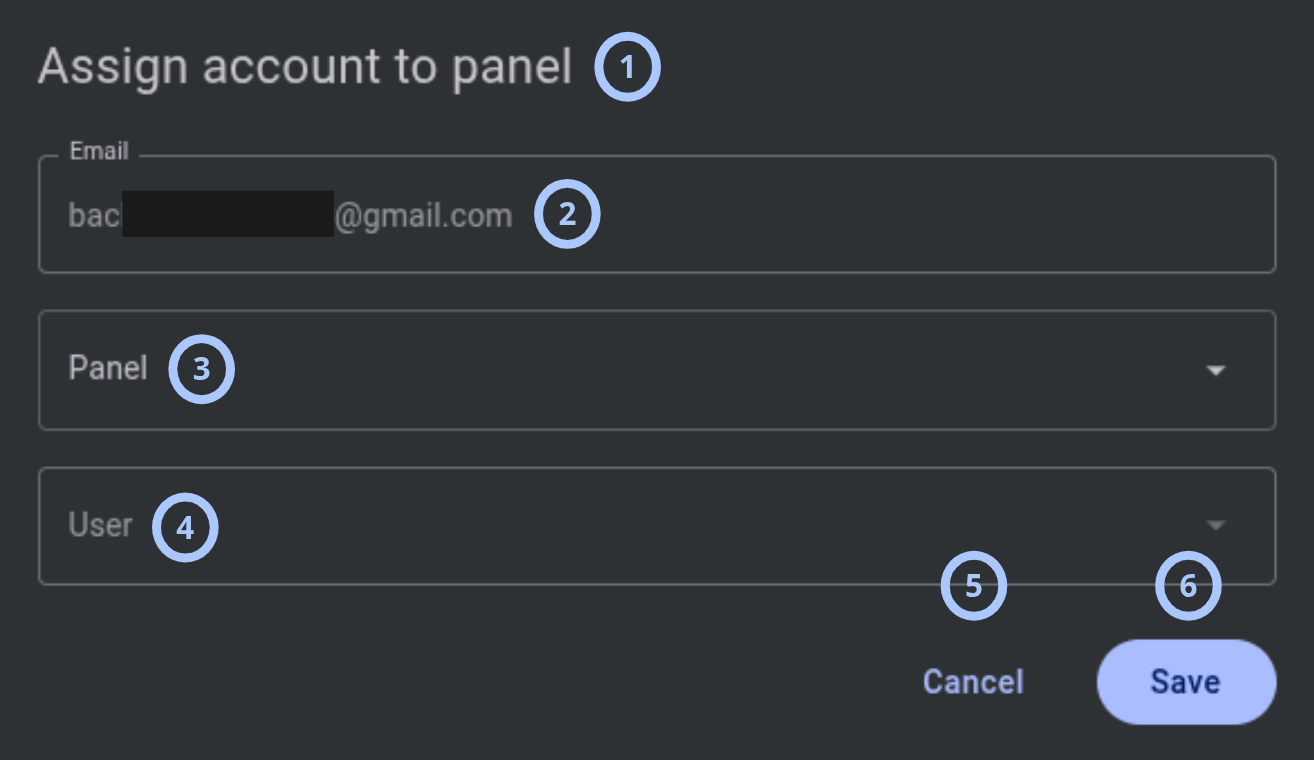
The Assign account to panel modal opens when you select the + icon in the Panels section of the account details modal.
| Callout | UI element | Description | When to use |
|---|---|---|---|
| 1 | Modal title | Shows the modal name: Assign account to panel. | Use to confirm that you are assigning a panel. |
| 2 | Email field | Shows the account email address. This field is read-only. | Use to verify the account before assigning a panel. |
| 3 | Panel dropdown | Lists panels that can be assigned. | Use to select the panel to assign to the account. |
| 4 | User dropdown | Lists users from the selected panel. | Use to select which panel user is assigned to the account. |
| 5 | Cancel button | Closes the modal without assigning a panel. | Use when you do not want to continue. |
| 6 | Save button | Assigns the selected panel and user to the account. | Use after selecting valid Panel and User values. |
Unassign panel modal

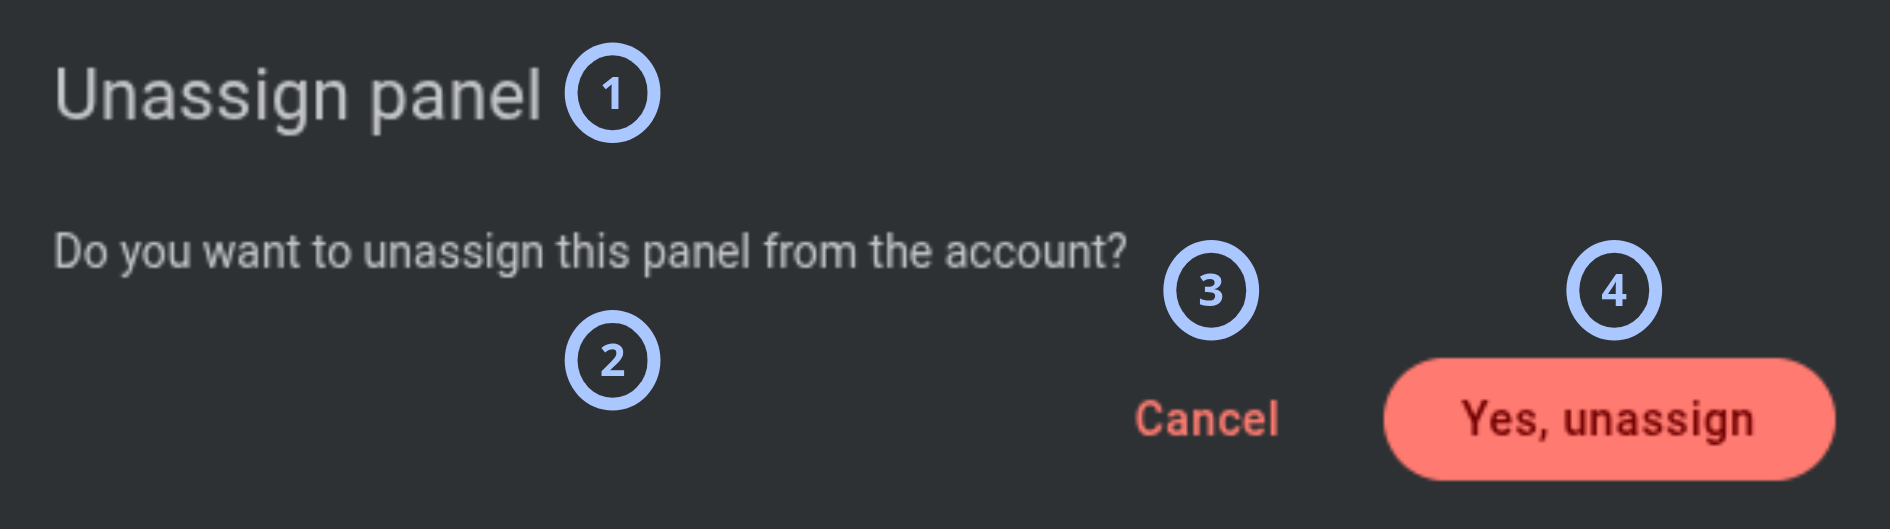
The Unassign panel modal opens when you select the unassign icon for a panel in the account details modal.
| Callout | UI element | Description | When to use |
|---|---|---|---|
| 1 | Modal title | Shows the modal name: Unassign panel. | Use to confirm that you are removing a panel assignment. |
| 2 | Warning message | Shows the message: Do you want to unassign this panel from the account? | Review before unassigning the panel. |
| 3 | Cancel button | Closes the modal without unassigning the panel. | Use when you do not want to continue. |
| 4 | Yes, unassign button | Unassigns the panel from the account. | Use to confirm the change. |
Pagination controls


Pagination controls appear at the bottom of the accounts grid.
| Callout | UI element | Description | When to use |
|---|---|---|---|
| 1 | Previous and next arrows | Move between pages in the accounts grid. | Use when the account list has more records than the current page can show. |
| 2 | Range indicator | Shows the current range and total number of accounts, for example, 1-15 of 25. | Use to understand where you are in the account list. |
| 3 | Accounts per page selector | Controls how many accounts appear on one page. Available values are 10, 15, 50, 100, and 200. | Use to change the grid page size. |
How to use this page
Register an account
Goal:
- Create an account and send a one-time registration code to the account email address.
Steps:
- Open the Accounts page.
- Select the + add icon in the page header.
- In the Register account modal, enter the account email address.
- Select Save.
Expected result:
- The account is registered.
- A one-time registration code is sent to the account email address.
- The account appears in the accounts grid with Not confirmed status.
SMTP must be configured before the system can send the one-time registration code.
Suspend an active account
Goal:
- Disable access for an account without removing it.
Steps:
- Open the Accounts page.
- Find an account with Active status.
- Select the three vertical dots menu for the account.
- Select Suspend.
Expected result:
- The account status changes to Suspended.
- The account no longer has access to the user application.
Enable a suspended account
Goal:
- Restore access for a suspended account.
Steps:
- Open the Accounts page.
- Find an account with Suspended status.
- Select the three vertical dots menu for the account.
- Select Enable.
Expected result:
- The account status changes to Active.
- The account has access to the user application.
Use bulk actions for selected accounts
Goal:
- Apply access or removal actions to one or more selected accounts.
Steps:
- Open the Accounts page.
- Select the checkbox for one or more accounts.
- Review the buttons that appear in the page header.
- Select one of the available actions:
- Suspend
- Enable
- Remove
- Complete any confirmation modal, if shown.
Expected result:
- The selected action is applied to the selected account or accounts.
- The grid updates to show the latest statuses or removal result.
If selected accounts have different statuses, actions for the selected statuses can appear together. Review the selected rows before you continue.
Reset an account password
Goal:
- Send a one-time password reset code to the account email address.
Steps:
- Open the Accounts page.
- Find the account in the grid.
- Select the three vertical dots menu for the account.
- Select Reset password.
- In the Reset password modal, review the warning message.
- Select Yes, reset.
Expected result:
- A one-time password reset code is sent to the account email address.
- The account owner can use the code to reset the password.
SMTP must be configured before the system can send the one-time password reset code.
Remove an account
Goal:
- Permanently remove an account from the accounts grid.
Steps:
- Open the Accounts page.
- Find the account in the grid.
- Select the three vertical dots menu for the account.
- Select Remove.
- In the Remove account modal, review the warning message.
- Select Yes, remove.
Expected result:
- The account is removed.
- The account no longer appears in the accounts grid.
This action cannot be undone.
Review account details
Goal:
- View account details and assigned panels.
Steps:
- Open the Accounts page.
- Select an account row in the grid.
- Review the account email, created date, last login date, and status.
- Review the Panels section.
- Select a panel group link if you need to open the related group page.
Expected result:
- The account details modal opens from the right side of the page.
- The modal shows account details and assigned panel information.
Assign a panel to an account
Goal:
- Assign an available panel and panel user to an account.
Steps:
- Open the Accounts page.
- Select an account row in the grid.
- In the account details modal, go to the Panels section.
- Select the + assign panel icon.
- In the Assign account to panel modal, review the read-only Email field.
- Select a panel from the Panel dropdown.
- Select a user from the User dropdown.
- Select Save.
Expected result:
- The selected panel and user are assigned to the account.
- The panel appears in the Panels section of the account details modal.
- The panel count updates.
Unassign a panel from an account
Goal:
- Remove a panel assignment from an account.
Steps:
- Open the Accounts page.
- Select an account row in the grid.
- In the account details modal, find the panel in the Panels section.
- Select the unassign panel icon.
- In the Unassign panel modal, review the warning message.
- Select Yes, unassign.
Expected result:
- The panel is unassigned from the account.
- The panel no longer appears in the account details modal.
- The panel count updates.
Change the number of accounts shown per page
Goal:
- Change how many accounts appear in the grid.
Steps:
- Go to the bottom-right area of the accounts grid.
- Open the accounts per page selector.
- Select one of the available values:
- 10
- 15
- 50
- 100
- 200
Expected result:
- The grid updates to show the selected number of accounts per page.
- The range indicator updates.
Move between account pages
Goal:
- Navigate through multiple pages of accounts.
Steps:
- Go to the bottom-left area of the accounts grid.
- Select the next arrow to move forward.
- Select the previous arrow to move back.
- Review the range indicator, for example, 1-15 of 25.
Expected result:
- The grid shows the selected page of accounts.
- The range indicator updates.
Field and option reference
Register account fields
| Name | Description | Accepted values | Behavior | Restrictions | Default value |
|---|---|---|---|---|---|
| Account email address. | Valid email address. | Used for one-time registration and password reset codes. | Must be valid and reachable. | Empty. |
Accounts grid columns
| Name | Description | Accepted values | Behavior | Restrictions | Default value |
|---|---|---|---|---|---|
| Checkbox | Selects accounts for bulk actions. | Selected or not selected. | Shows bulk action buttons in the page header. | Available actions depend on selected account statuses. | Not selected. |
| Account email address. | Value saved in the account record. | Used to identify the account and send one-time codes. | Email must be valid for registration and password reset delivery. | Not applicable. | |
| Panels | Number of panels assigned to the account. | Number. | Updates when panels are assigned or unassigned. | Panel assignment is managed from the account details modal. | Not specified. |
| Last login | Date and time of the account's last login. | Date and time format, for example: 12:08:58 PM Tue 5 May, 2026 | Used to review account activity. | Shown only when login data exists. | Not specified. |
| Created | Date and time when the account was created. | Date and time format, for example: 12:08:58 PM Tue 5 May, 2026 | Used for account review and audit checks. | Not specified. | Set when the account is registered. |
| Status | Current account access state. | Active, Suspended, or Not confirmed. | Controls access to the user application and available actions. | Status changes are made through Suspend, Enable, or first login for not confirmed accounts. | Not confirmed after registration. |
Account status values
| Name | Description | Accepted values | Behavior | Restrictions | Default value |
|---|---|---|---|---|---|
| Active | The account was registered and confirmed. | Not applicable. | The account has access to the user application. The row actions menu shows Suspend, Reset password, and Remove. | Can be changed to Suspended by using the Suspend action. | Not the default status for a newly registered account. |
| Suspended | The account was registered and suspended. | Not applicable. | The account has no access to the user application. The row actions menu shows Enable and Remove. | Can be changed to Active by using the Enable action. | Not the default status for a newly registered account. |
| Not confirmed | The account was registered but is not active yet. | Not applicable. | The account can become active after the first login to the user application. The row actions menu shows Reset password and Remove. | Access is not active until the status becomes Active. | Default status after registration. |
Panel assignment fields
| Name | Description | Accepted values | Behavior | Restrictions | Default value |
|---|---|---|---|---|---|
| Account email address in the assign panel modal. | Current account email address. | Read-only field used to verify the selected account. | Cannot be changed in the assign panel modal. | Current account email address. | |
| Panel | Panel to assign to the account. | Panel from the dropdown list. | The selected panel is assigned after you select Save. | A panel must be selected before saving. | Empty. |
| User | Panel user to assign to the account. | User from the selected panel. | The selected user determines which panel user is linked to the account. | A user must be selected before saving. Available users depend on the selected panel. | Empty. |
Assigned panel item values
| Name | Description | Accepted values | Behavior | Restrictions | Default value |
|---|---|---|---|---|---|
| IMEI | Panel IMEI. | Saved panel IMEI. | Identifies the assigned panel. | Read-only in the account details modal. | Not applicable. |
| Account code | Panel account code. | Saved panel account code. | Helps identify the panel account. | Read-only in the account details modal. | Not applicable. |
| Panel group | Group assigned to the panel. | Existing group name, for example, Main Group. | Acts as a link to the group page. | Navigation depends on group access. | Not applicable. |
| Master/User | Panel user type assigned to the account. | Master or User. | Shows whether the account is assigned as a master user or regular user on the panel. | Read-only in the account details modal. | Depends on selected panel user. |
| Panel user name | Name of the panel user assigned to the account. | Saved panel user name. | Shows the user assignment on the panel. | Read-only in the account details modal. | Depends on selected panel user. |
Pagination options
| Name | Description | Accepted values | Behavior | Restrictions | Default value |
|---|---|---|---|---|---|
| Accounts per page | Controls how many accounts appear on one page. | 10, 15, 50, 100, 200. | Updates the grid page size. | Large page sizes may require more scrolling. | 15. |
| Range indicator | Shows the current visible range and total count. | System-generated value, for example, 1-15 of 25. | Updates when you change page or page size. | Read-only. | Depends on total account count. |
Tips
- Review the account email address before saving. Registration and password reset codes are sent to that address.
- Use the account details modal to confirm panel assignments before suspending or removing an account.
- Use Suspend when you need to block access but keep the account record.
- Use Remove only when the account is no longer needed.
- Increase the page size when reviewing many accounts, then use pagination to move through the list.
Troubleshooting
Account does not receive a registration code
Possible causes
- SMTP is not configured.
- SMTP configuration is incorrect.
- The account email address is invalid.
- The email was blocked, delayed, or moved to spam.
What to do
- Confirm that SMTP is configured.
- Verify the account email address.
- Ask the account owner to check spam or junk folders.
- Register the account again if needed.
Account does not receive a password reset code
Possible causes
- SMTP is not configured.
- SMTP service is unavailable.
- The account email address is incorrect.
- The email was filtered by the recipient mailbox.
What to do
- Confirm that SMTP is configured and working.
- Check the account email address in the account details modal.
- Select Reset password again after SMTP is confirmed.
- Ask the account owner to check spam or junk folders.
Save is not successful when registering an account
Possible causes
- The Email field is empty.
- The email address format is invalid.
- SMTP is unavailable when the system tries to send the registration code.
What to do
- Check that Email is completed.
- Verify the email address format.
- Confirm that SMTP is configured if the registration code must be sent immediately.
- Try saving again.
- If the issue continues, contact an administrator or support team.
Account cannot access the user application
Possible causes
- Account status is Suspended.
- Account status is Not confirmed.
- Registration was not completed.
- The account owner is using incorrect credentials.
What to do
- Open the Accounts page.
- Find the account.
- Review the Status column.
- If access should be allowed and the account is Suspended, select Enable.
- If the account is Not confirmed, ask the account owner to complete the first login to the user application.
- If the account owner cannot sign in, use Reset password to send a one-time reset code.
Panel cannot be assigned to an account
Possible causes
- No panel was selected.
- No user was selected.
- The panel is not available in the dropdown list.
- The selected panel has no available users.
- The current user does not have permission to assign panels.
- The panel is restricted by group visibility or another configuration.
What to do
- Open the Assign account to panel modal.
- Confirm that a panel is selected.
- Confirm that a user is selected.
- Check whether the expected panel exists.
- Confirm that the selected panel has available users.
- Confirm that you have permission to assign panels.
- Review panel and group configuration if the panel is missing.
Panel was unassigned by mistake
Possible causes
- The unassign action was confirmed.
- The wrong panel was selected.
What to do
- Open the account details modal.
- Select the + icon in the Panels section.
- Select the panel from the Panel dropdown.
- Select the user from the User dropdown.
- Select Save.
Account was removed by mistake
Possible causes
- The remove action was confirmed.
- The wrong account was selected before removal.
What to do
- Confirm whether the account still appears in the accounts grid.
- If the account was removed, register the account again if it is still required.
- Reassign panels to the account after registration, if needed.
Removed accounts cannot be restored.