< Previous | Contents | Next >
Add, suspend, remove, enable, and edit server users on the Users page.
Each row in the list represents an individual user and displays the following information:
• User name and email address
• User phone number
• Latest log on time. If the Last Login column does not contain any date or time information, the user has never logged in to the server.
• Role of the user. For more information about roles, see Roles page.
• Title of the administrator who created the user account
This information is contained in the column titles: NAME, ROLE, EMAIL, PHONE, LAST LOGIN, and CREATED BY.
Filter your search of the Users page by selecting one or more filter values from the Search list. From the Search list, select a filter value from one or more of the following keys: NAME, PHONE, ROLE NAME, ROLE CREATOR NAME, and LAST LOGIN. For more information, see Using the search filter.
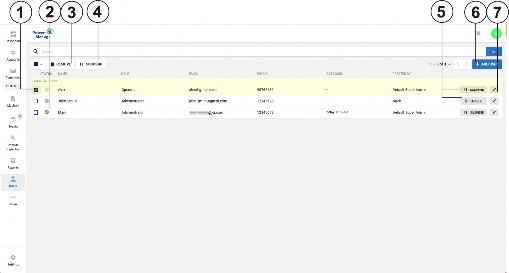
Figure 50. Navigating the Users page
Callout | Name | Description | |
1 | Check box | Select the check box of one or more events to enable REMOVE, SUSPEND, and ENABLE. | |
2 | User status |
| Offline user; enabled. |
| The user is suspended. | ||
| The user is logged in to the server. | ||
3 | REMOVE | Click to remove a user from the server. | |
4 | SUSPEND | Click to suspend a user. A suspended user cannot log on to the server. | |
5 | ENABLE or SUSPEND | Click to enable or suspend server users. | |
6 | ADD USER | Click to add a new user to the server. | |
7 | Pencil icon | Click to edit user information. | |
Related topics Adding a new user
Default super admin Editing user information