< Previous | Contents | Next >
The installers tab displays all the installers that have permissions to connect to the panels using the mobile installer app. When an installer connects to the installer app, they receive a list of their assigned panels. If configured to do so, the master customer must permit the installer's connection.
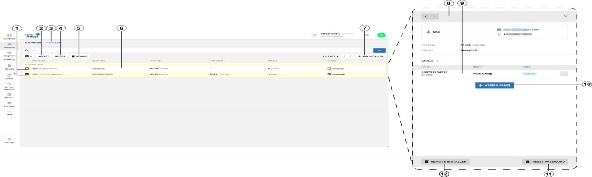
Figure 10. Installers tab
Callout | Name | Description |
1 | Check box | Select the check box of one or more accounts to accept, reject or completely remove the user. |
2 | ACCEPT | Appears after selecting the check box. Can be used to change the status of the installer from pending to accepted. |
3 | INSTALLERS tab | Lists all the mobile installers. |
4 | REJECT | Rejects the installer so they cannot connect to any panel. |
5 | REMOVE | Press to remove the installer. |
6 | INSTALLER field | Press the installer row to open examination pane for installer details and management. Pressing the right icon can switch between pending, accepted, and rejected statuses. |
7 | +ADD INSTALLER | Create new installer. The field requires email address, name and phone number. A newly created installer is added in pending status. |
8 | Installer examination pane | By selecting installer row an examination pane opens with detailed installer data. |
9 | Panel row | All panels that can be managed by the installer. Customer permission can be mandatory before the installer accesses the panel (requirement needs to be set in MMI). The panels can be removed by pressing on the - icon. |
10 | +ASSIGN PANEL | Click to add panel to this installer. |
11 | RESET PASSWORD | Reset password of this installer. Note that this password is for the installer to access the mobile app, not the password to connect to the panel. |
12 | REMOVE INSTALLER | Click to remove the installer. |