< Previous | Contents | Next >
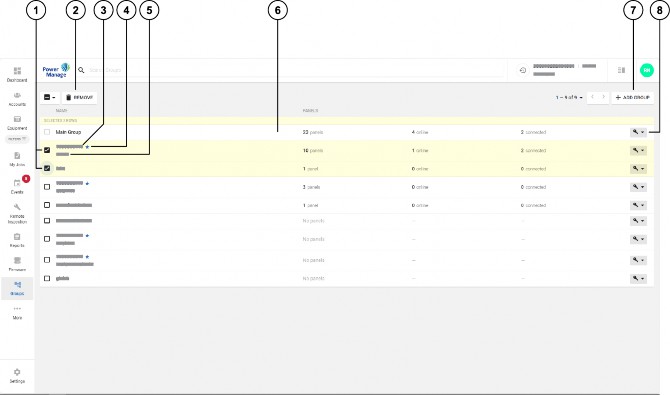
Manage panel groups on the Groups page. A group is a collection of panels that share the same configuration settings.
Figure 43. Navigating the Groups page

Callout | Name | Description |
1 | Check box | Select the check box of one or more groups to enable REMOVE. |
2 | REMOVE | Click to remove one or more selected panels from the server. Select a check box to enable REMOVE. Note: You cannot remove Main Group. |
Callout | Name | Description |
3 | GROUP NAME | When the dealer portal approves a new dealer request, PowerManage adds a dealer group to the Groups page. The dealer group name is the dealer ID assigned by the dealer portal. Note: You cannot edit the IQ panel group name. |
4 | Blue star | The blue star indicates that it is a dealer group. |
5 | DESCRIPTION | The group description. |
6 | Group hub | Click the row of the group to open it in the group hub. In the group hub, you can view general group and central station information in the GENERAL and CS COMMUNICATING tabs. Note: The Main Group contains all panels. You can move the panels to other groups. You cannot move the Main Group. For more information on the group |
7 | ADD GROUP | Click to add a new panel to the server. For more information about adding a group to the server, see Adding groups to the Groups page and Adding a group to the Groups page. |
8 | Connected roles | Lists all the roles connected to this group. For more information, see Navigating the Roles page |
Related topics Adding a new group Group parameters
Configuring the central station communication settings for a group Group hub
CS communicating tab in the group hub Group central station communication settings Dealer registration