General tab
Navigating the General tab
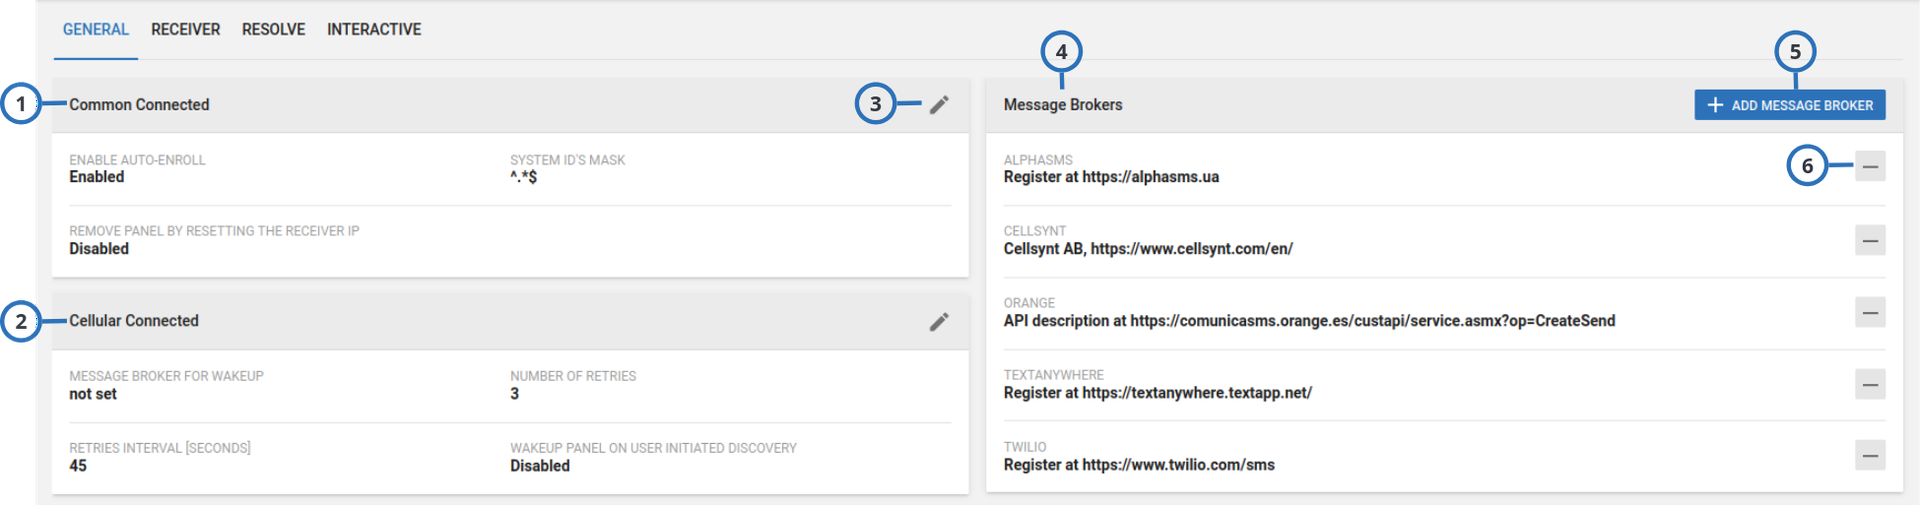
Figure. Navigating the General tab
| Callout | Name | Description |
|---|---|---|
| 1 | Common Connected | - To enable the auto-enrollment of panels to the server, select the Enable Auto-Enroll check box. To disable the auto-enrollment of panels to the server, clear the Enable Auto-Enroll check box.
|
| 2 | Cellular Connected | In the EDIT CELLULAR CONNECTED SETTINGS dialog box, perform one or more of the following actions:
|
| 3 | Pencil icon | Click to edit settings of the following section. |
| 4 | Message Brokers | Add a message broker to the system to enable the PowerManage server to send SMS messages to the following:
|
| 5 | ADD MESSAGE BROKER | Click ADD MESSAGE BROKER to create a message broker. For more information, see Adding a message broker to the system. |
| 6 | Minus icon | Click to remove a message broker from the server. |
Adding a message broker to the system
- In the navigation pane click Settings.
- On the General tab, click ADD MESSAGE BROKER.
- Enter the required information in the ADD MESSAGE BROKER SETTINGS dialog box.
- Click SAVE.
Add message broker settings
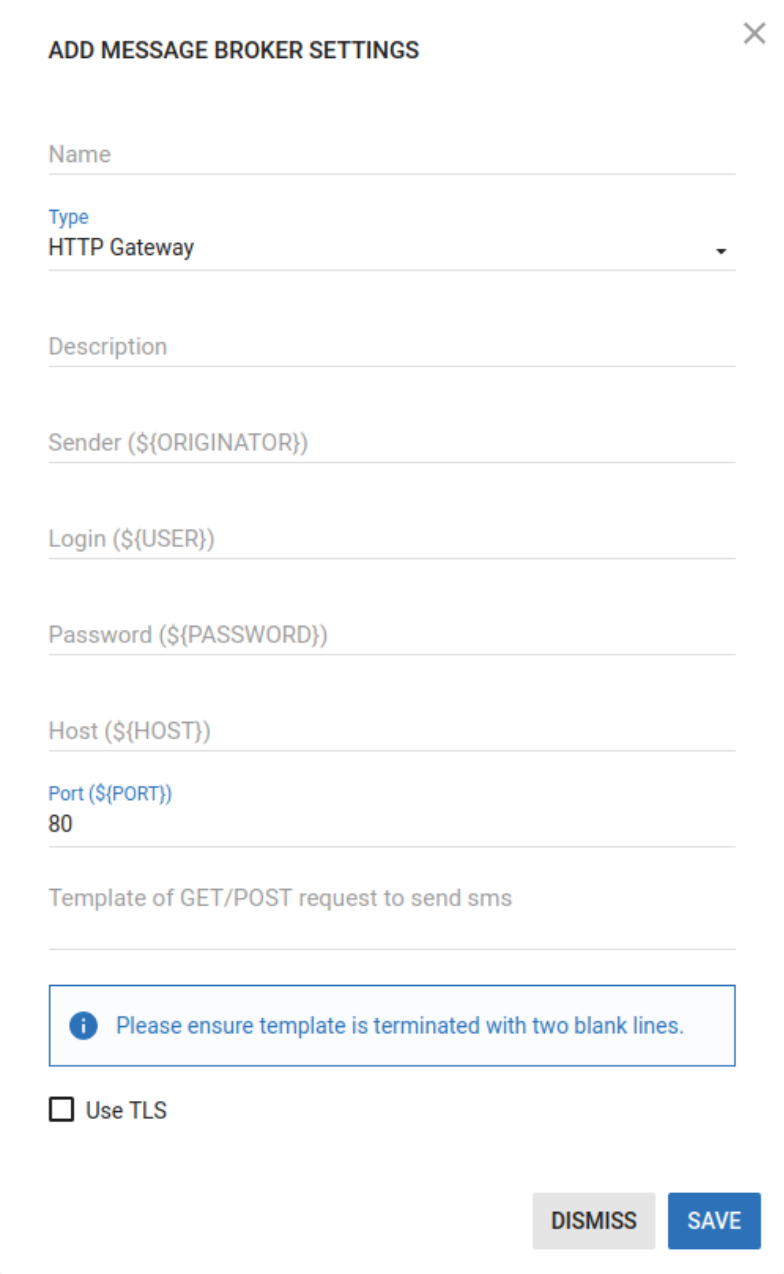
Figure. ADD MESSAGE BROKER SETTINGS dialog box
| Callout | Name | Description |
|---|---|---|
| 1 | Name | The name that identifies the message broker on the MESSAGE BROKER tab. |
| 2 | Type | If the modem is connected to the server, from the Type drop-down, select Serial Port. To use a third party message broker, connect via HTTPS Ethernet (TCP/IP). From the Type dropdown list, select HTTP Gateway. |
| 3 | Description | Describes the message broker on the MESSAGE BROKER tab. |
| 4 | Sender (${ORIGINATOR}) | Your message broker's phone number. To the user, this number displays as the SMS sender. |
| 5 | Login (${USER}) | The user logon that the message broker provides. |
| 6 | Password (${PASSWORD}) | The password that the message broker provides. |
| 7 | Host (${HOST}) | The message broker's URL. |
| 8 | Port (${PORT}) | The port to use to connect to the message broker. |
| 9 | Template of GET/POST request to send sms | The HTTP message that sends to the message broker. For more information about Template of GET/POST request to send sms, see Creating a GET or POST request template. |
| 10 | Use TLS | To enable TLS encryption, select the Use TLS check box. |
Creating a GET or POST request template
The contents of the Template of GET/POST request to send sms field are sent as a HTTP/HTTPS message to the message broker site to send an SMS.
- The type, format, and parameters of a GET or POST message vary and depend on your message broker and your country. The following guidelines are general and you need to contact your message broker to successfully complete the task. To see a GET/POST request example, see GET or POST request example.
- The request fails if you do not press the ENTER key on the keyboard after
HTTP/1.1in the request method statement and at the end of each request header. For more information about the request method statement, see Step 1. For more information about request headers, see Step 2. - The request fails if the request contains any unnecessary blanks.
-
On the first line, enter the request method statement. The request method statement generally begins with the request method, for example, GET or POST, and ends with
HTTP/1.1. Enter the URI and the required key-value pairs between the request method andHTTP/1.1.noteIt is necessary to substitute the values with local environment variables as required. For more information, see Substituting values in your GET or POST request template.
-
On a new line, enter a request header, for example,
Host:. Enter any additional request headers and ensure each request header is on a new line. Other examples of request headers include:User-Agent:andConnection:.
Use local environment variables as required. For more information, see Substituting values in your GET or POST request template.
Please ensure template is terminated with two blank lines.
Substituting values in your GET or POST request template
To convert an API query string value, replace it with its relevant local environment variable.
The type, format, and parameters of a GET or POST message vary and depend on your message broker. These guidelines are general and you need to contact your message broker to successfully complete the task. To see a GET/POST request example, see GET or POST request example.
In GET or POST request example, the local environment variables are enclosed in curly braces and preceded by a
dollar sign: ${}.
In the example in GET or POST request example, the following conversions take place:
username=demotconverts tousername=$\{USER}&password=democonverts to&password=$\{PASSWORD}&msg=1234converts to&msg=$\{TEXT}
Use the environment variables in the ADD MESSAGE BROKER SETTINGS dialog box. For more information, see Add message broker settings.
- ${ORIGINATOR}: Your message broker's phone number. To the user, this number displays as the SMS sender.
- ${USER}: The log on that the message broker provides.
- ${PASSWORD}: The password that the message broker provides.
- ${HOST}: The message broker's URL.
- ${PORT}: The port you use to connect to the message broker.
As well as the environment variables in the ADD MESSAGE BROKER SETTINGS dialog box, PowerManage automatically creates the following variables that you can also use:
- ${CONTENT_LENGTH}: Information about the size of POST request body
- ${ID}: An auto-increment variable
- ${UUID}: An auto-generated variable that is used as a message ID
- ${DESTINATION}: SMS recipient number
- ${TEXT}: Message text
GET or POST request example
Example information provided
In the following general example, the message broker site is http://www.vianett.com and the message broker API
URL is https://www.vianett.com/en/developers/api-documentation/http-get-post-api.
The API description contains the following example
variables: https://smsc.vianett.no/v3/send?
username=demot
&password=demo
&msgid=1234
&tel=4711111111
&msg=Hello+World
&pricegroup=300
&campaignid=12345
GET/POST template request
GET /v3/send?username=$\{USER}&password=$\{PASSWORD}&msgid=$\{UUID}&tel=$\{DESTINATION} &msg=${TEXT}&campaigned=378404HTTP/1.1
Host:${HOST}
Port:${PORT}
User-Agent:firefox
Connection:close