< Previous | Contents | Next >
Navigating the Remote Inspection page
A remote inspection is a series of nine tests that check a panel remotely for any faults that affect the system and its functionality. If at least one of the nine tests fail, the inspection fails. For more information about each inspection test, see Remote inspection tests.
You can perform tests once or periodically. Finished remote inspections appear at the top of the page and uninitiated tests appear at the bottom of the page.
You can filter the search values on the Remote Inspection page. For more information, see Using the search filter.
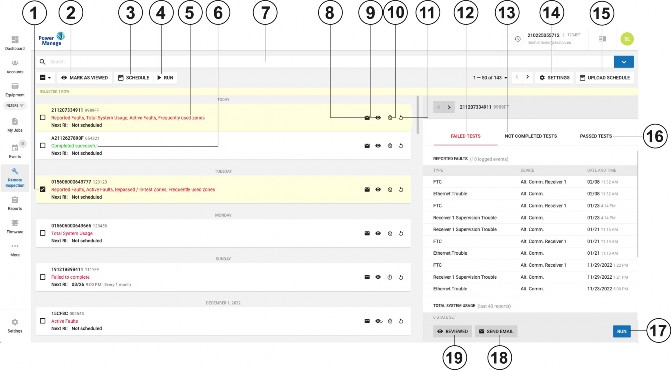
Figure 36. Navigating the Remote Inspection page
Callout | Name | Description |
1 | Check box | Select one or more check boxes to perform an action. |
Select a check box to enable MARK AS VIEWED, SCHEDULE, and RUN. | ||
2 | MARK AS VIEWED | Click to mark one or more remote inspections as viewed. MARK AS VIEWED appears when you select a check box. |
3 | SCHEDULE | Click to schedule one or more reports. SCHEDULE appears when you select a check box. |
4 | RUN | Click to run one or more reports immediately. RUN appears when you select a check box. |
5 | Failed test | Red text indicates a complete, failed test. |
6 | Successful test | Green text indicates a complete test without any failures. |
7 | Search field | Use the search field to search for specific results. |
8 | Email icon | Email the results of the completed remote inspection to a user. This has the same function as SEND EMAIL. Note: For PowerMaster panels, the private panel report defines the emial adress. For Neo and PSP panels, the INFO tab defines the email address. For more |
9 | Mark as viewed icon | Click to mark the completed remote inspection as viewed. This has the same function as MARK AS VIEWED. |
To see who viewed the remote inspection, hover over the icon. | ||
10 | Schedule icon | Click the schedule icon to schedule a remote inspection or to stop a scheduled remote inspection. This has the same function as SCHEDULE. |
11 | Run icon | Click to run a report immediately. This has the same function as RUN. |
12 | FAILED TESTS | You can view a detailed report in the examination pane. All failed tests display in red text. |
13 | NOT COMPLETED TESTS | You can view a detailed report in the examination pane. All incomplete tests dis- play in gray. |
14 | SETTINGS | Click to configure the general remote inspection settings. For more information, see Remote inspection values. |
15 | UPLOAD SCHEDULE | Click to create a new remote inspection schedule. For more information, see |
16 | PASSED TESTS | You can view a detailed report in the examination pane. All successful tests are green. |
17 | RUN | Click to run a report again immediately. This has the same function as the Run icon. |
18 | SEND EMAIL | Click to email the results of a completed remote inspection to a user that is defined in the private report in the panel. This has the same function as the email icon. |
19 | REVIEWED | Click to mark a completed remote inspection as reviewed. This has the same function as MARK AS VIEWED. Note: If the report is already reviewed, this text is gray. |
Related topics
Remote inspection tests Remote inspection values
Creating a remote inspection for a batch of panels Canceling a remote inspection
Running a remote inspection manually
Scheduling one or more remote inspections for a batch of panels