Groups page
Navigating the Groups page
Manage panel groups on the Groups page. A group is a collection of panels that share the same configuration settings.
Any panel that connects by auto enroll automatically joins Main Group.
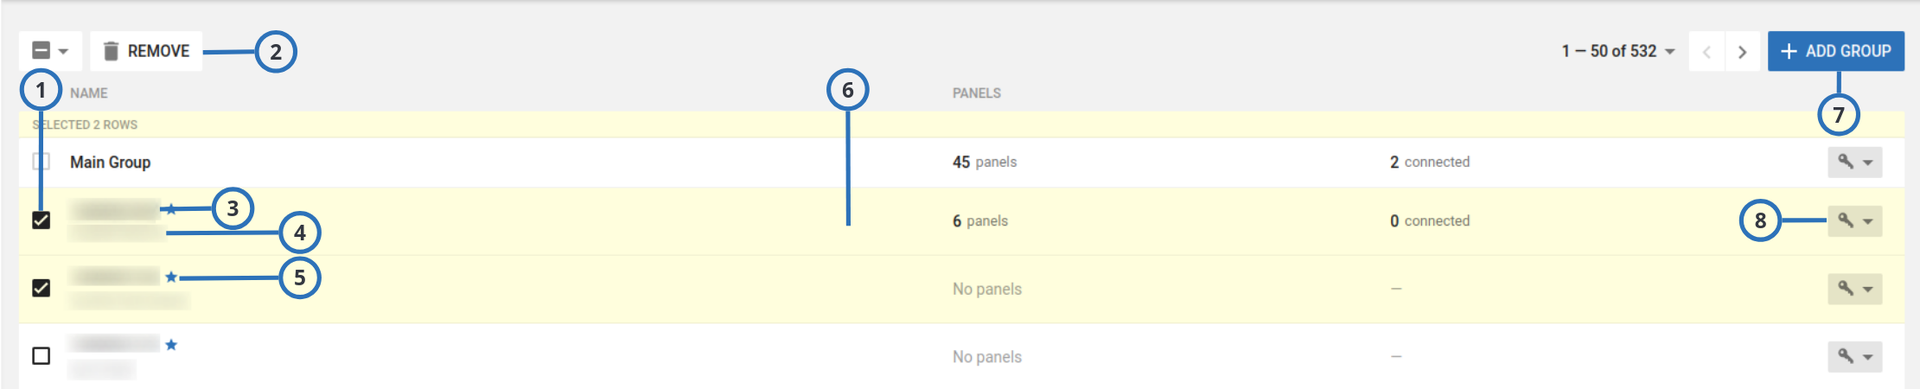
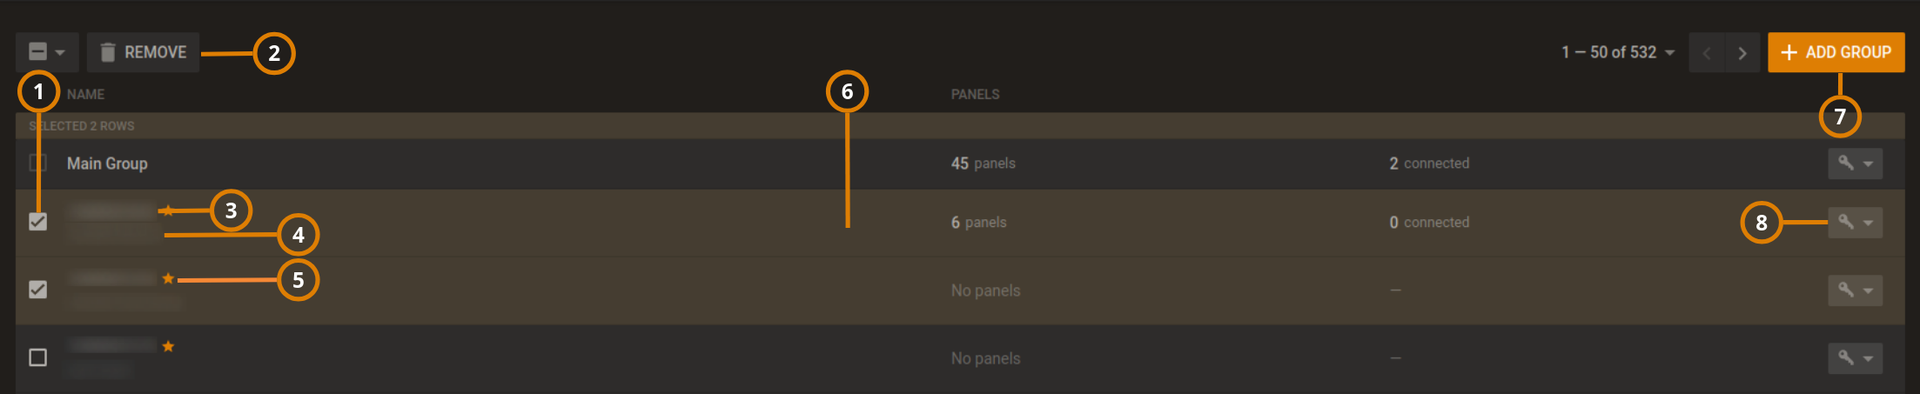
Figure. Navigating the Groups page
| Callout | Name | Description |
|---|---|---|
| 1 | Check box | Select the check box of one or more groups to enable REMOVE. |
| 2 | REMOVE | Click to remove one or more selected panels from the server. Select a check box to enable REMOVE. note You cannot remove Main Group. |
| 3 | GROUP NAME | When the dealer portal approves a new dealer request, PowerManage adds a dealer group to the Groups page. The dealer group name is the dealer ID assigned by the dealer portal. important You cannot edit the Dealer group name. |
| 4 | DESCRIPTION | The group description. |
| 5 | Star icon | The star icon indicates that it is a dealer group. |
| 6 | Group hub | Click the row of the group to open it in the group hub. note The Main Group contains all panels. You can move the panels to other groups. You cannot move the Main Group. For more information on the group hub, see Groups hub. |
| 7 | ADD GROUP | Click to add a new panel to the server. For more information about adding a group to the server, see Group parameters and Adding a new group. |
| 8 | Connected roles | Lists all the roles connected to this group. For more information, see Navigating the Roles page |
Group parameters
If you add a new group to the server or edit an existing group, configure the parameters in the ADD GROUP or EDIT GROUP dialog boxes. You can configure parameters for a specific panel including cellular and cable or broadband communication supervision periods with timeouts and upgrade channels.
- Supervision period - how frequently supervision messages are sent from panel to server.
- Offline timer - the server signal panel is offline. You cannot receive supervision messages during this time.
To make a new group in the server, see Adding a new group.
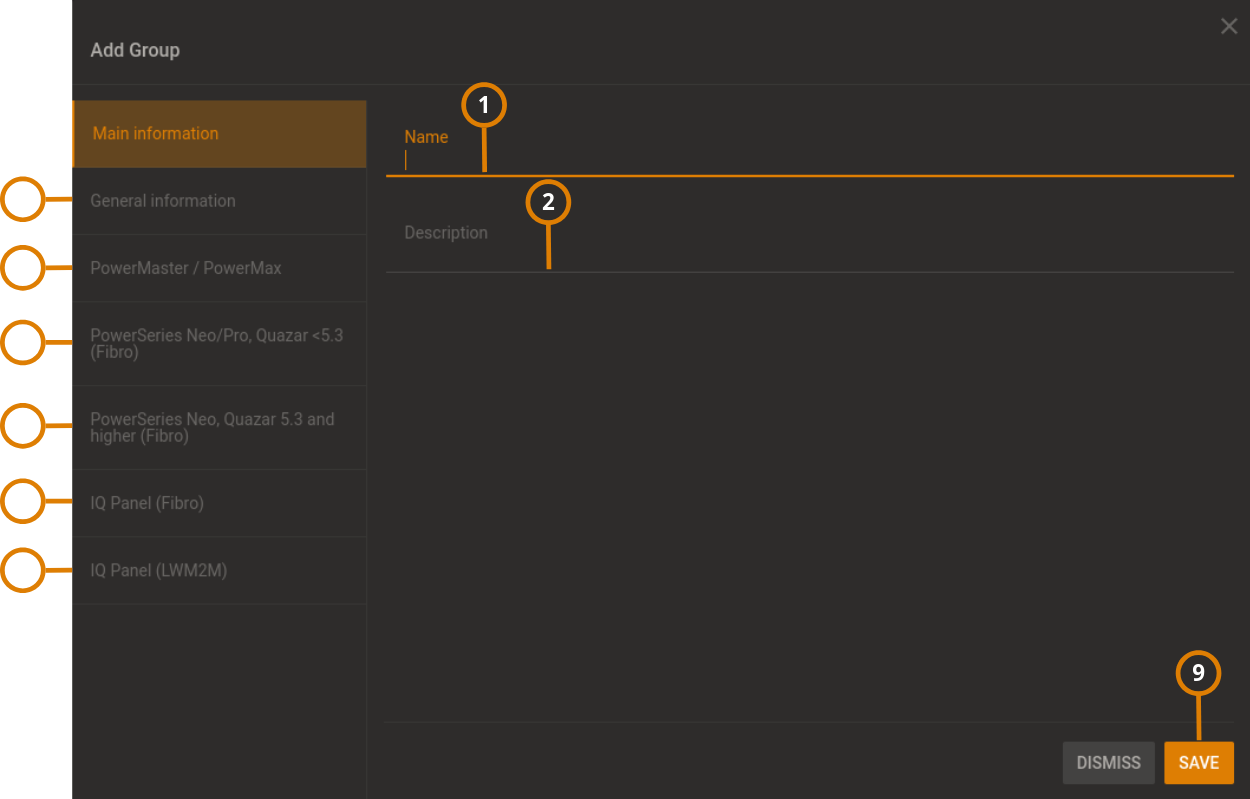
Figure. Group parameters dialog box

| Callout | Description | Function |
|---|---|---|
| 1 | Name | Each group name must be unique and can only contain the characters:
A-Z, a-z, and 0-9. Spaces are also accepted. |
| 2 | Description | Enter an optional description of the group in the Description field. |
| 3 | General Information | Click the General Information tab to set to set the following options.
|
| 4 | PowerMaster / PowerMax |
|
| 5 | PowerSeries Neo/Pro, Quazar 5.3 (Fibro) | Edit the broadband connection settings for NEO/Pro and Quazar panels earlier than version 5.3
note If you enable the broadband supervision, ensure that the correct receiver channel directs to a PowerManage server that can support an Ethernet heartbeat.
|
| 6 | PowerSeries Neo, Quazar 5.3 panel and higher (Fibro) | Edit the cellular connection settings for PowerSeries Neo, Quazar 5.3 panels and higher.
note If you turn on Cellular Supervision enabled, ensure that the correct receiver channel directs to a PowerManage server that can support a GPRS heartbeat.
|
| 7 | IQ Panel (Fibro) | Edit the supervision settings for IQ panels that connected via Fibro. For more information, see PowerSeries Neo, Quazar 5.3 panel and higher (Fibro). |
| 8 | IQ Panel (LwM2M) | Edit the supervision settings for IQ panels that connected via LwM2M.
|
| 9 | SAVE | Click to save the group configuration. |
Adding a new group
- In the navigation pane, click System, then click Groups.
- Click ADD GROUP.
- Enter the information required in the ADD GROUP dialog box.
- Click SAVE.
The new group now appears on the Groups page.
To complete the setup, configure the central station communication settings. For more information, see Configuring the central station communication settings for a group.
Groups hub
View and edit general group settings in the Groups hub:
- To access the Group hubs, click More > Groups.
- To remove a group, on the required group row, select the check box. The Remove Group button appears. The Main Group is the default group and contains newly enrolled equipment You cannot remove this group.
- To see a list of all roles that have permission to the Main Group, click the drop-down button on the right hand side of the required panel.
- To open a group in the Group hub, on the Group page, click the group row.
- To add a new group, click +ADD GROUP.
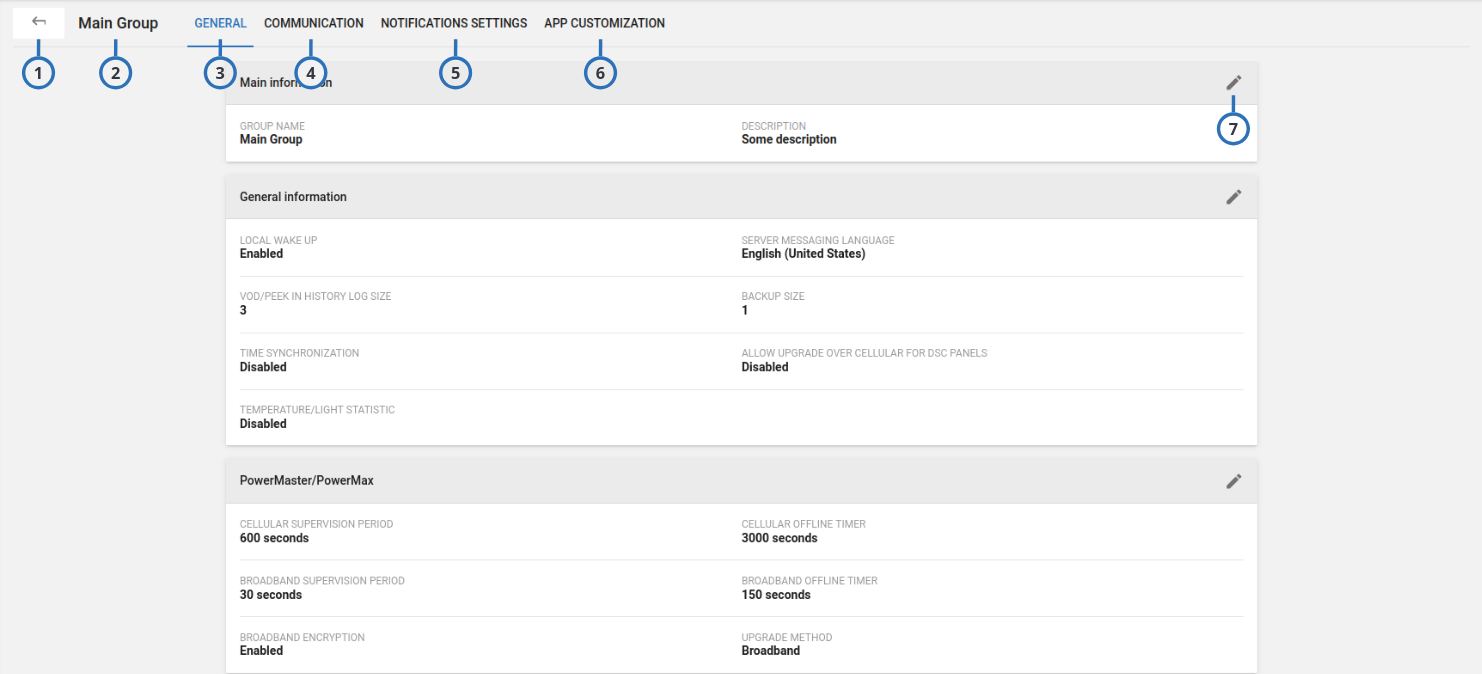
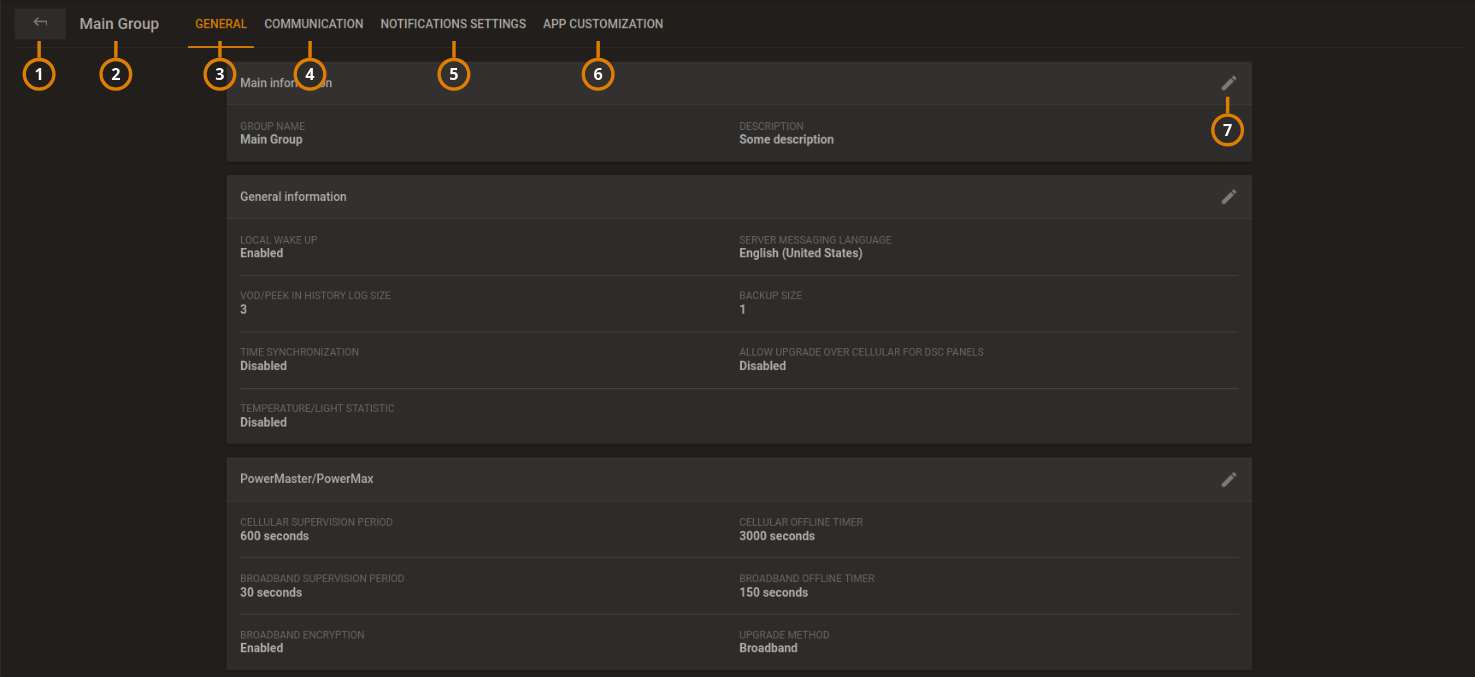
Figure. Navigating the Groups hub
| Callout | Name | Description |
|---|---|---|
| 1 | Back arrow | Click to return to the group list page. |
| 2 | Main Group | The name of the group you open in the group hub. |
| 3 | Group GENERAL tab | Displays general group information and parameters. For a description of the group information and parameter fields, see Groups page parameters. |
| 4 | Group CS COMMUNICATING tab | Click to manage the communication between the panel and the central station (automation). For more information, see CS communicating tab in the Groups hub. |
| 5 | Group NOTIFICATION SETTINGS tab | The Group Notifications Settings tab includes two sub sections: Event Profile Settings specifies which event types are sent to the mobile app. End User Notifications specifies which push notifications and emails can be sent to mobile phone. For more information, see Notification Settings tab |
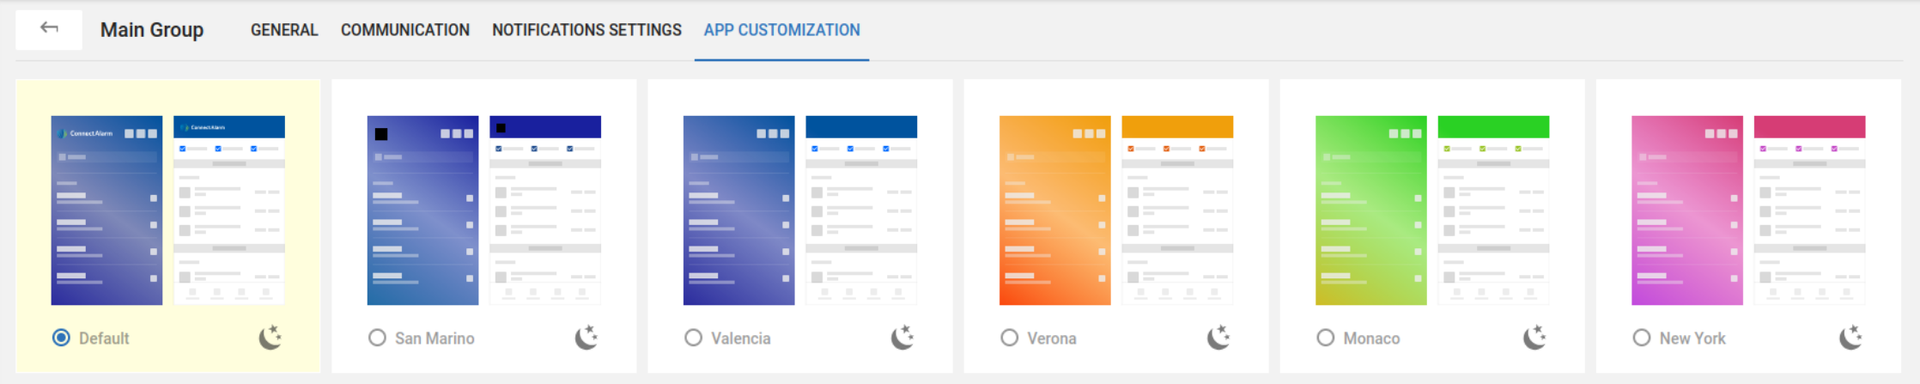
| 6 | Group APP CUSTOMIZATION tab | Lists all the application look types available. By default there is only one setting. Contact technical support to add customizations. For more information, see App Customization tab |
| 7 | Pencil icon | Click the icon to edit the group page parameters. For more information, see Group page parameters. |
CS COMMUNICATING tab
Define which event types are communicated to one or more central stations or automations on the CS COMMUNICATING tab.
Figure. CS COMMUNICATING tab in the group hub


| Callout | Name | Description |
|---|---|---|
| 1 | Central station | A central station or automation that connects to the group. You can add and define the central stations that appear on the Central stations page. For more information, see Central stations page. |
| 2 | Pencil Icon | To determine the event types that the panel group communicates to the central station, click EDIT to open the Event types dialog box. |
NOTIFICATION SETTINGS tab
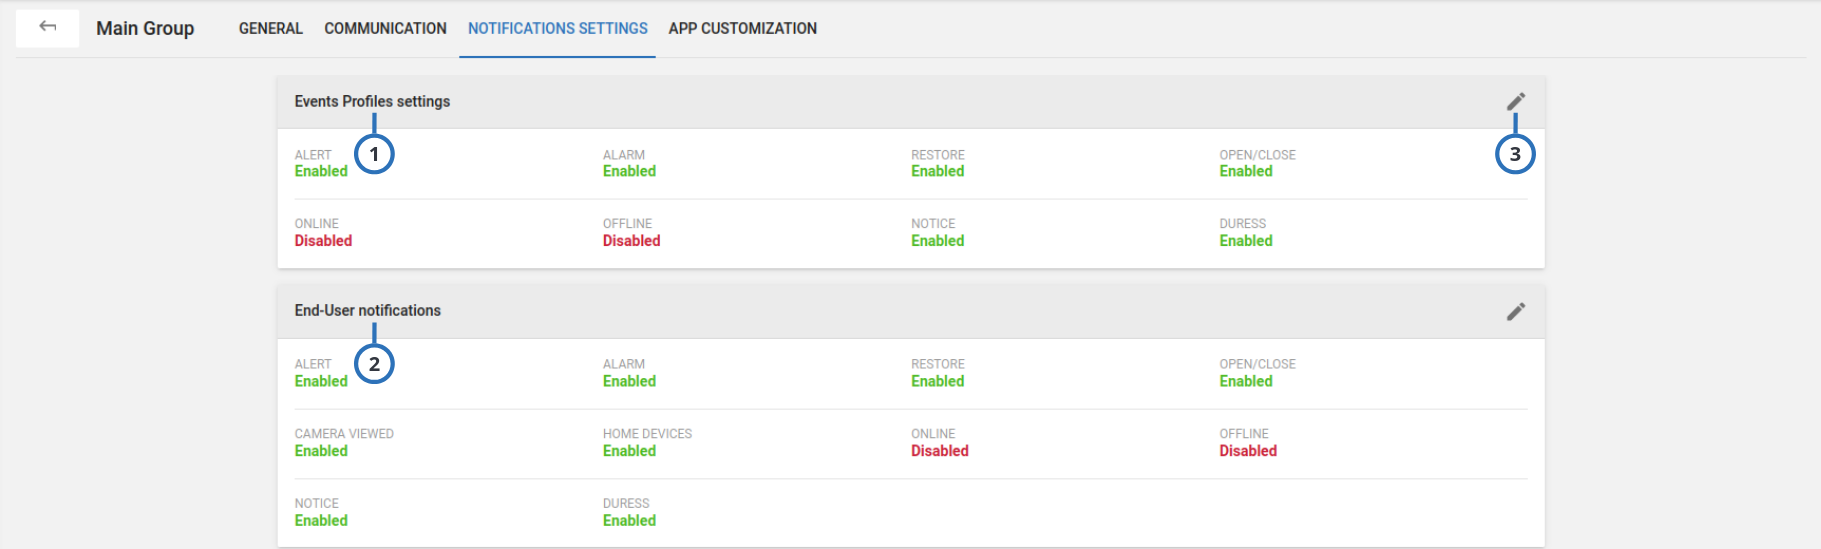
Figure. Notification Settings

| Callout | Name | Description |
|---|---|---|
| 1 | Events Profiles settings | You can edit the mobile phone settings for events from the panel. |
| 2 | End-User notifications | You can edit mobile phone notification settings for the end-user. |
| 3 | Pencil icon | Click to edit settings |
APP CUSTOMIZATION tab
Figure. APP CUSTOMIZATION tab

Group central station communication settings
You can enable or disable the communication of various event types to one or more central stations.
The following list defines the information each event type communicates to the central station when you select the relevant check box on the CS COMMUNICATING tab:
Alarm
For security or safety breaches, the platform sends an alarm notification to the central station. The security and safety breaches are burglary, fire, emergency, and panic alarms.
Alert
For an event that requires attention, the platform sends an alert notification to the central station. The alert events are low battery, AC failure, gas, and flood events.
Restore
If a detector reading returns to its original state, the platform sends a restore alert to the central station.
Security open/close
If the state of the panel changes, the central station updates. The panel states are away, home, and disarm.
You can configure the panel to send detector open and close notifications even when the panel is in a disarm state.
Camera being viewed
If a PIR CAM requests video on demand, the platform sends a notification to the central station. Camera trouble Currently not supported.
Home devices (HD) on/off
If a PGM turns on or off, the platform sends a notification to the central station. Home devices (HD) trouble Currently not supported.
Online
When the panel goes online, the platform sends a notification to the central station.
Offline
When the panel goes offline, the platform sends a notification to the central station.
Notice
If there is an information message, such as a device bypass or panel auto test, the platform sends a notification to the central station.
Routine remote inspection (RRI)
After a routine remote inspection, the platform sends a success or failure notification to the central station.
Open/close
If the state of a detector changes, the platform sends a notification to the central station.
Illumination
If there is an alert related to light, the platform sends a notification to the central station.
Temperature
If there is a temperature alert, the platform sends a notification to the central station.
Configuring the central station communication settings for a group
- In the navigation pane, click System > Groups.
- On the Groups page, click the group to configure.
- Click the CS COMMUNICATING tab.
- Click EDIT button edit group settings.
- Select the check boxes of the alert types to communicate to the central station.
- Click SAVE.