Central stations page
Navigating the Central stations page
Use the Central stations page to manage the central station applications that connect to the PowerManage server.
On the Groups page, connect groups to one or more of the central stations defined on this page. For more information about groups, see Groups page.
Each row on the Central stations page represents a role and displays the following information:
- The Central station name
- The protocol used
- The communication parameters of the central station
This information is contained in the column titles: NAME, PROTOCOL, and COMMUNICATION.
Filter your search of the Central stations page by selecting one or more filter values from the Search list. From the Search list, select a filter value from one or more of the following keys: NAME, PROTOCOL, HOST, PORT, and DEVICE. For more information, see Using the search filter.
- The Central stations page is an automation application.
- Self-monitoring users do not need to use this page.
Figure. Navigating the Central Stations page


| Callout | Name | Description |
|---|---|---|
| 1 | Check box | Select the check box of one or more central station applications to enable REMOVE. |
| 2 | REMOVE | Click to remove a CS from the server. |
| 3 | STATUS | Displays the connection status of the central station. |
| 4 | CS row | Click to open a CS examination pane with GENERAL and COMMUNICATION tabs. The GENERAL tab includes general information about the CS, for example, name, protocol, heart beat. The COMMUNICATION tab lists the groups and enables or disables event groups identical functionality under Groups, then the CS COMMUNICATING tab. |
| 5 | ADD CENTRAL STATION | Click to add a new central station. For more information about how to add a central station, see Adding a central station and Adding or editing central stations. |
| 6 | Pencil icon | Click to edit a central station configuration. For more information about how to edit a central station, see Editing a central station configuration and Adding or editing central stations. |
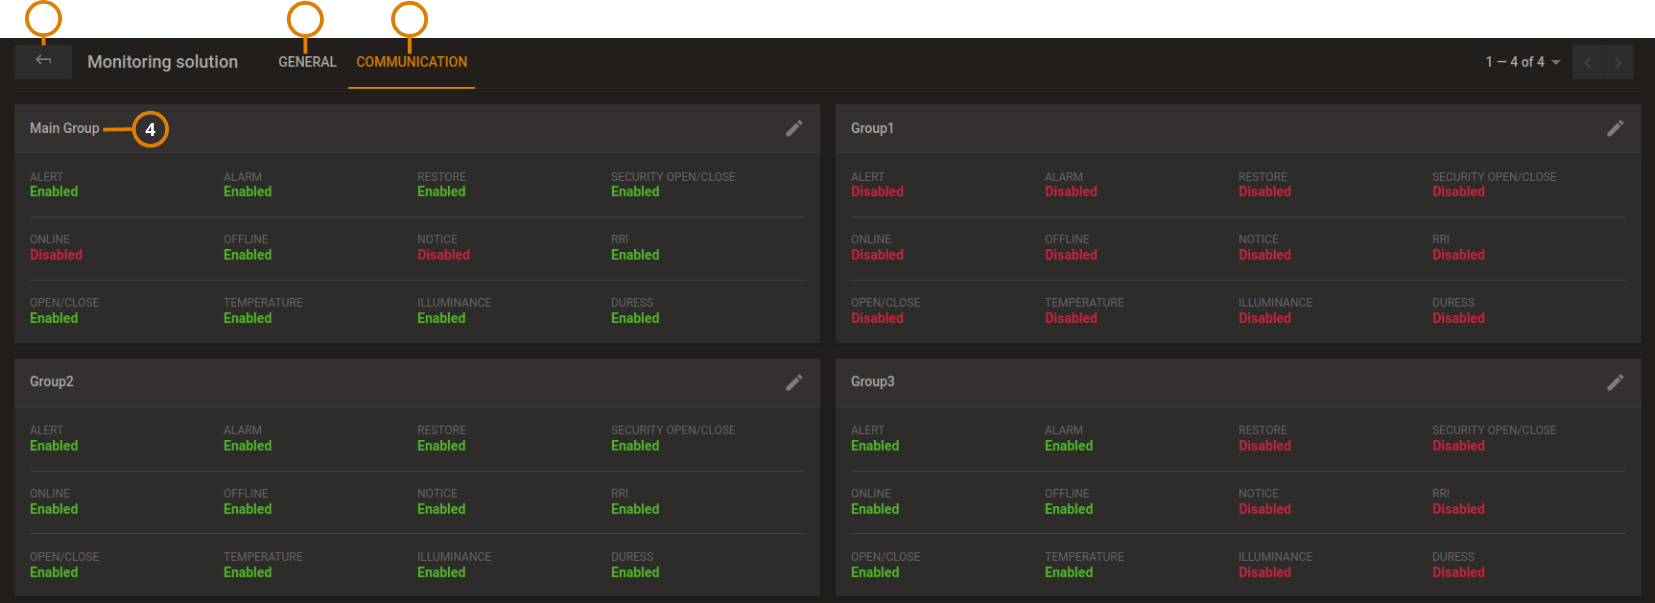
Figure. CS communication

| Callout | Name | Description |
|---|---|---|
| 1 | Back arrow | Click to return to CS list |
| 2 | GENERAL tab | CS parameter |
| 3 | COMMUNICATION tab | Enable or disable event forwarding from all groups. To access the Communication tab, from the menu, click More > Groups > CS Communicating |
| 4 | CS Name | Name of each Central Station |
Adding or editing central stations
Configure the central station settings when you add a new central station or edit an existing central station configuration.
Figure. Adding Central station dialog box
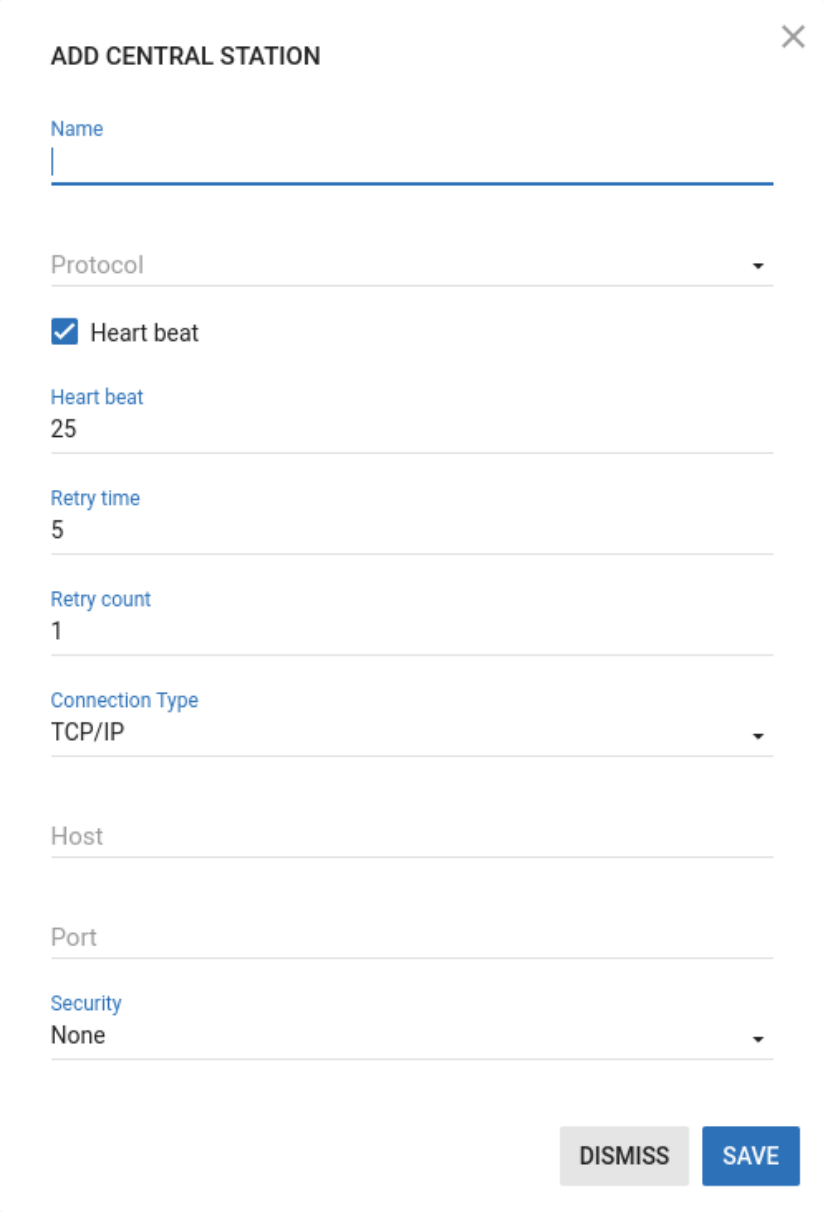
The following list defines the central station settings:
- Name: Enter a name that is local and identifiable to the server.
note
When adding a central station, the Name field is mandatory. When editing a central station, the Name field is read-only.
- Protocol: Select a protocol that is suitable for the central station or automation. For example, MasterMind or Patriot servers use NMLR2 protocols, and BOLD's Manitou server uses FEP protocol.
- Heart beat: Define how often the server checks the status of the connection. The heart beat is measured in seconds.
- Retry time: Define how often the server automatically tries to send a message to the central station in case of a failure.
- Retry count: Define how many times the server automatically tries to send a message to the central station in case of a failure.
- Connection type: From the Connection type list, select one of the following options:
- TCP/IP. If you select TCP/IP, continue to enter the required information in the Host and Port fields.
- Serial connection type. If you select Serial, enter a serial port in the Serial Port field.
- HTTP protocol. The HTTP requires:
- Host (e.g. example.com)
- Path (e.g. /a/b/c?d=e)
- Port (e.g. 1234)
- User and password – not mandatory
- Security: If you select a TCP/IP connection, from the Security list, select one of the following options: TLS 1 or None.
Adding a central station
- From the navigation pane, click System > Central Stations.
- Click ADD CENTRAL STATION.
- Enter the information required in the Name, Protocol, Heart beat, Retry time, Retry count, and Connection Type fields. For more information, see Adding or editing central stations.
- Click SAVE. Related topics
Editing a central station configuration
- From the navigation pane, click System > Central Stations.
- To edit a central station, click Edit.
- Enter the information that is required in the Name, Protocol, Heart beat, Retry time, Retry count, and Connection Type fields. For more information, see Adding or editing central stations.
- Click SAVE.
Removing a central station
- In the navigation pane, click System, then click Central Stations.
- Select the check box of one or more central stations to remove.
- Click REMOVE.
- To confirm the function, click OK.